


Introduction
Netcore Unbxd Product Information Management (PIM) is an AI-powered platform that allows you to manage all product-related information digital assets catalogs more efficiently. It allows businesses to ingest raw product data from any source or format process and store it in a centralized location, improving efficiency, decreasing time-to-market, and boosting conversion.
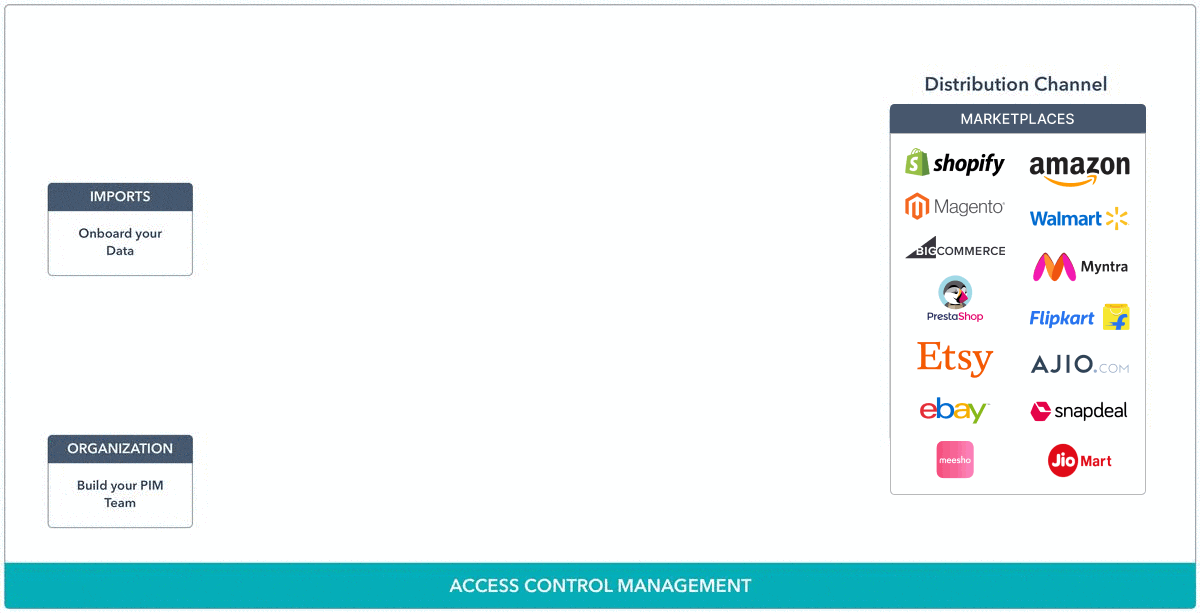
Unbxd Product Information Management & Distribution Center
Key Features
Centralized Product Data Repository: Unbxd PIM provides a centralized repository to manage and store all product information in one place. It allows you to gather and organize product data from various sources, including spreadsheets, databases, and external systems.
Data Enrichment: The platform offers robust capabilities for enriching product data. You can enhance the information with additional attributes, images, videos, descriptions, specifications, and other relevant details. This helps create comprehensive and compelling product listings.
Automated Workflow Management: Unbxd PIM enables you to define and manage workflows for product data management. You can set up approval processes, assign tasks to team members, and track the progress of data enrichment activities. This streamlines collaboration and ensures data accuracy.
Product Organization: Forget the hassle of maintaining complex Excel sheets. Manage your entire product data effortlessly within the ‘Product Organization’ module. Categorize your products into distinct product groups for faster navigation and access.
Rapid Data Distribution: Unbxd PIM can distribute product data quickly and seamlessly to multiple sales channels, ensuring zero data loss.
AI enrichment apps: As part of recent updates, 25+ AI enrichment apps have been added to instantly generate product descriptions, creative titles, video intro outlines, SEO, and more. These AI-powered apps offer customization capabilities, enhancing compelling content creation for effective marketing.
User-Friendly Interface: The platform provides an intuitive and user-friendly interface, making it easy for users to navigate, manage, and manipulate product data efficiently.
Key Components
Once your product data is onboarded to Unbxd PIM, it marks the beginning of the product information journey. Unbxd PIM provides various components and functionalities to manage and utilize your product information efficiently. Here’s a breakdown of how you can effectively navigate through these components:
You can upload a . CSV, .TSV, .XLSX, .JSON ,.XML, or .ZIP file to initiate the import process. Unbxd PIM also allows you to import product information from SFTP locations or using public URLs. Moreover, you can schedule imports from pre-configured SFTP locations depending on your business requirements.
Import templates in Unbxd PIM are predefined configurations that allow you to save and reuse mapping and configuration settings for future imports. They help streamline the import process and ensure consistency in data mapping and transformation.
Scheduled imports enable automatic data intake from external sources into the PIM system at predetermined intervals. The data can be imported from various sources like ERP systems, supplier portals, or spreadsheets. These imports can be scheduled to run daily, weekly, or monthly, depending on your update requirements.
Invite members and assign roles to form the “PIM team.” This team will be responsible for keeping the PIM up-to-date in your organization.
A member is an individual who is assigned to manage or perform Product Information Management (PIM) related activities within an organization. Members play a crucial role in ensuring the smooth operation and efficient management of product data and assets.
Example: create a product attribute called product_color.
Attribute groups organize similar product information together. This enhances the organization and consistency of the information, making it easier to manage and display.
Example: product_model, product_weight, and product_resolution can be grouped into a attribute group named “Attribute Details.”
Create categories and subcategories to define the product classifications. A product can be associated with multiple categories or subcategories, and categories or subcategories can be associated with multiple attributes.
Add a product (includes variant products) or edit products (includes bulk editing) on the Product Listing page. You can also group the products into static or dynamic product groups.
Certify Products Once your organization considers product information accurate and complete, you can certify the product.
Note: Only Certified Products can be exported, and you cannot edit certified products”
With Unbxd PIM, users can organize, transform the store and retrieve product-related digital files efficiently.
The Digital Asset Management feature enables:
- Efficient organization of all product-related digital assets.
- Transformation of digital assets to fit different use cases
- Secure storage of all product-related digital files
- Easy retrieval of product assets when needed.
Tasks functionality allows users to create and execute tasks to ensure product information is consistently updated.
-
- Creation of tasks related to product information management
- Efficient execution and tracking of these tasks
- Ensuring product information remains accurate and up-to-date
Readiness reports is a feature that provides insights and analysis on the readiness and completeness of product data within the PIM system. These reports help users assess the quality and accuracy of product information, identify any missing or incomplete data, and take necessary actions to improve data completeness.
Unbxd PIM allows users to create and publish product catalogs. This involves:
-
- The creation of product catalogs using individual products or product groups.
- Publishing of these catalogs for various purposes, such as sharing with customers or internal stakeholders.
A digital marketplace that allows consumers to search for and download software applications (apps) that help in data enrichment and data distribution
Workflows help automate and streamline processes within Unbxd PIM.
They consist of triggers and nodes:
This is the event or condition that initiates the workflow.The trigger can be Either Time based or Event Based.
NODES
Nodes represent steps or actions performed in the workflow. These are like building blocks that are combined to create complex workflows. Each node signifies a specific task that needs to be carried out, such as sending an email, updating a database, or running a script. Nodes can be connected to create a sequence of actions that form the workflow.
Exports in PIM refer to the functionality that allows you to send product information to stakeholders in various file formats such as .CSV, .XLS, .JSON, and .XML. This feature enables the dissemination of product data to external systems, partners, or channels in a standardized format that can be easily processed and utilized.
Marketplaces are business entities receiving complete, up-to-date product information from Unbxd PIM.
Applications that have been integrated to make the transfer of information and processing duties linked to PIM easier can be referred to as Channels in the context of Unbxd PIM.
The best illustration of this would be BigCommerce.