Structured information to guide you through Unbxd PIM with minimal assistance
  1. Introduction
  2. Access Unbxd PIM
  3. Explore Unbxd PIM
  4. Features of Overview page
  5. Profile
  6. Organization - Set up your PIM Team
    1. Invite a New Member
    2. Update Member Information
    3. View a Member Information
    4. Delete a Member
    5. Create a New Role
    6. Set Property Permissions for a Role
    7. Set System Permissions for a Role
    8. Change Assigned Members of a Role
    9. Change Property Permissions for a Role
    10. Change System Permissions for a Role
    11. Change the Role Name
    12. View a Role Information
    13. Delete a Role
    14. Edit your Organization Profile Information
  7. Imports - Onboard & Schedule your Product Content
    1. Import File Best Practices
    2. Tips for doing an effective import
    3. Perform First-time Product Import
    4. Import data via SFTP
    5. View an Existing Import Information
    6. Schedule an Import
    7. Edit a Scheduled Import
    8. View a Scheduled Import Information
    9. Stop a Scheduled Import
    10. Delete a Scheduled Import
    11. Import Templates
    12. Deleting Import Template
    13. Trouble Shooting Import Errors
  8. Products - Build & Enrich Product Content
    1. Advanced Search and Filtering and saving filters by creating static product group
    2. Customize your Product Listing View
    3. Add a Solo Product
    4. Add a Solo Product via AI
      1. AI Content Score
    5. Add a Variant Product
    6. Edit a Solo Product
    7. Edit a Parent Product
    8. Edit Products from Product Listing Page
    9. Edit a Variant Product from its Parent Product
    10. Cloning a Product
    11. Product Listing Page [AG Grid Feature / Excel Mode]
    12. View Activity Log Details for a Product
    13. View Product Details
    14. View Task Information for a Product
    15. Delete a Product
    16. Product Groups
      1. Create a Static Product Group
      2. Edit a Static Product Group
      3. View a Static Product Group Information
      4. Delete a Static Product Group
      5. Create a Dynamic Product Group
      6. Edit a Dynamic Product Group
      7. View a Dynamic Product Group Information
      8. Delete a Dynamic Product Group
    17. Bulk Actions for Products & Product Groups
      1. Add Products to a Static Product Group
      2. Bulk Edit Products
      3. Bulk Edit Category
      4. Assign Task
      5. Certify Products
      6. Delete Multiple Products
      7. Certify Product Groups
      8. Run Readiness Report
      9. Delete Product Groups
      10. Edit Multiple Products from a Static Product Group
      11. Remove Products from a Static Product Group
      12. Delete Products from a Dynamic Product Group
      13. Delete Products from a Static Product Group
      14. Edit Multiple Products from a Dynamic Product Group
      15. Enrich Products or Product group data
  9. Certified Products & Certified Product Group
    1. Customize your Products Listing View
    2. Export Certified Products
    3. Export Products with Readiness Check & Assign Task
    4. View Activity Log Details for a Product
    5. Delete Products from Certified Product Group
    6. Export Certified Product Groups
    7. Export Certified Product Groups with Readiness Check & Assign Task
    8. Add Channel Readiness for a Certified Product Group
    9. Edit a Certified Product Group
    10. View Certified Products
    11. Delete a Product Group
  10. Scripts - Transform your Product Data
    1. Using the Transformation Script Editor
    2. Post Transformation
    3. List of Transformation Scripts
  11. Properties - Manage your Product Characteristics
    1. Property Data Types
    2. Create a New Property
    3. Change the Property Name and Assigned Property Group
    4. Change Role Permissions for a Property
    5. Make a Property Searchable
    6. View a Property Information
    7. Download all Properties
    8. Delete a Property
    9. Property Groups
      1. Create a New Property Group
      2. Change Property Group Name and Associated Properties
      3. View a Property Group Information
      4. Delete a Property Group
  12. Categories - Manage your Product Classifications
    1. Create a New Category & Subcategory
    2. Change Category Name & Associated Properties
    3. View Category & Subcategory Information
    4. Delete a Category or Subcategory
    5. Bulk Remove Categories
    6. Upload Category Property Association
    7. Download Category Property Association
    8. Download Category Property Template
  13. Tasks - First Step Towards Building Processes
    1. Create a New Task
    2. Edit an Existing Task
    3. View Task Details and Task Status Details
    4. Task Templates
      1. Create a New Task Template
      2. Edit a Task Template
      3. View Task Template Details
      4. Create a Task using a Task Template
      5. Delete a Task Template
    5. Task Assignee
  14. Readiness Reports-Ensure product information completeness
    1. Creating Readiness Report
    2. Downloading Readiness Report
    3. Viewing Readiness Reports
    4. Assigning Task using Readiness Report
  15. Catalogs - Share real-time Product Content
    1. Create & Share a New Catalog
    2. Edit a Catalog
    3. Delete a Catalog
  16. Workflows - Automate PIM Processes
    1. Create a New Workflow
    2. Run a Workflow Manually
    3. Pause & Resume a Workflow
    4. Edit a Workflow
    5. View Workflow Details
    6. View Activity Log Details for a Workflow
    7. Delete a Workflow
    8. Bulk Actions
  17. Digital Asset Management - Manage your Digital Files
    1. Add a New Asset
    2. Associate Assets with Products
    3. Perform Asset Transformations
    4. Deassociate Asset from Products
    5. Download Assets
    6. Delete an Asset
  18. Exports
    1. View Exports
    2. Download an Exported File
    3. Send an Email with the Exported File
    4. Schedule an Export
    5. Edit a Scheduled Export
    6. View Scheduled Export Details
    7. Stop a Scheduled Export
    8. Delete a Scheduled Export
    9. Export Parent Products
    10. Export Products via SFTP
    11. Standard Templates and Custom Templates
      1. Edit a Standard Template
      2. View Standard Template Details
      3. Create a Custom Template
      4. Bulk add properties while creating custom export template
      5. Edit a Custom Template
      6. View Custom Template Details
      7. Delete a Custom Details
  19. Deleting Export Template
  20. Volusion
  21. AI Enrichment Apps
    1. Mandatory Properties and Prompt Values for each AI App
    2. Creation of templates for AI enrichment apps
      1. Amazon Description Generator
      2. Amazon Title Generator
      3. Amazon Ads Headline Generator
      4. Product Name Generator
      5. Google Ads Generator
      6. Google Ad Description Generator
      7. Google Title Generator
      8. Youtube Hooks Generator
      9. Youtube Outline Generator
      10. Youtube Description Generator
      11. Youtube Intros Generator
      12. Youtube Titles Generator
      13. Trending Instagram Hashtag Generator
  22. Bulk Transform and Enrichment
  23. Custom Template Uploader
  24. Custom Template Downloader
  25. Headerless File Format
  26. Bulk Asset Upload and Download
  27. Image Keyword Extraction
  28. Dropbox
  29. Zapier(Gmail)
  30. Zapier(Google Sheet)
  31. Find Duplicates and Related Products
  32. Vend
  33. Volusion
  34. Google URL data Fetcher
  35. UPC Generator
  36. Image Convertor to Webp
  37. Translate Catalog
  38. Extract Common Variant Properties
  39. Image Keyword Extraction
  40. AI Image to Product Builder
  41. DAM Remove BG
  42. Guide for Obtaining AWS S3 Bucket Credentials & Configuring Public Access Permissions
  43. SFTP Watcher App
  44. Generate Partial Search
  45. Channel Integration
    1. Channel Integrations -
      1. Installing BigCommerce store via Unbxd PIM
      2. Importing data into Unbxd PIM from BigCommerce
      3. Mandatory Properties to export products to BigCommerce
      4. Exporting data from Unbxd PIM to BigCommerce
      5. Automating import and export using Templates and Workflows
    2. Channel Intergation-
      1. Installing Shopify via Unbxd PIM
      2. Shopify Store Fetcher
      3. Mandatory Property Mappings for Shopify
      4. Properties in Shopify and Shopify Graph QL and their importance
      5. Importing the data into Unbxd PIM from Shopify
      6. Exporting data from Unbxd PIM to Shopify
      7. Automating import and export using Scheduled Imports/Exports and Workflows
    3. Shopify Graph QL
    4. Channel Integrations -
      1. Installing Unbxd PIM via Brightpearl
      2. Importing the data into Unbxd PIM from Brightpearl
      3. Exporting data from Unbxd PIM to Brightpearl
      4. Automating import and export using Templates and Workflows
    5. Channel Integration -
      1. Installing Magento using Username and Password
      2. Magento Token Based Installtion
      3. Mandatory Properties for Magento
      4. Mageworx
    6. Channel Intergation-
      1. Installing Etsy via Unbxd PIM
      2. Importing the data into Unbxd PIM from Etsy
      3. Exporting data from Unbxd PIM to Etsy
      4. Automating import and export using Scheduled Imports/Exports and Workflows
    7. Channel Integration -
      1. Installing Walmart via Unbxd PIM
    8. Channel Integration-
      1. Installing Unbxd PIM via Amazon Seller central
      2. Installing Amazon Seller Central via Unbxd PIM
      3. Importing data into Unbxd PIM from Amazon
      4. Exporting data from Unbxd PIM to Amazon
      5. Automating import and export using Templates and Workflows
      6. Download category template from amazon seller central
    9. Ebay Installation-
    10. Steps to get template file for Ebay-
    11. Channel Integration-
      1. Google Shopping App Installation
      2. Mandatory Properties for Google Shopping
    12. Woocommerce Installation-

Advanced Search and Filtering and saving filters by creating static product group

The advanced search and filtering functionality in the Products Listing page of Unbxd PIM allows you to find relevant products from an extensive product catalog quickly. This feature enables you to perform targeted searches based on specific criteria and apply filters to refine your search results.

Understanding Search Feature

The search box focuses on the property values associated with the products. It supports keyword or phrase searches that partially or fully match the product name or relevant property.

Note: The search functionality operates on properties made searchable during import or those manually set as searchable in Properties.

Procedure to Perform a Search

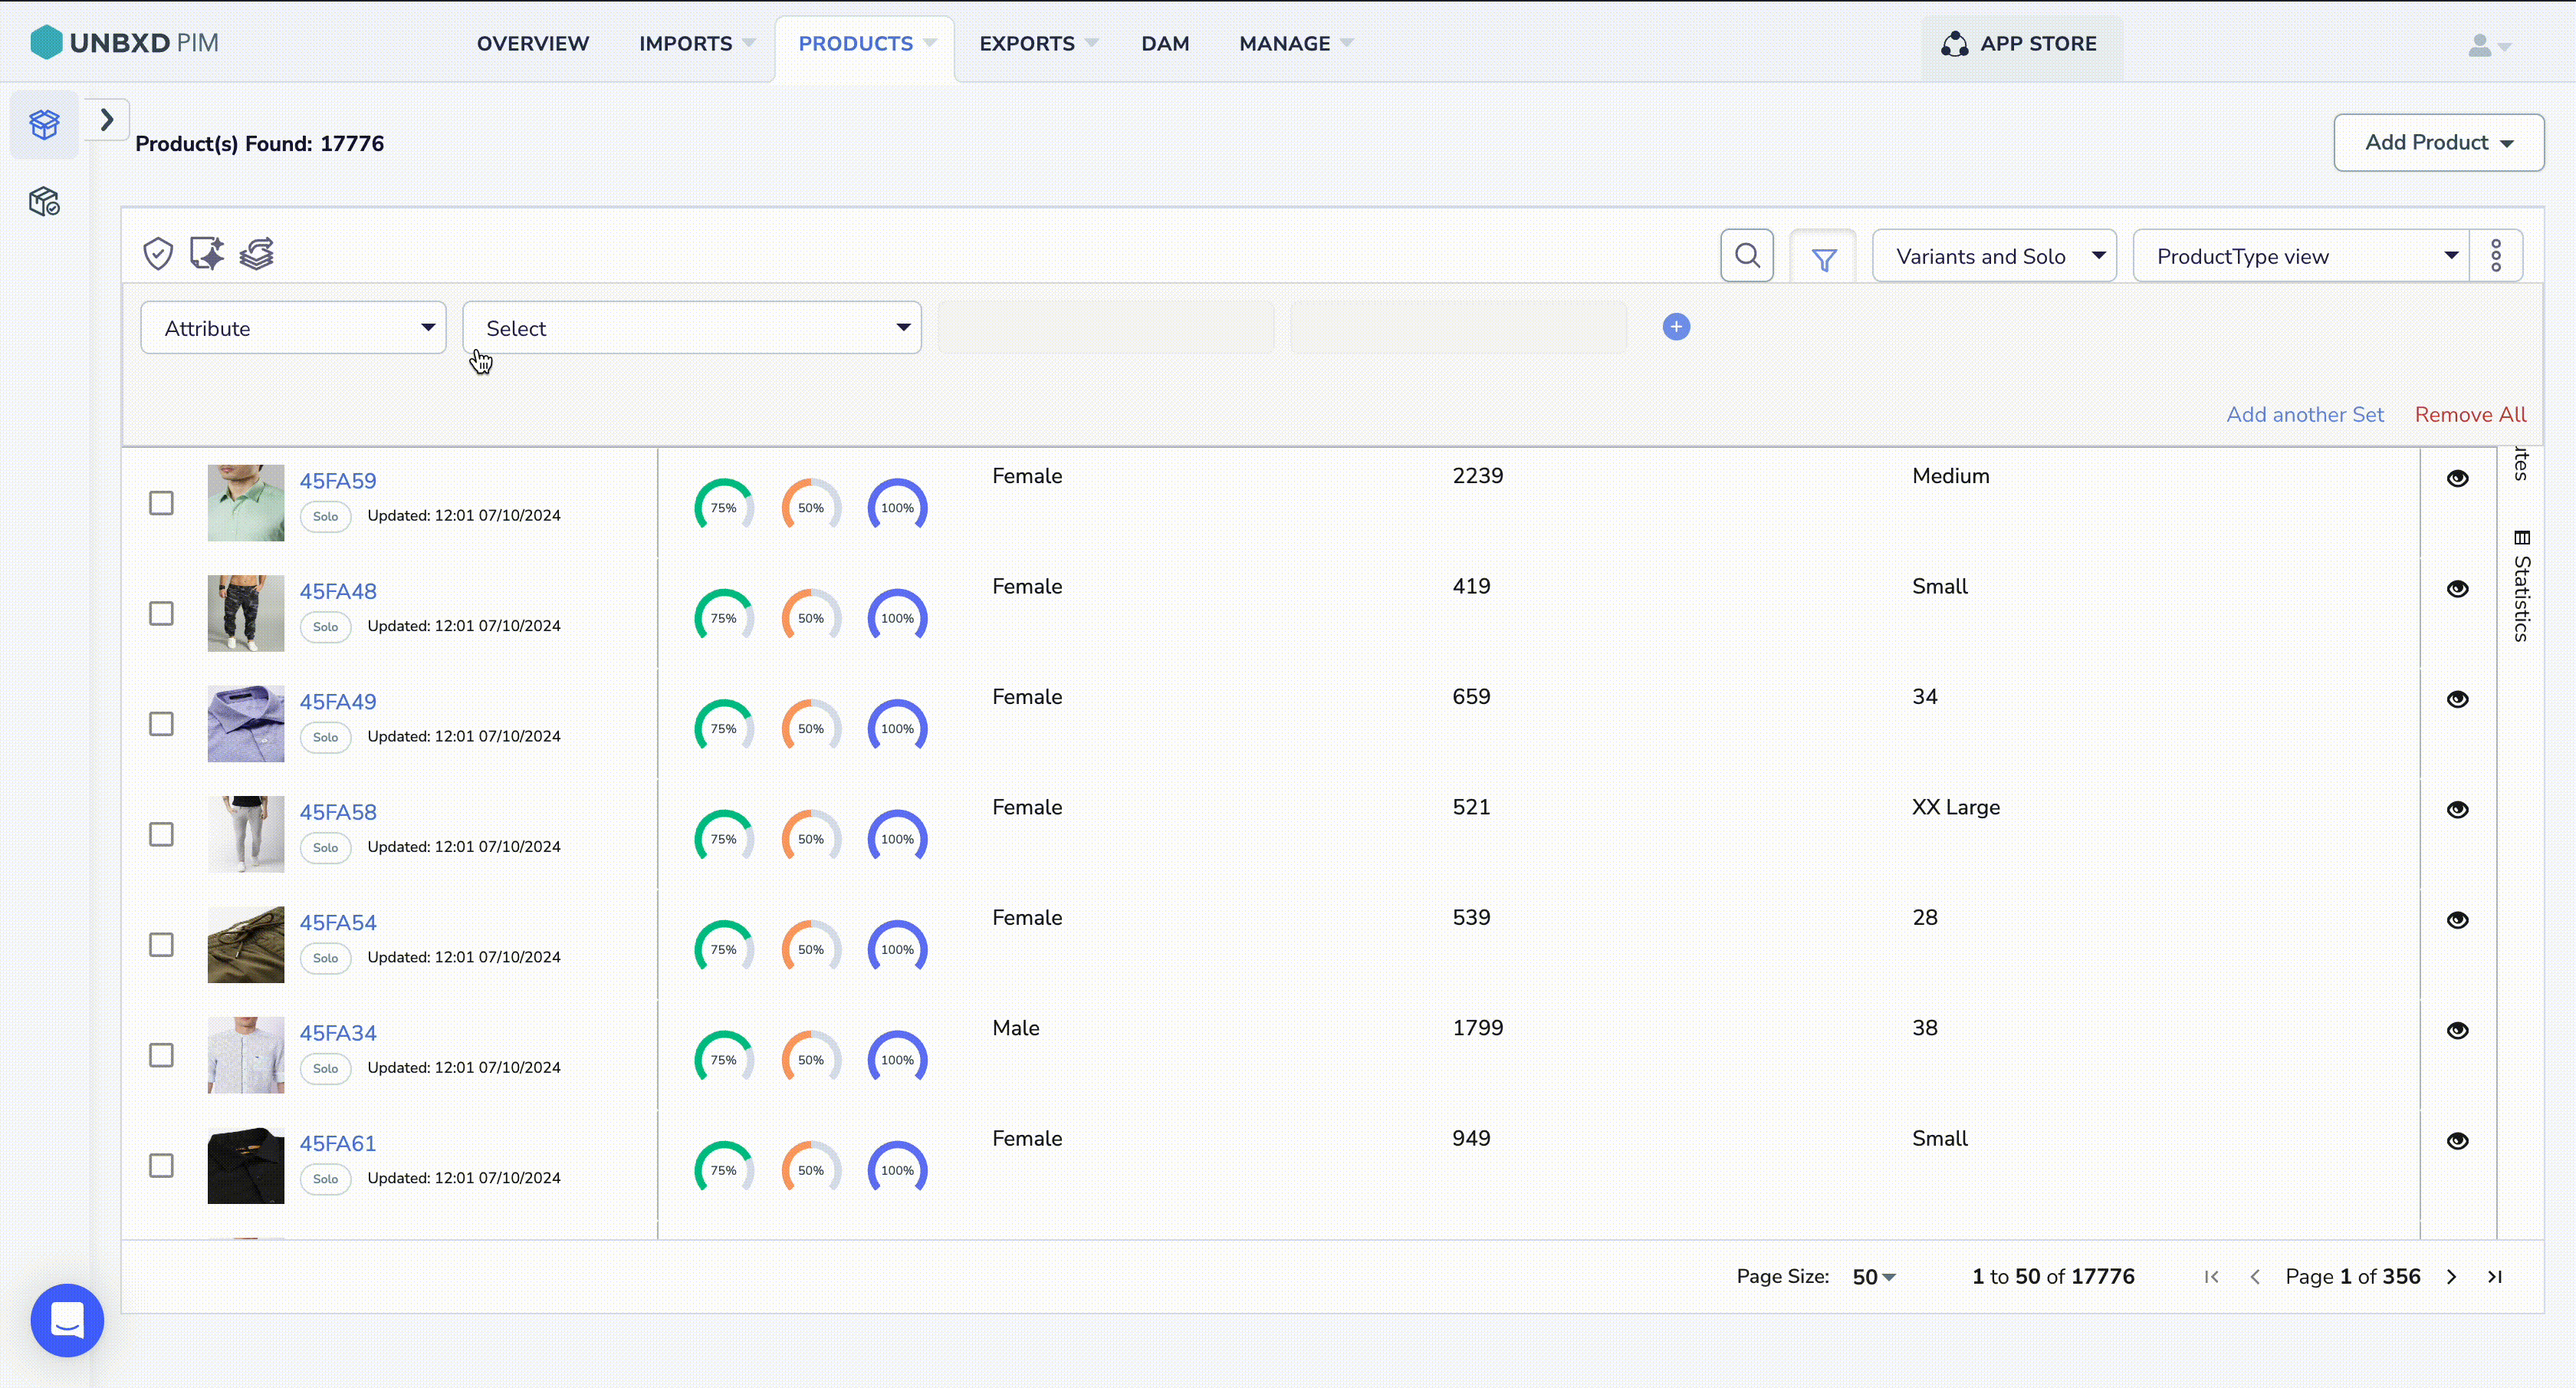
  1. Navigate to the ‘PRODUCTS’ tab to access the Products Listing page. The page lists solo and variant products.
  2. Type the desired search term related to your products in the search box.
      1. The filtering process involves four columns. In the first column, select the condition you are filtering on, such as “property.” In the second column, choose the property you want to filter out further from the dropdown menu. Further refinement can be done in the third column with options like “equals,” “doesn’t equal,” “in,” “not in,” “has any value,” “has no value,” “contains word,” or “doesn’t contain word.” The appearance of the fourth column depends on the choice made in the third column.
      2. If “date” is selected in the first column, you have two options in the second column: “date created” or “date updated.” The third column provides conditions for further refinement, such as “in the time frame of,” “not in the time frame of,” “on,” “not on,” “between date range,” “less than,” “less than and equals to,” “greater than,” or “greater than and equals to.” The occurrence of the fourth column depends on the choice made in the third column.
      3. If you select “task” in the first column, the second column will present “task name”. In the third column, you can refine the filter using options like “in” and “not in.” The fourth column allows you to select the specific task name based on your choice in the third column.
      4. If you select “product group” in the first column, the second column will display “product.” For further refinement in the third column, options like “in list” and “not in list” will be available. The fourth column will then display the product groups in a dropdown menu, allowing you to select one.
      5. If you select “category” in the first column, the second column presents options like “category name” for further refinement. In the third column, you can choose from “in list,” “not in list,” “has any value,” or “has no value” to specify your filter criteria. The fourth column appears only when you choose “is in list” or “not in list” and would display the category list accordingly.
      6. If you select “certification” in the first column, in the second column, you’ll find “product status” for further refinement. In the third column, you can choose between “in” or “not in.” The fourth column then displays the options of “Certified,” “Not Certified,” or “Certified With Pending Updates”
  3. Hit ‘Enter’. The Products Listing page refreshes to display matching results.

For additional information on setting properties as searchable, please refer to the documentation’s ‘Making a Property Searchable’ section.

Applying and Saving Filters:

Filters enable you to apply multiple conditions to refine your search results. Here’s how you can use and save filters:

  1. Navigate to the ‘PRODUCTS’ tab. This page displays solo and variant products.
  2. Click the filter icon to open the filter options.
  3. Select the Unbxd PIM component name from the first dropdown list. This can be ‘Property’, ‘Tasks’, etc.
  4. For ‘Property’, the second dropdown list displays different properties (like ‘Color’, ‘Size’, etc.), and the third one presents other comparators (‘equals’, ‘does not equal’, ‘in’, ‘not in’, ‘has any value’, and ‘has no value’). The fourth one provides the property values.
  5. To add another filter condition with an AND operator (meaning all needs must be met), click ‘+’.
  6. To introduce another filter condition with an OR operator (meaning at least one of the conditions must be met), click ‘Add another Set’.
  7. If you need to remove a specific filter condition, click the ‘-‘ button next to it.
  8. If you want to save these filtered products as a Dynamic Product Group, click ‘Save as dynamic product group‘.
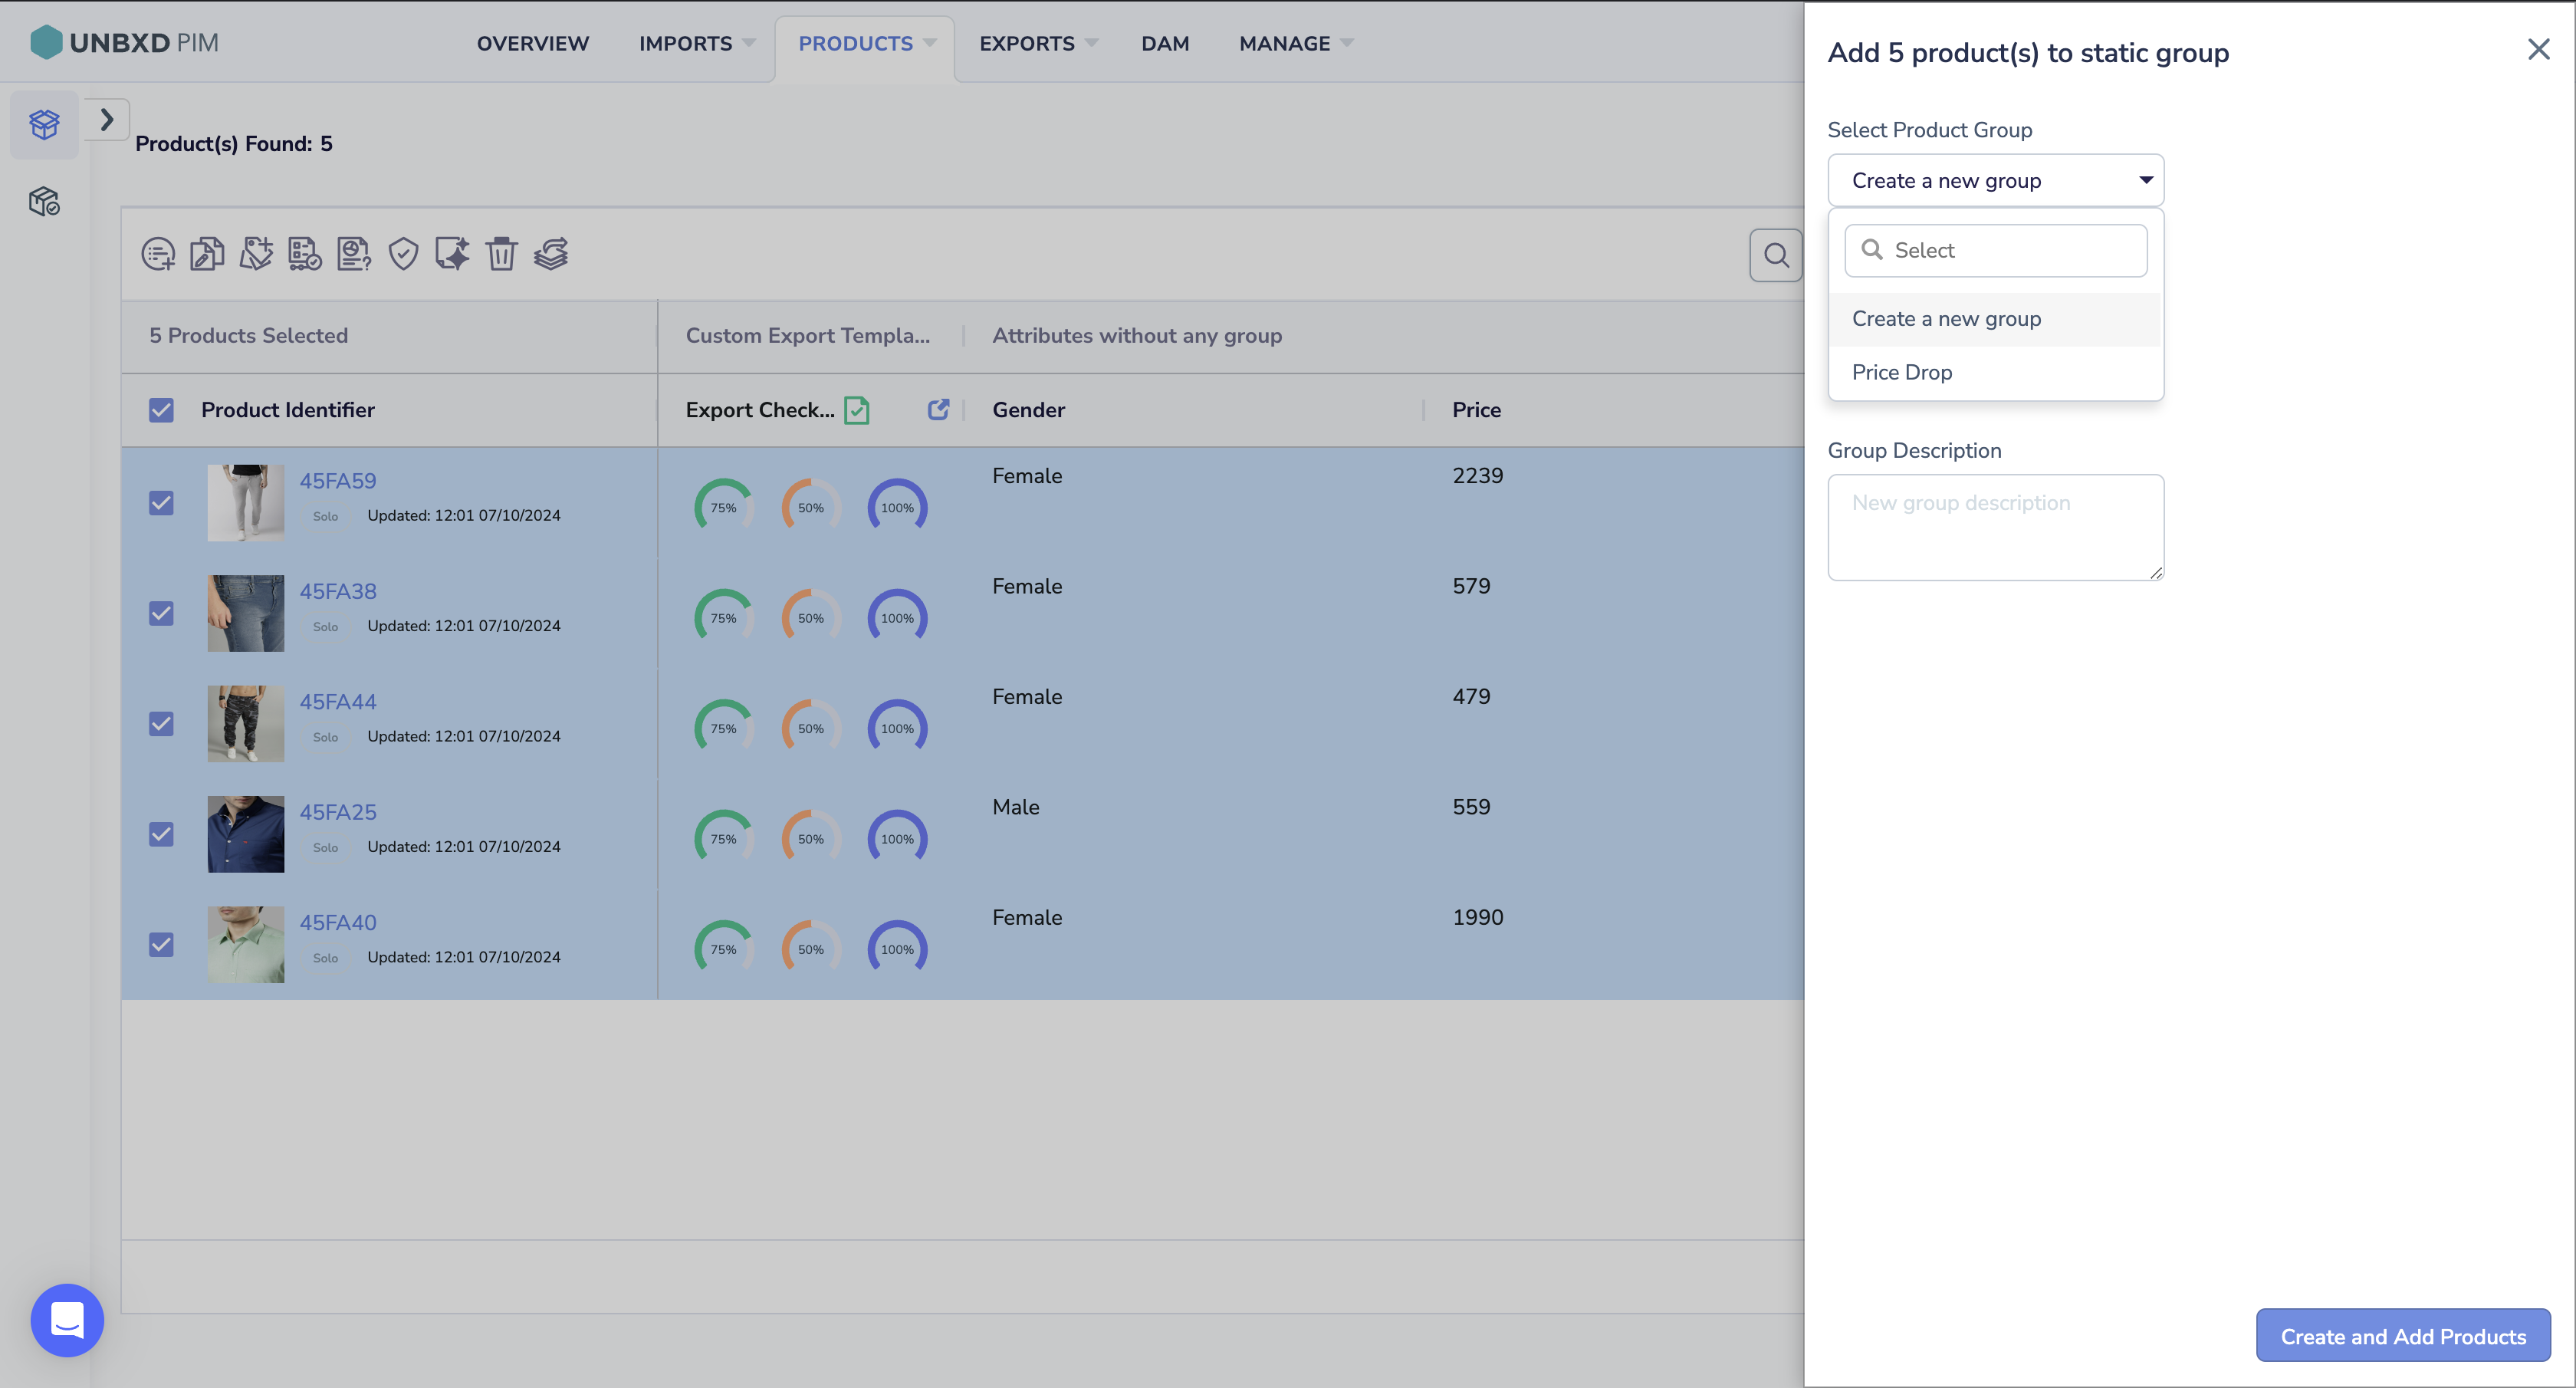
  9. To save these products as a Static Product Group, follow these steps:
    i. Select all listed products.
    ii. Click on.
    iii. Click on ‘Add to Static Product Group‘.

iv. Select the product group from the available product group or click Create a new one.


Remember, the filters applied on the ‘Products Listing’ page are temporary, but creating Product Groups allows you to save these filtered products for future reference.

Yes No
0 of 0 users found this section helpful
Suggest Edit