


Attributes in Shopify and Shopify Graph QL and their importance
Note: Shopify now supports video through GraphQL, but you cannot send images and videos from the same template. The video file size should not exceed 20MB.
- videoSRC:This field represents the source URL of the video.
- videoAlt:This field represents the alternative text for the video.Example: For a product demonstration video,
videoAltmight be “Video demonstrating the features of the new smartphone model.” - Position:The order of the product variant in the list of product variants.Let’s say you have a product with multiple color options as variants. The product variants are listed in a specific order, and the first position in the list is 1. Here’s an example:Product: T-Shirt.Product Variants
- Red
- Blue
- Green
- Black
In this case, “Red” is in the first position, so it has the position of 1 in the list of product variants. Similarly, “Blue” is in the second position (position 2), “Green” is in the third position (position 3), and “Black” is in the fourth position (position 4). This numbering helps you and your customers easily select and identify the different variants of the product.
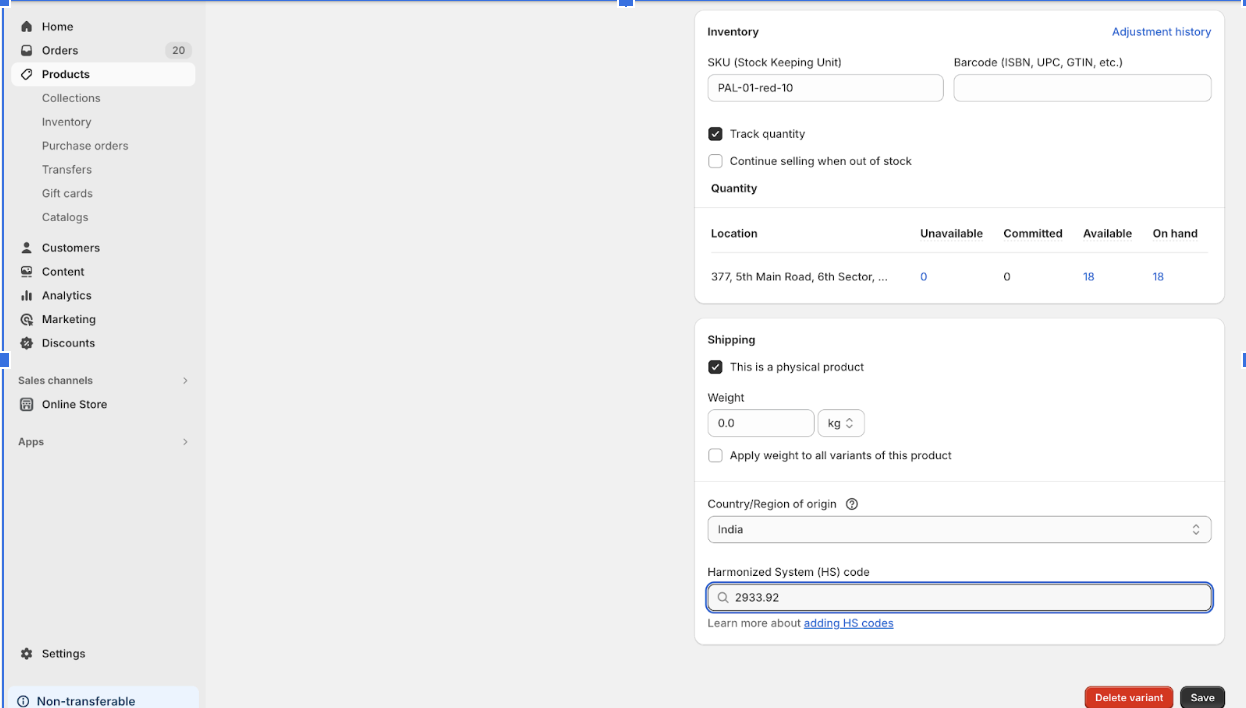
- Harmonized System Code[HS Code]:HS code is like a special number that helps describe and categorize a product. It’s made up of six digits and it’s used to group products into categories and types. This can be really helpful for things like calculating taxes and duties when shipping products to different countries. So, the HS code in Shopify is a way to organize and label products for international trade.HS Code: 6104.43This code represents a specific category of clothing items: “Women’s or girls’ trousers, shorts of synthetic fibers, not knitted or crocheted.” The first two digits (61) indicate the broad category of textiles and textile products, and the following two digits (04) narrow it down to items like trousers and shorts. The last two digits (43) specify that these are specifically women’s or girls’ trousers made of synthetic fibers and not knitted or crocheted.
- image_altText:The image_altText is a descriptive text added to an image on a webpage. It’s important because it provides context about the image for people who cannot see it, such as those who use screen readers. For example: let’s say you have an online store that sells T-shirts. You have a product page with a picture of a red T-shirt. The image_altText for this image could be “Red T-shirt with short sleeves and crew neckline.” This description provides essential information about the product and helps people understand what the image is showing, even if they can’t see it.
- compare-at-price:The “compare-at price” of a product variant in an e-commerce context is the original or suggested price at which the product was or is being sold before any discounts or special offers are applied. It serves as a reference point for customers, showing them the potential savings when they purchase the product at its current, discounted price. Here’s an example to illustrate the concept: Product: Laptop Bag Product Variant: Black Laptop Bag
- Regular Price: $80
- Compare-at Price: $100
In this example, the “compare-at price” for the Black Laptop Bag is $100. This is the price at which the bag was originally listed or what the manufacturer suggests as its value. However, the current price at which customers can buy it is $80, which is a discount from the compare-at-price. This comparison helps customers see that they are saving $20 when they purchase the bag at the current price, making it a good deal.
The “compare-at price” can be a useful tool for both online retailers and customers, as it highlights the value and attractiveness of the discount, encouraging more sales.
- Tags:Tags are like labels or keywords that you can attach to a product to help organize and search for it. They are typically used for filtering and searching products on an e-commerce platform. Each product can have multiple tags, and each tag can be up to 255 characters long. Tags are often separated by commas to make it easier to work with them. Here’s an example to help illustrate this concept: Product: Digital CameraTags: “camera, photography, 4K video, compact, zoom, professional, Wi-Fi, vlogging”In this example, the “Digital Camera” product has several tags attached to it. These tags are separated by commas and include keywords that describe the product’s features, use cases, and characteristics. Customers visiting the online store can use these tags to filter or search for products. For instance, if a customer searches for “4K video,” this camera would appear as a relevant result because it has that tag associated with it. Tags make it easier for customers to find products that match their interests and needs.
- Location-based inventory:Location-based inventory refers to tracking and managing inventory at specific locations or warehouses. Each location has its separate inventory levels in a location-based inventory system, and stock is allocated to specific locations based on demand and availability.Using location-based inventory can help businesses track and manage their inventory more accurately, particularly if they have multiple warehouses or locations. It also allows businesses to more easily fulfill orders from the closest warehouse or location, which helps reduce shipping costs and improve delivery times.Location-based inventory systems can benefit businesses with a large product range, as they can track and manage each product at each location. It can also be helpful for businesses with a high volume of orders. It allows them to track and manage inventory levels at each location more easily to ensure sufficient stock is always available to fulfill orders.The naming convention followed:
locationid_inventory_quantity
Eg:1570_inventory_quantity (in PIM)
Here, 1570 is the location_id
- Sales_channels: In Shopify, a sales channel allows merchants to sell their products or services through various platforms or marketplaces. Some examples of sales channels include
- Online stores (Shopify’s platform)
- Facebook Shop
- Instagram Shopping
- Amazon
- Google Shopping
- Buy Button,
- Point of Sale (POS).
Each sales channel has features and integrations, and merchants can choose which channels they want to use based on their business needs.
- redirectNewHandle:In the context of e-commerce or website management, when you’re dealing with product handles, a “redirect” is a way to automatically forward or direct users from the old product URL to the new one. This is done to ensure that anyone trying to access the old URL is taken to the correct, updated product page. Whether a redirect is required typically depends on the situation.Let me provide an example to clarify:Scenario:Let’s say you have an e-commerce website, and you’ve been selling a product called “Classic Red Shoes.” The handle (or URL) for this product has been:/products/classic-red-shoesNow, you decide to rename the product to “Elegant Ruby Red Shoes” and change the product handle to:/products/elegant-ruby-red-shoesIn this case, you may want to set up a redirect from the old URL (/products/classic-red-shoes) to the new one (/products/elegant-ruby-red-shoes) for the following reasons:
- User Experience: If someone had bookmarked or shared the old product URL, they would expect to find the product when they access that URL. A redirect ensures they end up at the right place without confusion.
- Search Engine Optimization (SEO): Search engines like Google may have indexed the old product URL. A redirect helps preserve the SEO ranking and history of the old URL, passing some of that authority to the new URL.
- So, if you set the attribute “redirect” to “true,” it means that when you change the product handle, the old URL will automatically redirect users and search engines to the new URL. This ensures a smooth transition without losing traffic or search visibility.
- If
requiresSellingPlanis set totruefor this product variant, it means that customers who want to buy the “Colombian Dark Roast” coffee beans must subscribe to a selling plan. They can’t make a one-time purchase. They would be committing to regularly receive this coffee every month or at the specified interval. - If
requiresSellingPlanis set tofalsefor the same product variant, it means that customers have the option to either subscribe to a selling plan for regular deliveries or make a one-time purchase of the coffee beans without any subscription.requiresSellingPlan field in Shopify GraphQL is used to indicate whether a product variant can be purchased by a customer with or without a selling plan. A selling plan is a way for customers to subscribe to regular, recurring purchases of a product, such as getting a new supply of coffee beans every month. Here’s a simple example to illustrate this concept:Product: Coffee Beans Product Variant: Colombian Dark Roast
- The SEO title, also known as the meta title tag, is a critical element of on-page search engine optimization. It provides a brief and descriptive title for a webpage that helps search engines understand what the page is about and influences how the page appears in search engine results. Here’s an explanation with an example:
- Explanation: The SEO title is a piece of HTML code placed within the
<head>section of a webpage. It’s not visible on the webpage itself, but it’s vital for search engines like Google to determine the content and relevance of the page. The SEO title serves as a concise summary of the page’s content, and it should include relevant keywords to improve search engine visibility - Example: Suppose you run an online store selling digital cameras, and you have a product page for a “Nikon D750 DSLR Camera.” Here’s how you might create an SEO title for that product page:
- html
<head>

<title>Nikon D750 DSLR Camera - Best Digital Cameras 2023 - Your Camera Store</title>

</head>
- In this example:
- “Nikon D750 DSLR Camera” is the main product name, which is essential for clarity.
- “Best Digital Cameras 2023” adds context by specifying the category and year.
- “Your Camera Store” indicates the website or business name, which can help build brand recognition
- Explanation: The SEO title is a piece of HTML code placed within the
- seo_description: The SEO description of a product is a concise and informative piece of content that is designed to enhance a product page’s search engine visibility and provide potential customers with relevant information about the product. This description is not visible on the product page but is embedded in the page’s HTML code to provide search engines with context about the product.Here’s an explanation with an example:
- Explanation: The SEO description is a part of on-page SEO strategy used by online stores and websites to improve their rankings in search engine results. It is usually placed within the website’s HTML
<head>section and is not directly displayed to users visiting the page. Instead, it is intended to provide search engines like Google with a summary of the product’s key features and benefits. - Example: Let’s say you have an e-commerce website that sells mobile phones, and you want to create an SEO description for a specific product, the “SmartTech Galaxy”
- Explanation: The SEO description is a part of on-page SEO strategy used by online stores and websites to improve their rankings in search engine results. It is usually placed within the website’s HTML
- SEO Description: html
<meta name="description" content="The SmartTech Galaxy S22 - A cutting-edge smartphone with a stunning AMOLED display, high-performance camera, and long-lasting battery. Get the latest in mobile technology today.">In this example:”The SmartTech Galaxy S22″ is the product name.”A cutting-edge smartphone with a stunning AMOLED display, high-performance camera, and long-lasting battery” provides a brief but enticing description of the product’s key features.”Get the latest in mobile technology today” encourages users to click and learn more about the product.
When someone searches for “SmartTech Galaxy S22” or related terms in a search engine, this SEO description helps provide a summary of the product’s highlights. It can increase the likelihood of the product’s page appearing in search results, as it aligns with what potential customers are searching for and encourages them to visit the product page. A well-optimized SEO description is an essential part of SEO and can drive more organic traffic to a product page, ultimately boosting sales and conversions
- remove_price_when_updating:
The “remove_price_when_updating” field in Shopify’s GraphQL is a feature that allows you to control whether a product variant’s price should be removed or preserved when making updates to that variant. Let’s break it down with an example to illustrate its purpose:
Example: Suppose you manage an online store that sells t-shirts in various sizes and colors. You have a product variant for a “Basic White T-Shirt” with the following details:
- Product Title: Basic White T-Shirt
- Size: Medium
- Color: White
- Price: $15.00
- Weight: 0.2 lbs
- Inventory: 50 units
Now, let’s say you need to make an update to this product variant because you want to change the weight and the inventory count, but you want to keep the price the same.
Scenario 1 –
remove_price_when_updatingset tofalse:If you set
remove_price_when_updatingtofalsewhen updating this variant, your update might look something like this in GraphQL:graphqlmutation {
productVariantUpdate(input: {
id: "abc123"
price: $15.00
weight: 0.3 lbs
inventory: 75
}) {
productVariant {
id
price
weight
inventory
}
}
}
With
remove_price_when_updatingset tofalse, you explicitly specify the price as $15.00 in your update, alongside the changes you want to make. In this case, the price remains unchanged after the update.Scenario 2 –
remove_price_when_updatingset totrue:If you set
remove_price_when_updatingtotruewhen updating the variant, your update might look like this:graphqlmutation {inventory: 75}) {productVariant {idpriceweightinventory
productVariantUpdate(input: {
id: "abc123"
weight: 0.3 lbs
}
}
}With
remove_price_when_updatingset totrue, you don’t include the price field in your update. This tells Shopify to keep the price unchanged during the update.This option can be helpful in scenarios where you want to make updates to a product variant but don’t want to accidentally change the price. By setting
remove_price_when_updatingtotrue, you ensure that the price remains the same, making it a useful feature for product management and inventory control in an online store. - weightunit: The unit of weight used to measure a product variant refers to the specific measurement system and unit of measurement that is applied to express the weight of that particular variant. It helps customers understand the weight of the product, which can be crucial for various reasons, including shipping and product specifications. Example: Imagine you have an online store that sells fitness equipment, including dumbbells. You offer a set of adjustable dumbbells, and the product variant in question is a single dumbbell.Unit of Weight: Pounds (lbs)Variant Weight: 20 lbs
- productType: The product type specified by a merchant refers to the category or classification that the merchant assigns to a product in their online store. It helps organize and group products, making it easier for customers to find what they’re looking for and for the merchant to manage their inventory. Here’s an example to illustrate this concept Example: Imagine you run an online clothing store. You have a product, a stylish leather jacket. You can specify a product type for this item.
- Product Name: Classic Leather Jacket
- Product Type: Outerwear. In this example:
- “Classic Leather Jacket” is the name of the product.
- “Outerwear” is the product type specified by the merchant.
-
Country
Code Of Origin:The Country Code of Origin is a two-letter code (ISO 3166-1 alpha-2) assigned to each country. It uniquely identifies the country where a product originated, helping in international trade and regulatory processes. Examples include “US” for the United States and “JP” for Japan. The code designating a country/region, which generally follows ISO 3166-1 alpha-2 guidelines. If a territory doesn’t have a country code value in the CountryCodeenum, then it might be considered a subdivision of another country. For example, the territories associated with Spain are represented by the country codeES, and the territories associated with the United States of America are represented by the country codeUS.
- province
Code Of Origin:Identifies the specific province or state within a country where a product originated. Example: In ISO 3166-2, the province code for California is “CA,” and for Ontario in Canada, it is “ON.” Typically used for more detailed regional tracking within a country.
- harmonized
System Code The harmonized system code of the inventory item. This must be a number between 6 and 13 digits. In Case you have standardized harmonized code across the globe then the property name in PIM is harmonizedSystemCode. Usage:Provides a broader level of origin information and is crucial in international trade for customs, tariffs, and import/export regulations.
- country
Harmonized System Codes: Examples of countryHarmonizedSystemCodes Incase you have different harmonized codes for different countries the properties in template should be suffixed with country code i.e for Australia the property will be harmonizedSystemCode_AU for Japan it will be harmonizedSystemCode_JP.
- Category: The Category Attribute facilitates the categorization of products.