Structured information to guide you through Unbxd PIM with minimal assistance
  1. Introduction
  2. Access Unbxd PIM
  3. Explore Unbxd PIM
  4. Features of Overview page
  5. Profile
  6. Organization - Set up your PIM Team
    1. Invite a New Member
    2. Update Member Information
    3. View a Member Information
    4. Delete a Member
    5. Create a New Role
    6. Set Property Permissions for a Role
    7. Set System Permissions for a Role
    8. Change Assigned Members of a Role
    9. Change Property Permissions for a Role
    10. Change System Permissions for a Role
    11. Change the Role Name
    12. View a Role Information
    13. Delete a Role
    14. Edit your Organization Profile Information
  7. Imports - Onboard & Schedule your Product Content
    1. Import File Best Practices
    2. Tips for doing an effective import
    3. Perform First-time Product Import
    4. Import data via SFTP
    5. View an Existing Import Information
    6. Schedule an Import
    7. Edit a Scheduled Import
    8. View a Scheduled Import Information
    9. Stop a Scheduled Import
    10. Delete a Scheduled Import
    11. Import Templates
    12. Deleting Import Template
    13. Trouble Shooting Import Errors
  8. Products - Build & Enrich Product Content
    1. Advanced Search and Filtering and saving filters by creating static product group
    2. Customize your Product Listing View
    3. Add a Solo Product
    4. Add a Solo Product via AI
      1. AI Content Score
    5. Add a Variant Product
    6. Edit a Solo Product
    7. Edit a Parent Product
    8. Edit Products from Product Listing Page
    9. Edit a Variant Product from its Parent Product
    10. Cloning a Product
    11. Product Listing Page [AG Grid Feature / Excel Mode]
    12. View Activity Log Details for a Product
    13. View Product Details
    14. View Task Information for a Product
    15. Delete a Product
    16. Product Groups
      1. Create a Static Product Group
      2. Edit a Static Product Group
      3. View a Static Product Group Information
      4. Delete a Static Product Group
      5. Create a Dynamic Product Group
      6. Edit a Dynamic Product Group
      7. View a Dynamic Product Group Information
      8. Delete a Dynamic Product Group
    17. Bulk Actions for Products & Product Groups
      1. Add Products to a Static Product Group
      2. Bulk Edit Products
      3. Bulk Edit Category
      4. Assign Task
      5. Certify Products
      6. Delete Multiple Products
      7. Certify Product Groups
      8. Run Readiness Report
      9. Delete Product Groups
      10. Edit Multiple Products from a Static Product Group
      11. Remove Products from a Static Product Group
      12. Delete Products from a Dynamic Product Group
      13. Delete Products from a Static Product Group
      14. Edit Multiple Products from a Dynamic Product Group
      15. Enrich Products or Product group data
  9. Certified Products & Certified Product Group
    1. Customize your Products Listing View
    2. Export Certified Products
    3. Export Products with Readiness Check & Assign Task
    4. View Activity Log Details for a Product
    5. Delete Products from Certified Product Group
    6. Export Certified Product Groups
    7. Export Certified Product Groups with Readiness Check & Assign Task
    8. Add Channel Readiness for a Certified Product Group
    9. Edit a Certified Product Group
    10. View Certified Products
    11. Delete a Product Group
  10. Scripts - Transform your Product Data
    1. Using the Transformation Script Editor
    2. Post Transformation
    3. List of Transformation Scripts
  11. Properties - Manage your Product Characteristics
    1. Property Data Types
    2. Create a New Property
    3. Change the Property Name and Assigned Property Group
    4. Change Role Permissions for a Property
    5. Make a Property Searchable
    6. View a Property Information
    7. Download all Properties
    8. Delete a Property
    9. Property Groups
      1. Create a New Property Group
      2. Change Property Group Name and Associated Properties
      3. View a Property Group Information
      4. Delete a Property Group
  12. Categories - Manage your Product Classifications
    1. Create a New Category & Subcategory
    2. Change Category Name & Associated Properties
    3. View Category & Subcategory Information
    4. Delete a Category or Subcategory
    5. Bulk Remove Categories
    6. Upload Category Property Association
    7. Download Category Property Association
    8. Download Category Property Template
  13. Tasks - First Step Towards Building Processes
    1. Create a New Task
    2. Edit an Existing Task
    3. View Task Details and Task Status Details
    4. Task Templates
      1. Create a New Task Template
      2. Edit a Task Template
      3. View Task Template Details
      4. Create a Task using a Task Template
      5. Delete a Task Template
    5. Task Assignee
  14. Readiness Reports-Ensure product information completeness
    1. Creating Readiness Report
    2. Downloading Readiness Report
    3. Viewing Readiness Reports
    4. Assigning Task using Readiness Report
  15. Catalogs - Share real-time Product Content
    1. Create & Share a New Catalog
    2. Edit a Catalog
    3. Delete a Catalog
  16. Workflows - Automate PIM Processes
    1. Create a New Workflow
    2. Run a Workflow Manually
    3. Pause & Resume a Workflow
    4. Edit a Workflow
    5. View Workflow Details
    6. View Activity Log Details for a Workflow
    7. Delete a Workflow
    8. Bulk Actions
  17. Digital Asset Management - Manage your Digital Files
    1. Add a New Asset
    2. Associate Assets with Products
    3. Perform Asset Transformations
    4. Deassociate Asset from Products
    5. Download Assets
    6. Delete an Asset
  18. Exports
    1. View Exports
    2. Download an Exported File
    3. Send an Email with the Exported File
    4. Schedule an Export
    5. Edit a Scheduled Export
    6. View Scheduled Export Details
    7. Stop a Scheduled Export
    8. Delete a Scheduled Export
    9. Export Parent Products
    10. Export Products via SFTP
    11. Standard Templates and Custom Templates
      1. Edit a Standard Template
      2. View Standard Template Details
      3. Create a Custom Template
      4. Bulk add properties while creating custom export template
      5. Edit a Custom Template
      6. View Custom Template Details
      7. Delete a Custom Details
  19. Deleting Export Template
  20. Volusion
  21. AI Enrichment Apps
    1. Mandatory Properties and Prompt Values for each AI App
    2. Creation of templates for AI enrichment apps
      1. Amazon Description Generator
      2. Amazon Title Generator
      3. Amazon Ads Headline Generator
      4. Product Name Generator
      5. Google Ads Generator
      6. Google Ad Description Generator
      7. Google Title Generator
      8. Youtube Hooks Generator
      9. Youtube Outline Generator
      10. Youtube Description Generator
      11. Youtube Intros Generator
      12. Youtube Titles Generator
      13. Trending Instagram Hashtag Generator
  22. Bulk Transform and Enrichment
  23. Custom Template Uploader
  24. Custom Template Downloader
  25. Headerless File Format
  26. Bulk Asset Upload and Download
  27. Image Keyword Extraction
  28. Dropbox
  29. Zapier(Gmail)
  30. Zapier(Google Sheet)
  31. Find Duplicates and Related Products
  32. Vend
  33. Volusion
  34. Google URL data Fetcher
  35. UPC Generator
  36. Image Convertor to Webp
  37. Translate Catalog
  38. Extract Common Variant Properties
  39. Image Keyword Extraction
  40. AI Image to Product Builder
  41. DAM Remove BG
  42. Guide for Obtaining AWS S3 Bucket Credentials & Configuring Public Access Permissions
  43. SFTP Watcher App
  44. Generate Partial Search
  45. Channel Integration
    1. Channel Integrations -
      1. Installing BigCommerce store via Unbxd PIM
      2. Importing data into Unbxd PIM from BigCommerce
      3. Mandatory Properties to export products to BigCommerce
      4. Exporting data from Unbxd PIM to BigCommerce
      5. Automating import and export using Templates and Workflows
    2. Channel Intergation-
      1. Installing Shopify via Unbxd PIM
      2. Shopify Store Fetcher
      3. Mandatory Property Mappings for Shopify
      4. Properties in Shopify and Shopify Graph QL and their importance
      5. Importing the data into Unbxd PIM from Shopify
      6. Exporting data from Unbxd PIM to Shopify
      7. Automating import and export using Scheduled Imports/Exports and Workflows
    3. Shopify Graph QL
    4. Channel Integrations -
      1. Installing Unbxd PIM via Brightpearl
      2. Importing the data into Unbxd PIM from Brightpearl
      3. Exporting data from Unbxd PIM to Brightpearl
      4. Automating import and export using Templates and Workflows
    5. Channel Integration -
      1. Installing Magento using Username and Password
      2. Magento Token Based Installtion
      3. Mandatory Properties for Magento
      4. Mageworx
    6. Channel Intergation-
      1. Installing Etsy via Unbxd PIM
      2. Importing the data into Unbxd PIM from Etsy
      3. Exporting data from Unbxd PIM to Etsy
      4. Automating import and export using Scheduled Imports/Exports and Workflows
    7. Channel Integration -
      1. Installing Walmart via Unbxd PIM
    8. Channel Integration-
      1. Installing Unbxd PIM via Amazon Seller central
      2. Installing Amazon Seller Central via Unbxd PIM
      3. Importing data into Unbxd PIM from Amazon
      4. Exporting data from Unbxd PIM to Amazon
      5. Automating import and export using Templates and Workflows
      6. Download category template from amazon seller central
    9. Ebay Installation-
    10. Steps to get template file for Ebay-
    11. Channel Integration-
      1. Google Shopping App Installation
      2. Mandatory Properties for Google Shopping
    12. Woocommerce Installation-

Volusion

Volusion supports both import and export functionalities. 

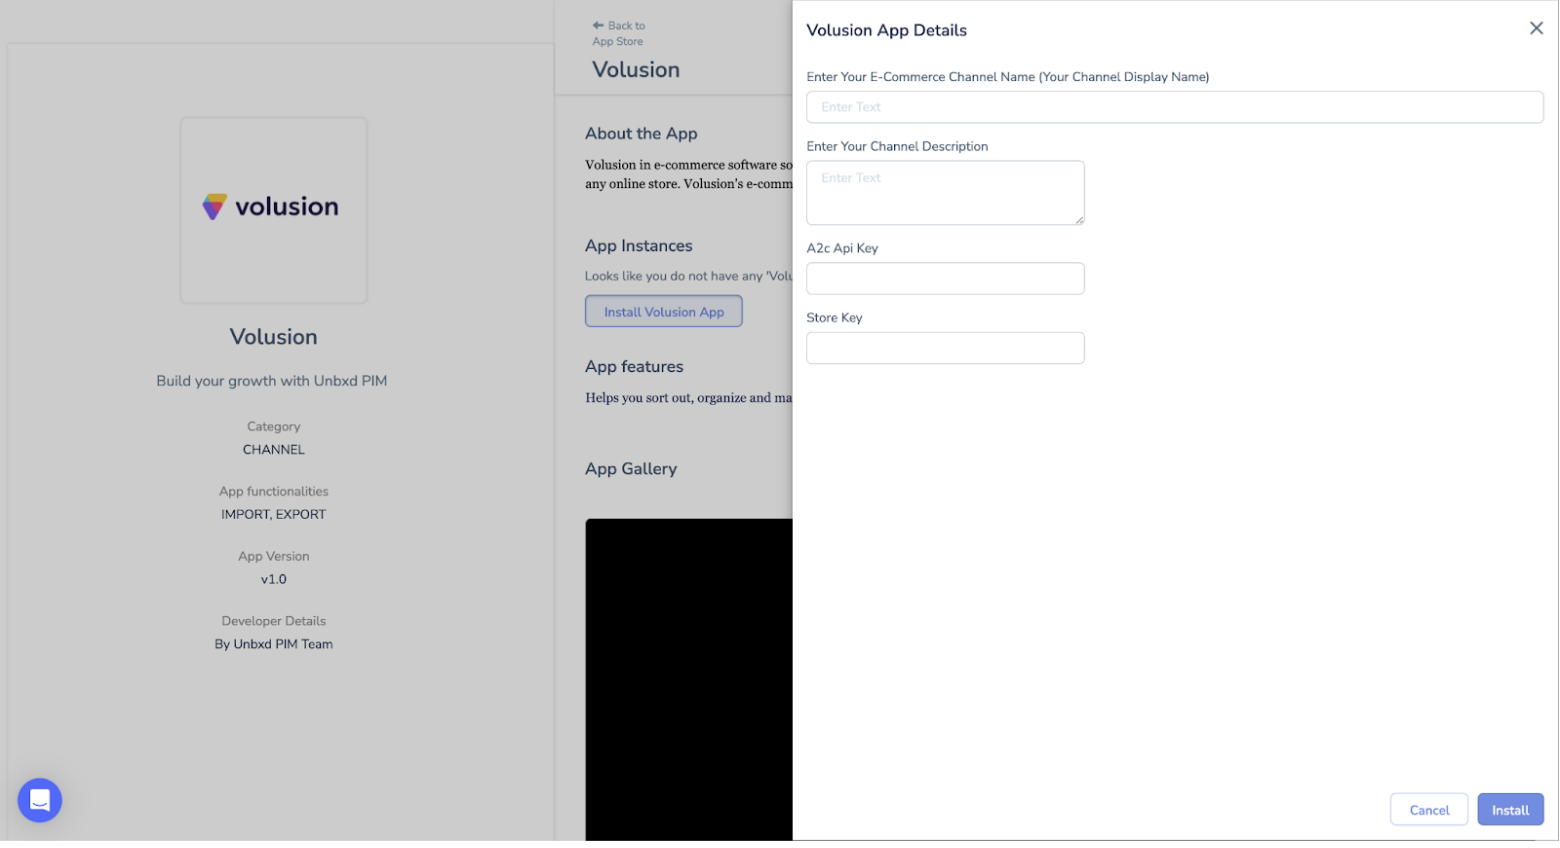
To Install Volusion app in PIM 

    1. Click on the App Store
    2. Search and click on Volusion
      1. Enter your E-commerce Channel Name 
      2. Enter Description if required
      3. Enter A2c Api Key [To get Api Key steps are below]
      4. Enter Store Key[To get Store key steps are below]
    3. Click on Install Volusion App


We get an A2c API and Store keys from api2cart for Volusion.

To establish a connection between Volusion and API2cart, you’ll need to provide the following information:

Login to your Volusion account and get the below details i.e., Store URL, Volusion Login and Password[Administrator Username and Encrypted Password]

  • Store URL:
    • This is the web address of your Volusion store.

Copy the part highlighted

  • Volusion Login and Password:
    • Your Volusion account credentials are required for authentication. 

Note that access to these credentials is only granted if API functionality is enabled for the account.

  • Administrator Username:
    • Navigate to the Integration Help page’s imports or exports sections.
    • Choose the administrator account’s username (email address) from the drop-down menu in the import or export section. This username will be used to connect to your store via the API.
  • Encrypted Password String:
    • Find the general query string information field within the chosen import or export section.
    • Locate the encrypted password string between the text “&EncryptedPassword=” and “&.” This string is the encrypted password you’ll use for API authentication.

The client can log in to Api2cart for Volusion using the above details i.e., Username, Password, and Store URL.

API Password Notification:


  • PCI security guidelines require updating your store’s administrator account password every 90 days.


  • If your administrator account password is updated, you must also update any URL string used to access your store through the Volusion API.
  • Obtain an updated URL for a specific export from the API section of your Admin Area after updating the administrator account password.


  • API Key and Store Key from API2cart:
    • API2cart acts as a bridge between Volusion and other platforms. To facilitate data exchange, you must obtain an API key and store key from API2cart. These keys serve as authentication tokens, allowing the systems to communicate securely.

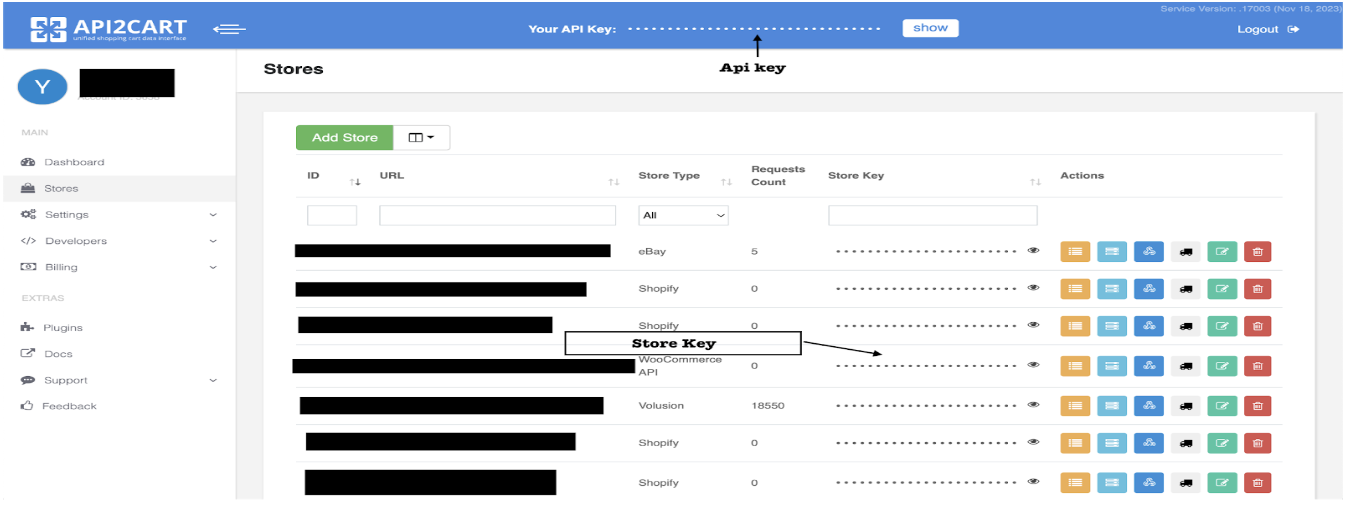
Copy the API and Store Key and paste them into the PIM console in the respective boxes.

Yes No
0 of 0 users found this section helpful
Suggest Edit