Structured information to guide you through Unbxd PIM with minimal assistance
  1. Introduction
  2. Access Unbxd PIM
  3. Explore Unbxd PIM
  4. Features of Overview page
  5. Profile
  6. Organization - Set up your PIM Team
    1. Invite a New Member
    2. Update Member Information
    3. View a Member Information
    4. Delete a Member
    5. Create a New Role
    6. Set Attribute Permissions for a Role
    7. Set System Permissions for a Role
    8. Change Assigned Members of a Role
    9. Change Attribute Permissions for a Role
    10. Change System Permissions for a Role
    11. Change the Role Name
    12. View a Role Information
    13. Delete a Role
    14. Edit your Organization Profile Information
  7. Imports - Onboard & Schedule your Product Content
    1. Import File Best Practices
    2. Tips for doing an effective import
    3. Perform First-time Product Import
    4. Variant options during Import
    5. Import data via SFTP
    6. View an Existing Import Information
    7. Schedule an Import
    8. Edit a Scheduled Import
    9. View a Scheduled Import Information
    10. Stop a Scheduled Import
    11. Delete a Scheduled Import
    12. Import Templates
    13. Deleting Import Template
    14. Trouble Shooting Import Errors
  8. Products - Build & Enrich Product Content
    1. Advanced Search and Filtering and saving filters by creating static product group
    2. Customize your Product Listing View
    3. Add a Solo Product
    4. Add a Solo Product via AI
      1. AI Content Score
    5. Add a Variant Product
    6. Edit a Solo Product
    7. Edit a Parent Product
    8. Edit Products from Product Listing Page
    9. Edit a Variant Product from its Parent Product
    10. Product Listing Page [AG Grid Feature / Excel Mode]
    11. View Activity Log Details for a Product
    12. View Product Details
    13. Cloning a Product
    14. Assign Category to Product from Product Display Page
    15. Assigning Category to a Parent Product
    16. Create and View task from PDP Page
    17. View Task Information from Product Display Page
    18. One Click Export
    19. Delete a Product from Product Listing Page
    20. Delete Product from Product Display Page
    21. Product Groups
      1. Create a Static Product Group
      2. Edit a Static Product Group
      3. View a Static Product Group Information
      4. Delete a Static Product Group
      5. Create a Dynamic Product Group
      6. Edit a Dynamic Product Group
      7. View a Dynamic Product Group Information
      8. Delete a Dynamic Product Group
    22. Bulk Actions for Products & Product Groups
      1. Add Products to a Static Product Group
      2. Bulk Edit Products
      3. Bulk Edit Category
      4. Assign Task
      5. Certify Products
      6. Delete Multiple Products
      7. Certify Product Groups
      8. Run Readiness Report
      9. Delete Product Groups
      10. Edit Multiple Products from a Static Product Group
      11. Remove Products from a Static Product Group
      12. Delete Products from a Dynamic Product Group
      13. Delete Products from a Static Product Group
      14. Edit Multiple Products from a Dynamic Product Group
      15. Enrich Products or Product group data
  9. Certified Products & Certified Product Group
    1. Customize your Products Listing View
    2. Export Certified Products
    3. Export Products with Readiness Check & Assign Task
    4. View Activity Log Details for a Product
    5. Delete Products from Certified Product Group
    6. Export Certified Product Groups
    7. Export Certified Product Groups with Readiness Check & Assign Task
    8. Add Channel Readiness for a Certified Product Group
    9. Edit a Certified Product Group
    10. View Certified Products
    11. Delete a Product Group
  10. Scripts - Transform your Product Data
    1. Using the Transformation Script Editor
    2. Post Transformation
    3. List of Transformation Scripts
  11. Attributes - Manage your Product Characteristics
    1. Attribute Data Types
    2. Create a New Attribute
    3. Change the Attribute Name and Assigned Attribute Group
    4. Change Role Permissions for a Attribute
    5. Make a Attribute Searchable
    6. View a Attribute Information
    7. Bulk Upload Attributes using an sheet
    8. Download all Attributes
    9. Delete a Attribute
    10. Attribute Groups
      1. Create a New Attribute Group
      2. Change Attribute Group Name and Associated Attributes
      3. View a Attribute Group Information
      4. Delete a Attribute Group
      5. Searching Product Group
  12. Categories - Manage your Product Classifications
    1. Bulk create category & subcategory
    2. Change Category Name & Associated Attributes
    3. View Category & Subcategory Information
    4. Delete a Category or Subcategory
    5. Bulk Remove Categories
    6. Upload Category Attributes Association
    7. Download Category Attribute Association
    8. Download Category Attribute Template
    9. Download All Categories
    10. Filter out Categories
  13. Tasks - First Step Towards Building Processes
    1. Create a New Task
    2. Edit an Existing Task
    3. View Task Details and Task Status Details
    4. Task Templates
      1. Create a New Task Template
      2. Edit a Task Template
      3. View Task Template Details
      4. Create a Task using a Task Template
      5. Delete a Task Template
    5. Task Assignee
  14. Readiness Reports-Ensure product information completeness
    1. Creating Readiness Report
    2. Downloading Readiness Report
    3. Viewing Readiness Reports
    4. Assigning Task using Readiness Report
  15. Catalogs - Share real-time Product Content
    1. Create & Share a New Catalog
    2. Edit a Catalog
    3. Delete a Catalog
  16. Workflows - Automate PIM Processes
    1. Create a New Workflow
    2. Run a Workflow Manually
    3. Pause & Resume a Workflow
    4. Edit a Workflow
    5. View Workflow Details
    6. View Activity Log Details for a Workflow
    7. Delete a Workflow
    8. Bulk Actions
  17. Digital Asset Management - Manage your Digital Files
    1. Add a New Asset
    2. Associate Assets with Products
    3. Perform Asset Transformations
    4. Deassociate Asset from Products
    5. Download Assets
    6. Delete an Asset
  18. Exports
    1. View Exports
    2. Download an Exported File
    3. Send an Email with the Exported File
    4. Schedule an Export
    5. Edit a Scheduled Export
    6. View Scheduled Export Details
    7. Email Exports
    8. Stop a Scheduled Export
    9. Delete a Scheduled Export
    10. Export Parent Products
    11. Export Products via SFTP
    12. Standard Templates and Custom Templates
      1. Edit a Standard Template
      2. View Standard Template Details
      3. Create a Custom Template
      4. Bulk add attributes while creating custom export template
      5. Edit a Custom Template
      6. View Custom Template Details
      7. Delete a Custom Details
  19. Deleting Export Template
  20. Volusion
  21. AI Enrichment Apps
    1. Mandatory Attributes and Prompt Values for each AI App
    2. Creation of templates for AI enrichment apps
      1. Amazon Description Generator
      2. Amazon Title Generator
      3. Amazon Ads Headline Generator
      4. Product Name Generator
      5. Google Ads Generator
      6. Google Ad Description Generator
      7. Google Title Generator
      8. Youtube Hooks Generator
      9. Youtube Outline Generator
      10. Youtube Description Generator
      11. Youtube Intros Generator
      12. Youtube Titles Generator
      13. Trending Instagram Hashtag Generator
  22. Bulk Transform and Enrichment
  23. Custom Template Uploader
  24. Custom Template Downloader
  25. Headerless File Format
  26. Bulk Asset Upload and Download
  27. Image Keyword Extraction
  28. Dropbox
  29. Zapier(Gmail)
  30. Zapier(Google Sheet)
  31. Find Duplicates and Related Products
  32. Vend
  33. Volusion
  34. Google URL data Fetcher
  35. UPC Generator
  36. Image Convertor to Webp
  37. Translate Catalog
  38. Extract Common Variant Attributes
  39. Image Keyword Extraction
  40. AI Image to Product Builder
  41. DAM Remove BG
  42. Guide for Obtaining AWS S3 Bucket Credentials & Configuring Public Access Permissions
  43. SFTP Watcher App
  44. Generate Partial Search
  45. Channel Integration
    1. Viewing Credentials for an Installed App
    2. Channel Integrations -
      1. Installing BigCommerce store via Unbxd PIM
      2. Importing data into Unbxd PIM from BigCommerce
      3. Mandatory Attributes to export products to BigCommerce
      4. Exporting data from Unbxd PIM to BigCommerce
      5. Automating import and export using Templates and Workflows
    3. Channel Intergation-
      1. Installing Shopify via Unbxd PIM
      2. Shopify Store Fetcher
      3. Mandatory Attribute Mappings for Shopify
      4. Attributes in Shopify and Shopify Graph QL and their importance
      5. Importing the data into Unbxd PIM from Shopify
      6. Exporting data from Unbxd PIM to Shopify
      7. Automating import and export using Scheduled Imports/Exports and Workflows
    4. Shopify Graph QL
    5. Channel Integrations -
      1. Installing Unbxd PIM via Brightpearl
      2. Importing the data into Unbxd PIM from Brightpearl
      3. Exporting data from Unbxd PIM to Brightpearl
      4. Automating import and export using Templates and Workflows
    6. Channel Integration -
      1. Installing Magento using Username and Password
      2. Magento Token Based Installtion
      3. Mandatory Attributes for Magento
      4. Mageworx
    7. Channel Intergation-
      1. Installing Etsy via Unbxd PIM
      2. Importing the data into Unbxd PIM from Etsy
      3. Mandatory Attributes required to list products on Etsy
      4. Exporting data from Unbxd PIM to Etsy
      5. Automating import and export using Scheduled Imports/Exports and Workflows
    8. Channel Integration -
      1. Installing Walmart via Unbxd PIM
    9. Channel Integration-
      1. Installing Unbxd PIM via Amazon Seller central
      2. Installing Amazon Seller Central via Unbxd PIM
      3. Importing data into Unbxd PIM from Amazon
      4. Exporting data from Unbxd PIM to Amazon
      5. Automating import and export using Templates and Workflows
      6. Download category template from amazon seller central
    10. Ebay Installation-
    11. Steps to get template file for Ebay-
    12. Channel Integration-
      1. Google Shopping App Installation
      2. Mandatory Attributes for Google Shopping
    13. Woocommerce Installation-

Creating a New Attribute

Post a product import, attributes are automatically created in Unbxd PIM. You can also manually create new attributes for your products.

While you create a attribute, you can:

  • Set the data type of the attribute
  • Add the attribute to a attribute group
  • Make the attribute searchable
  • Set the attribute as an essential attribute
  • Set the attribute as multivalued
  • Set role permissions for the attribute

Note:When naming a attribute, avoid using any special characters.(specially(.)instead use _)

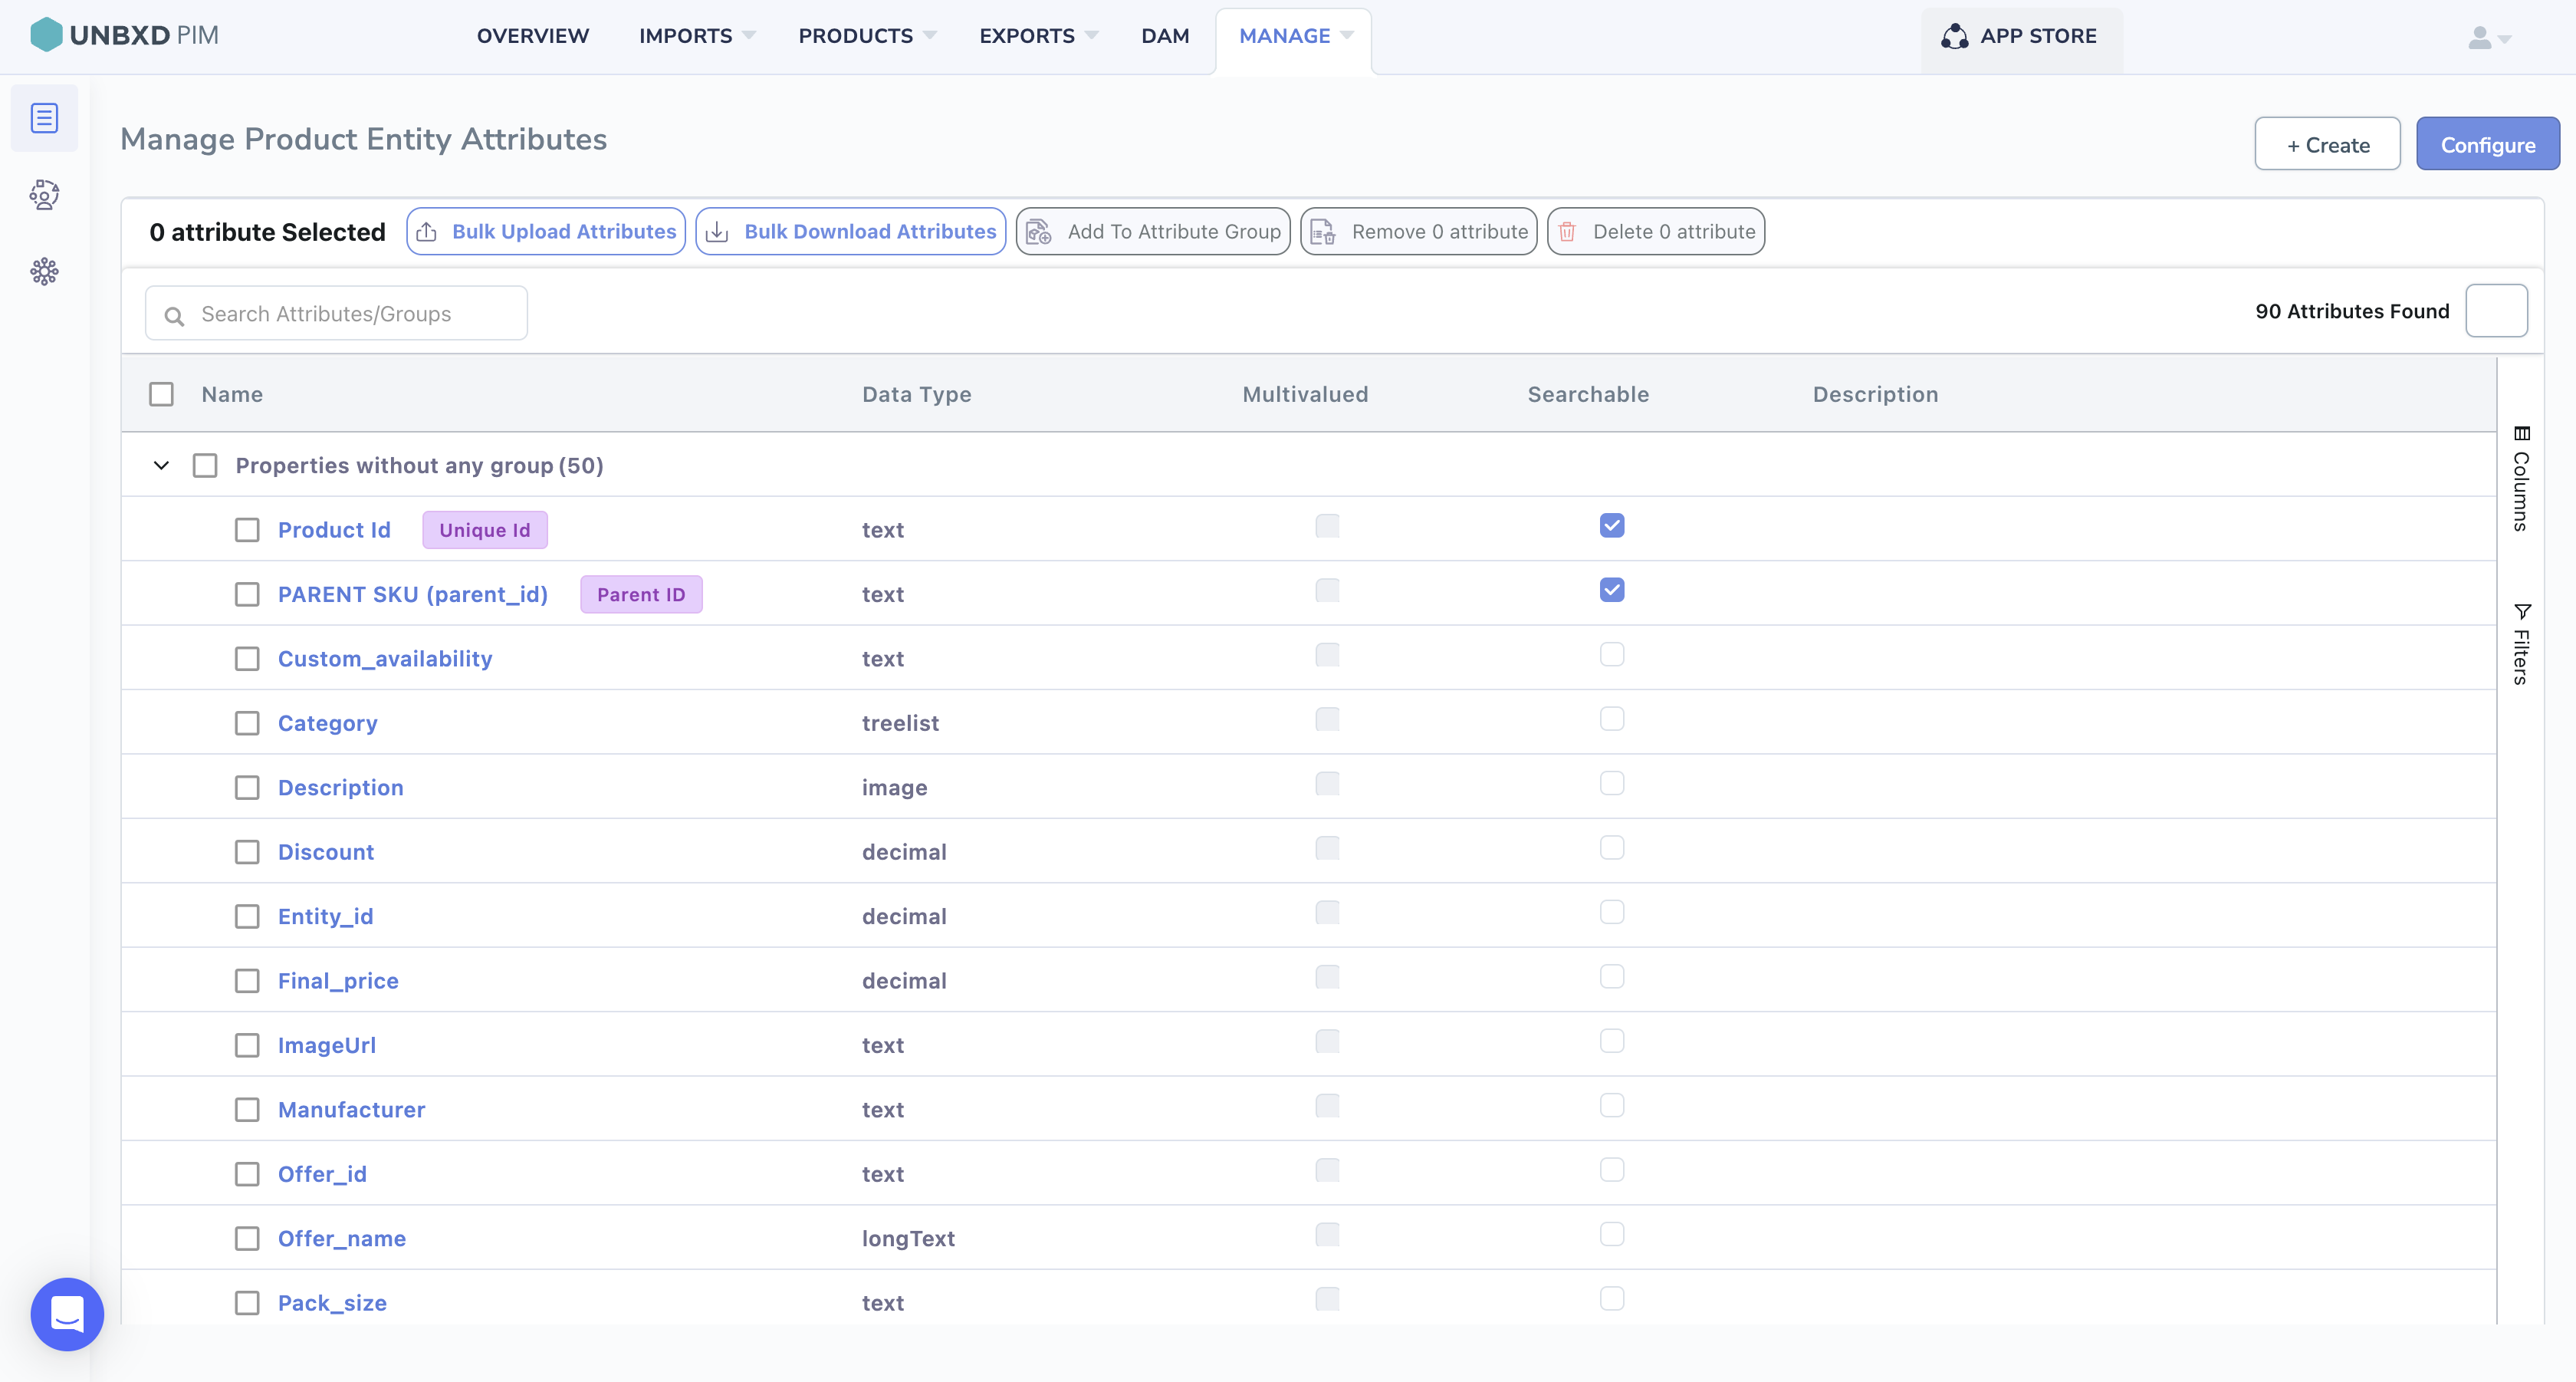
To create a new attribute:

  1. On the MANAGE tab, click Attributes.
    The Attributes Listing page appears.
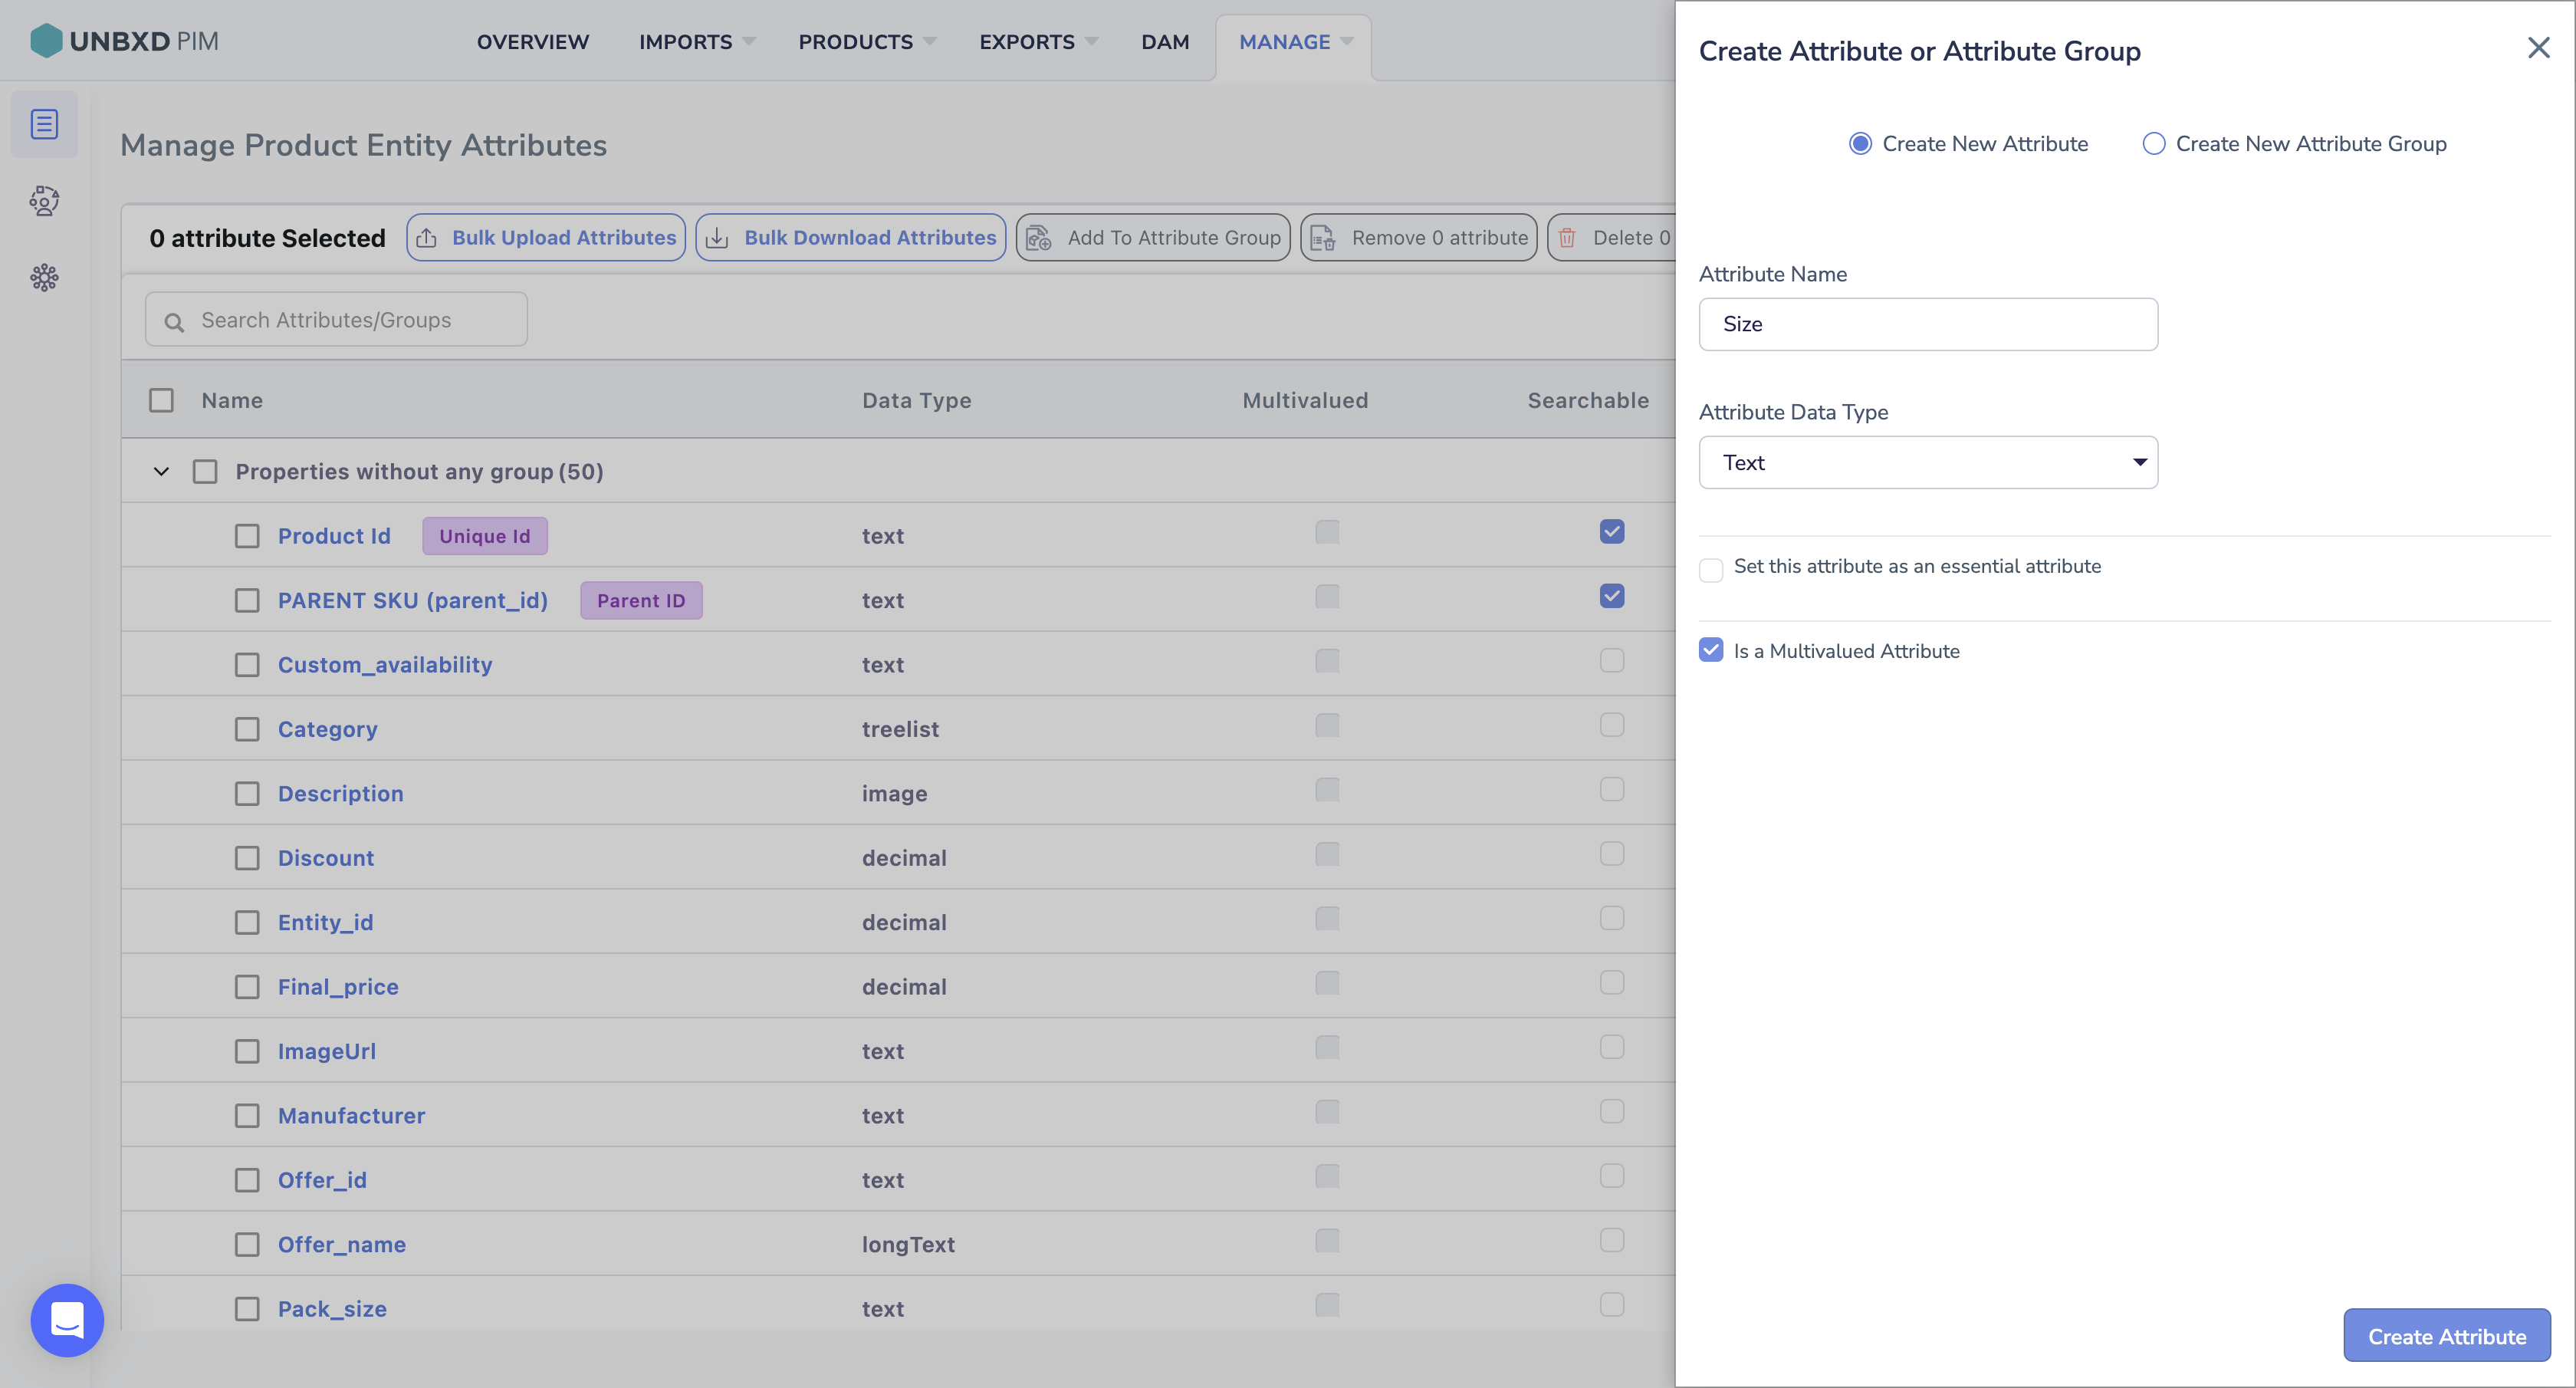
  2. Click +Create.

  3. Enter the attribute name.
  4. In the Attribute Data Type (mandatory) list, select the data type for the attribute.You can select from the following data types:
      • Text
      • Number
      • Date
      • Link
      • Boolean
      • File
      • Image
      • Tree/List
      • Text Area.                                                                                                                                                                                                                                             
      • Note: Now you will be able to create the essential attributes from the Attributes page(5 Attributes can be made essential).   
      • You can checkmark the is multivalued checkbox if the attribute has multiple values.
  5. Click Create Attribute.

Assigning Attributes to a Attribute Group

If you have already created a attribute group, you can assign the attribute to the attribute group. For more information about grouping the attributes, see Attribute Groups.

  1. In the Attribute Group list, select the attribute group. In the example below are the available attribute groups. 
  2. Click Update.


Making a Attribute Searchable(Optional)

By enabling the “Allow attribute to be searched” checkbox, you can make the attribute value searchable within the Products Listing page. This allows you to locate products based on specific attribute values easily.

Click Update.


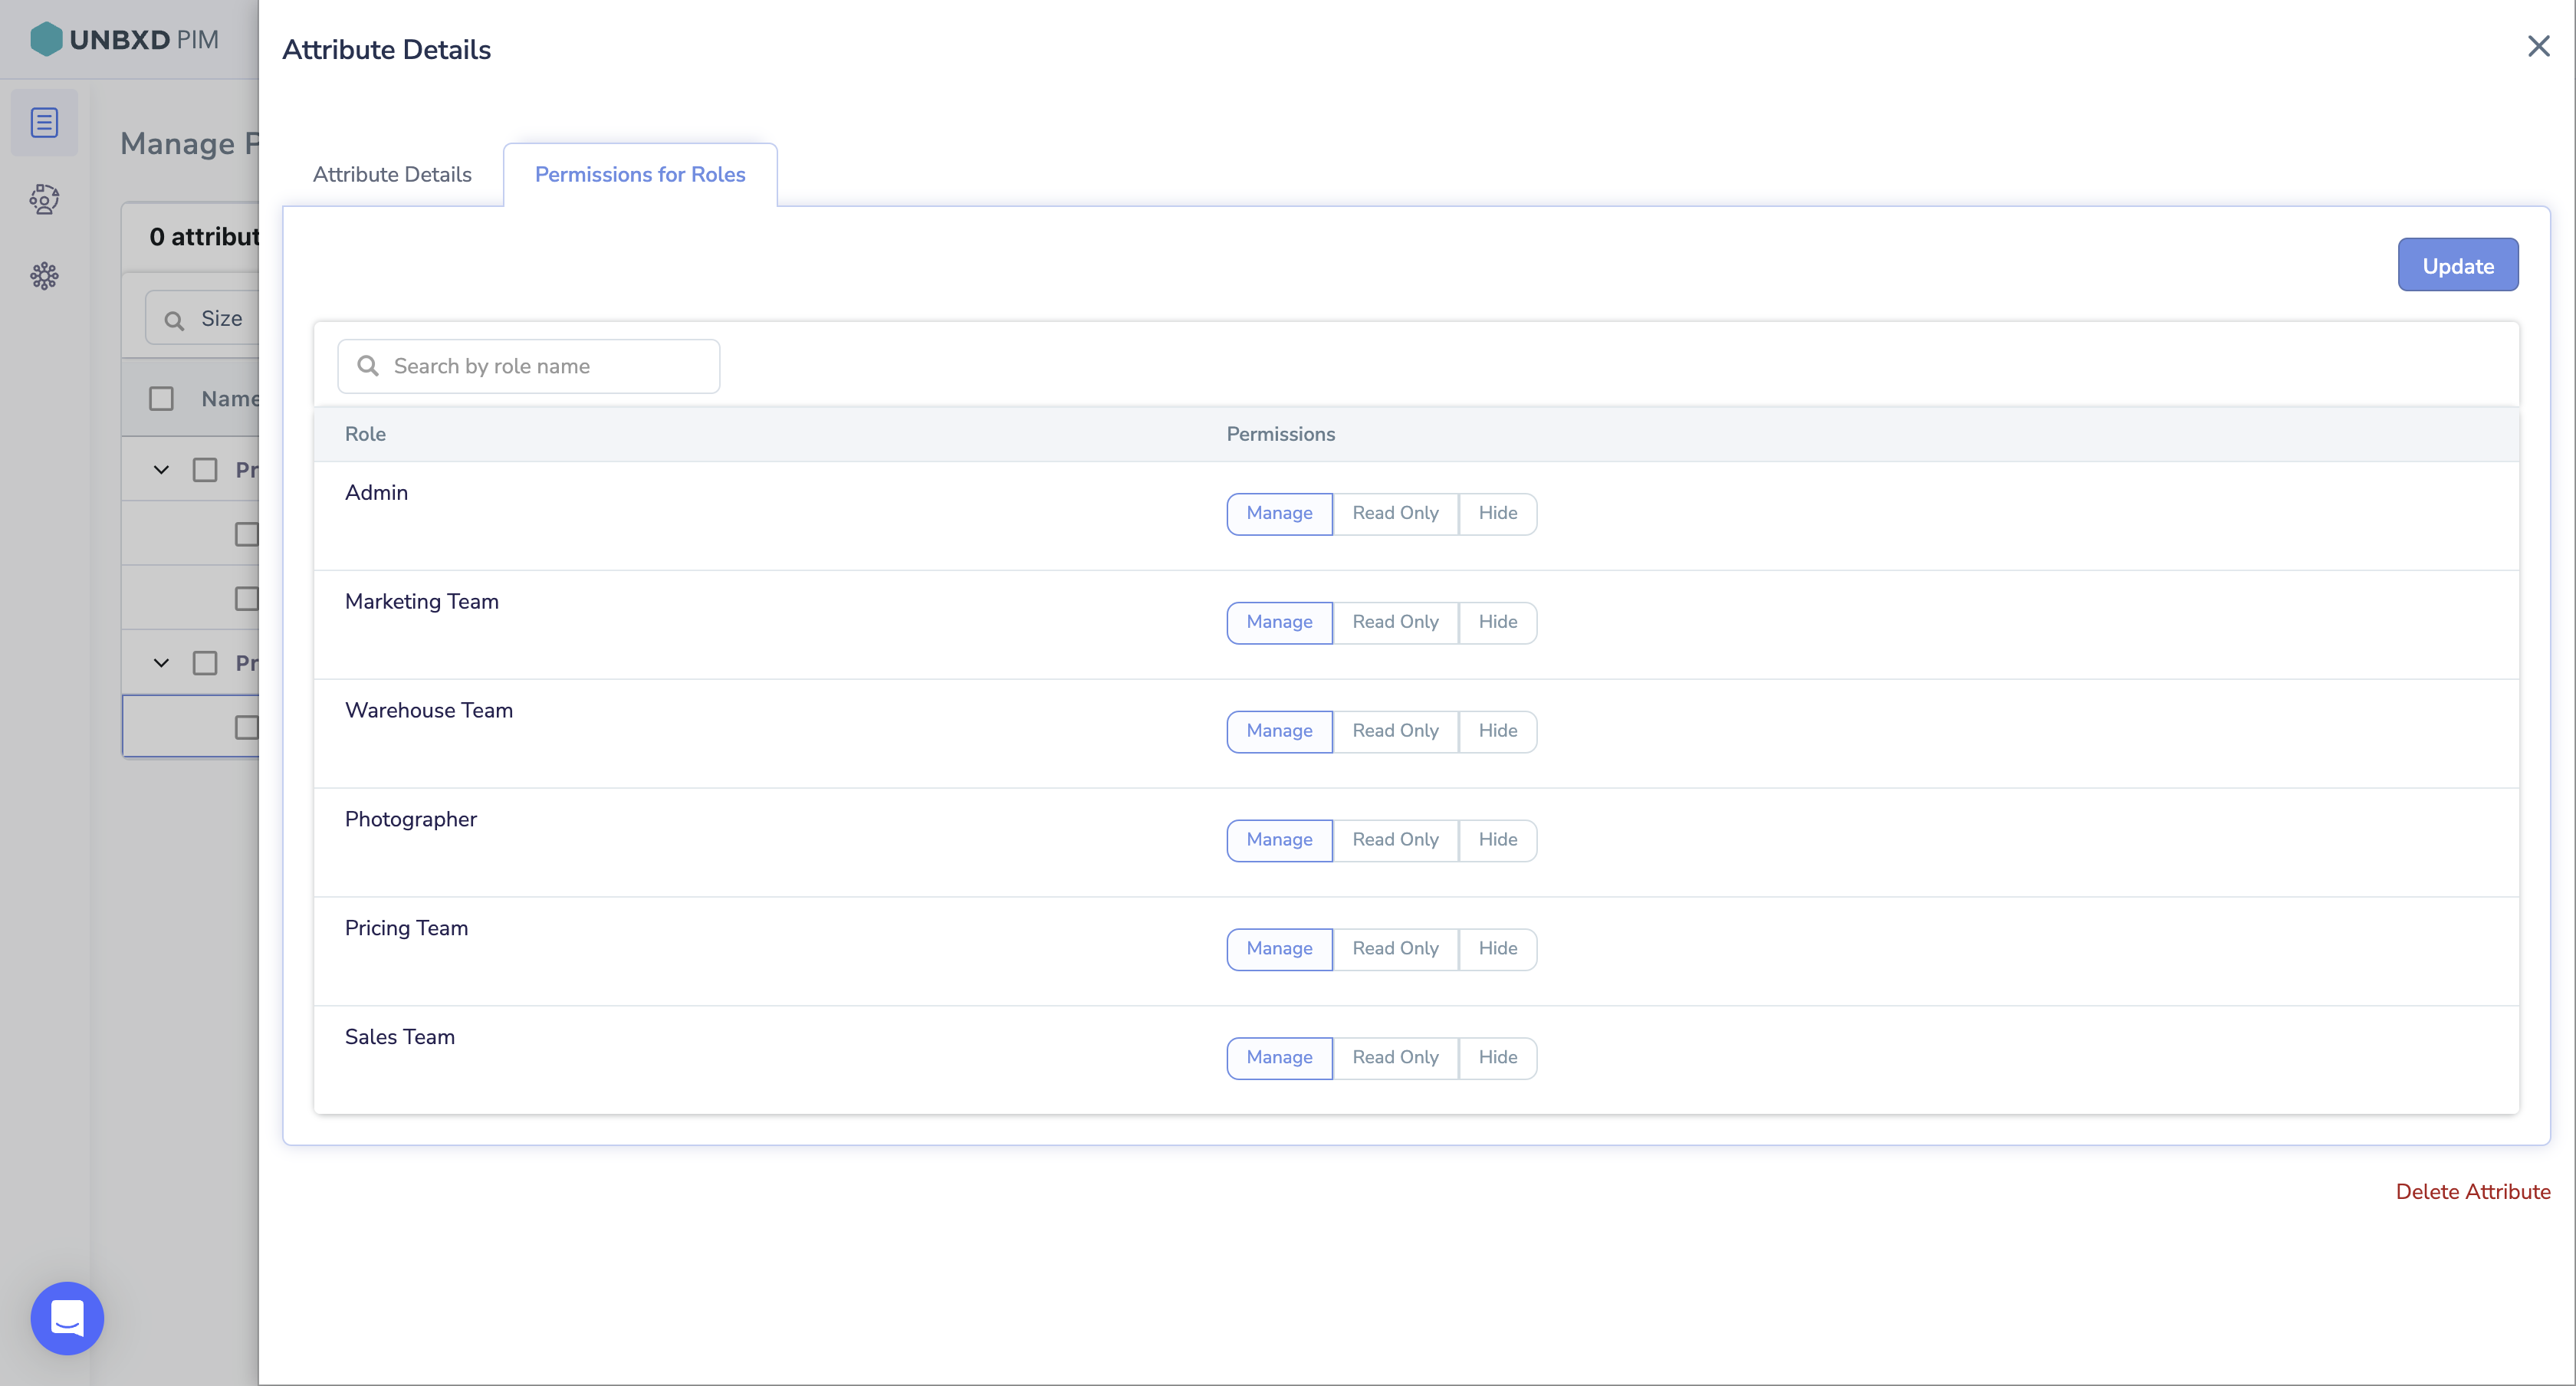
Setting Role Permissions for the Attribute

For a specific attribute, you can set the following role permissions. 

  • Manage – Allows the role to edit the attribute value and delete the attribute.
  • Read Only – Allows the role only to view the attribute value.
  • Hide – The role cannot view the attribute.
  1. Click the Permissions for Roles tab.
  2. If you are looking for a specific role, in the search box, search by role name.
  3. In the Permissions column, hover, and then click to set the following role permissions:
    • Manage
    • Read Only
    • Hide

      For example, sensitive attribute information like “Price” is hidden for certain roles except for Admin and Pricing Manager.
  4. Click Update.
Yes No
0 of 0 users found this section helpful
Suggest Edit