


Performing First-time Product Import
Once you have the import file ready, all you have to do is get that product data into Unbxd PIM. The first-time product import is a two-stage process:
- Uploading product information
- Mapping and configuring product attributes.
Note: If you have no file to import, you can start by creating product attributes. For more information, see Attributes. If you are still working on your import file or waiting for one, you can start with building your PIM team. For more information, see Organization Setup.
Upload Product Information in Unbxd PIM
- Navigate to the Import tab
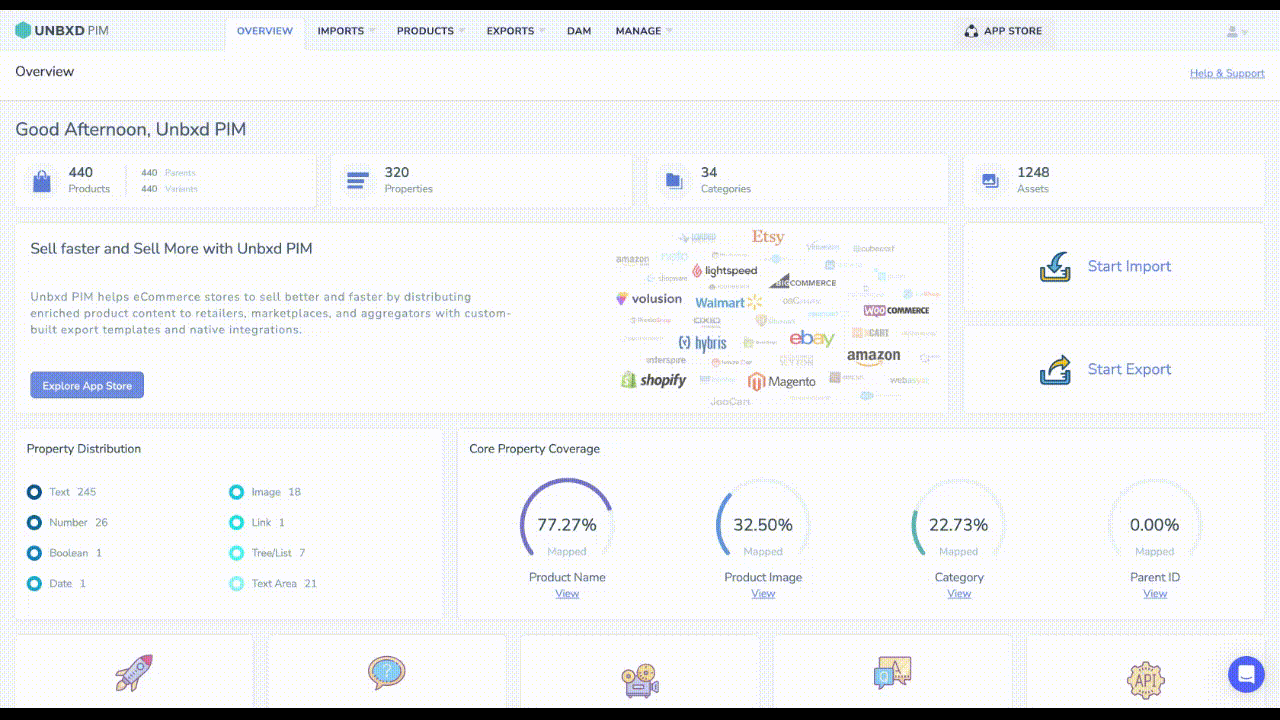
- Click New Import to start the product import process / Click Start Import on the Overview page.
- Upload your import file containing the product information in one of the supported formats (CSV, XLSX, JSON, TSV, or XML).
- Choose either the drag-and-drop method or use the file browser to select and upload the file from your local system.
-
-

Optionally, you can upload a . ZIP file that contains your product information.
Note:The . ZIP file will only import the above-supported formats (.CSV, XLSX, JSON, TSV, or . XML).
Once you have uploaded the file, it will be processed by Unbxd PIM. The uploaded attributes will be displayed, representing your import file
- To view sample import file formats, click Download sample file formats to access the examples.
- To view sample import file formats, click Download sample file formats to access the examples.
-

Upload your import file using an SFTP location in Unbxd PIM
- On the Overview page, navigate to the Import tab and click “New Import“.
- On the “Manage Import” tab, use the search box to find and select “SFTP” as the import channel.
- Under “Import details,” provide a name for the import to identify it.
- In the “SFTP details” section, click “Add new SFTP” to set up the SFTP location.
- In the “Select SFTP” list, click on “Add SFTP Details.”
- Enter a name for the SFTP connection to identify it.
- Enter the hostname or IP address of the SFTP server where your import file is located.
- Enter the port number associated with the SFTP server. The default SFTP port is 22, but it may vary based on your server configuration.
- Specify the path to the file you want to import on the SFTP server. Make sure to provide the correct file path and filename.
- Enter the username and password credentials to access the SFTP server and the import file.
- To test the connectivity of the SFTP location and ensure the provided details are correct, click on “Test Connection” and wait for the test to complete. If the connection is successful, a confirmation message will be displayed.
- After testing the connection, click “Save” to save the SFTP details.
- Finally, click “Save & Start Import” to initiate the import process from the specified SFTP location.

Upload your file using a public URL
-
- Click on Import
- New Import
- Search and click on Import Via URL
- Enter the URL of a file that is public
- Click on Save & Proceed

Once your file is processed, all the uploaded attributes appear in a tabular format replicating your import file.
Note: You are still in the pre-import phase, and the data in the table is a snapshot of your import file.
For the first import, all the attributes are tagged NEW. You can now start mapping the product attributes so that Unbxd PIM interprets your product information accurately before the actual import. Here, you can also map the product attributes as a new attribute or map to an existing attribute.
Perform These Mandatory steps before starting the actual import
- Map your important PIM attribute
- Configure your attributes.
Steps 1: Map the important PIM attributes
- (mandatory) In the list, select your attribute that is equivalent to a product ID.
- (mandatory) Select your attribute that is equivalent to a product name.
- In the list, select your attribute that is equivalent to a product image.
- If you have a parent ID for your products in the list, select the attribute that is equivalent to a parent id.
- If parent_id is coming from file then you will get another attribute mapping option for variant options select it if you do not have the variant attribute option but you want to create click on Configure All Fields Create an attribute name it similar to variant option click on add transformation and select set and add the attributes based on which you will create variants (example: Color and Size) click on save as draft and go back to map essential page and map that attribute.
- If you have categories for your products, in the list, select the attribute that defines your category structure. Once you map a attribute as “Category,” the attribute will automatically set its data type to “Tree/List.
- To configure these attributes, click Save and proceed.
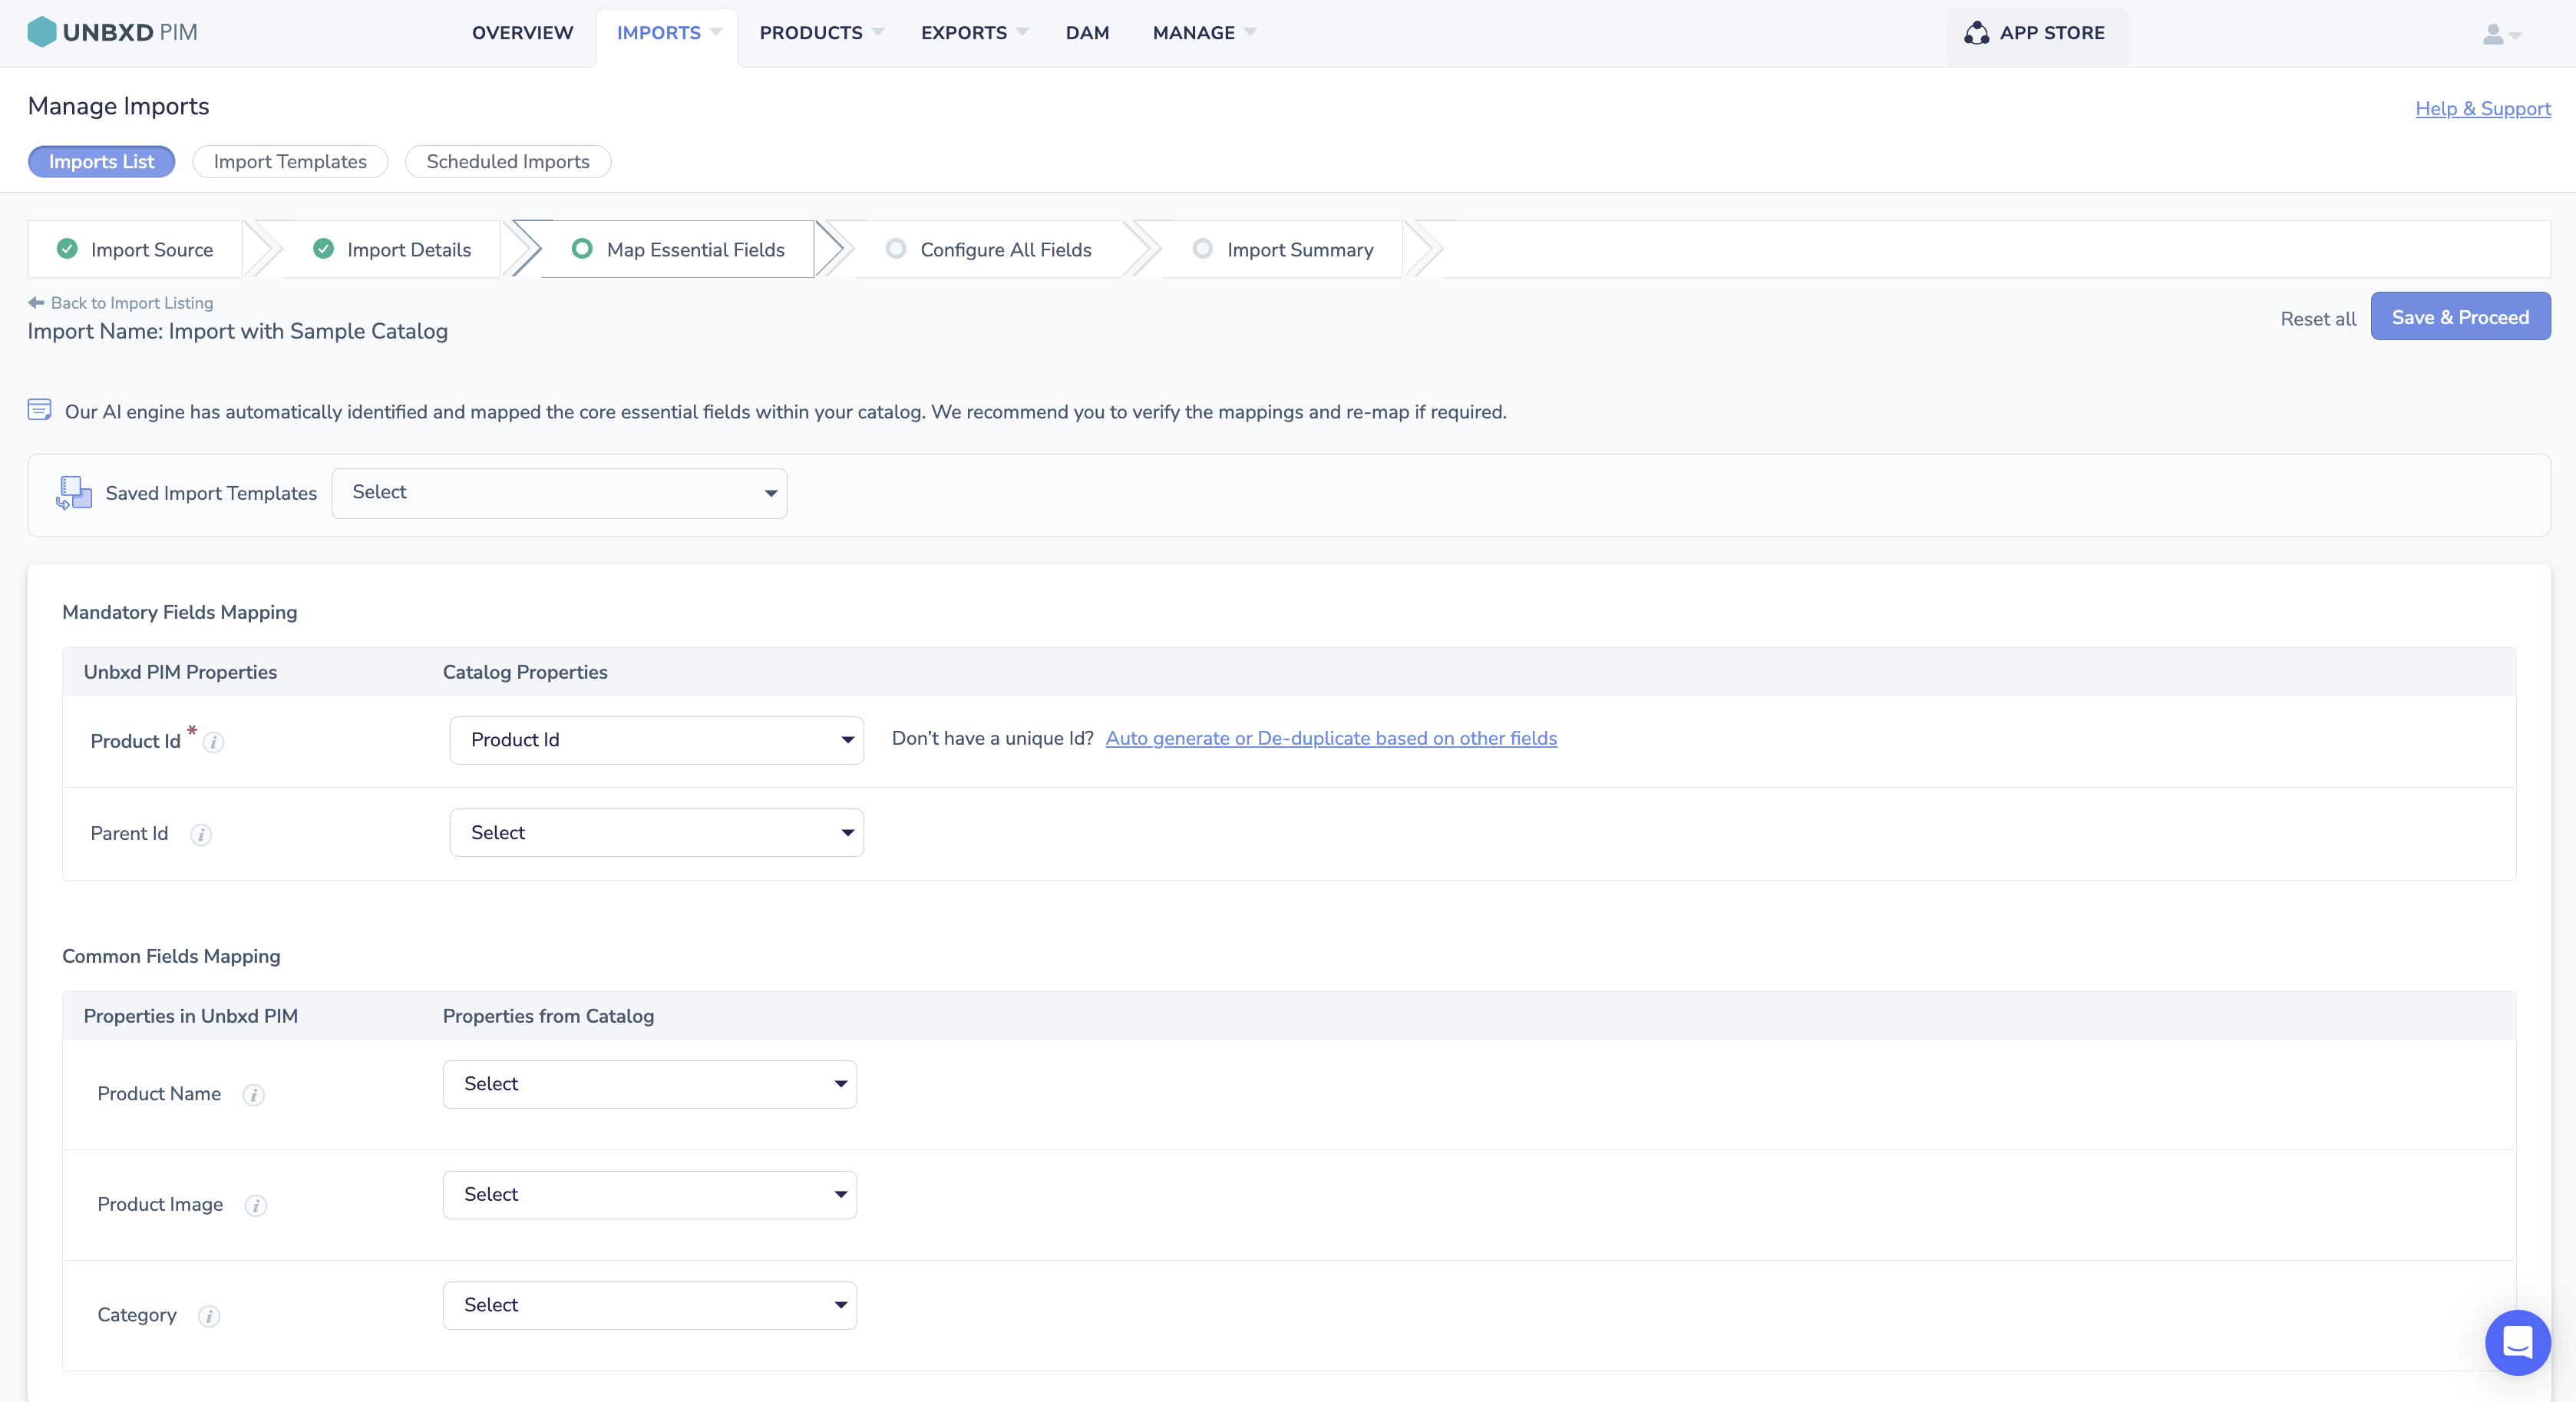
For example, the Product Id might be equivalent to the SKU Id of your import file. The Product Id will be mapped to SKU Id.
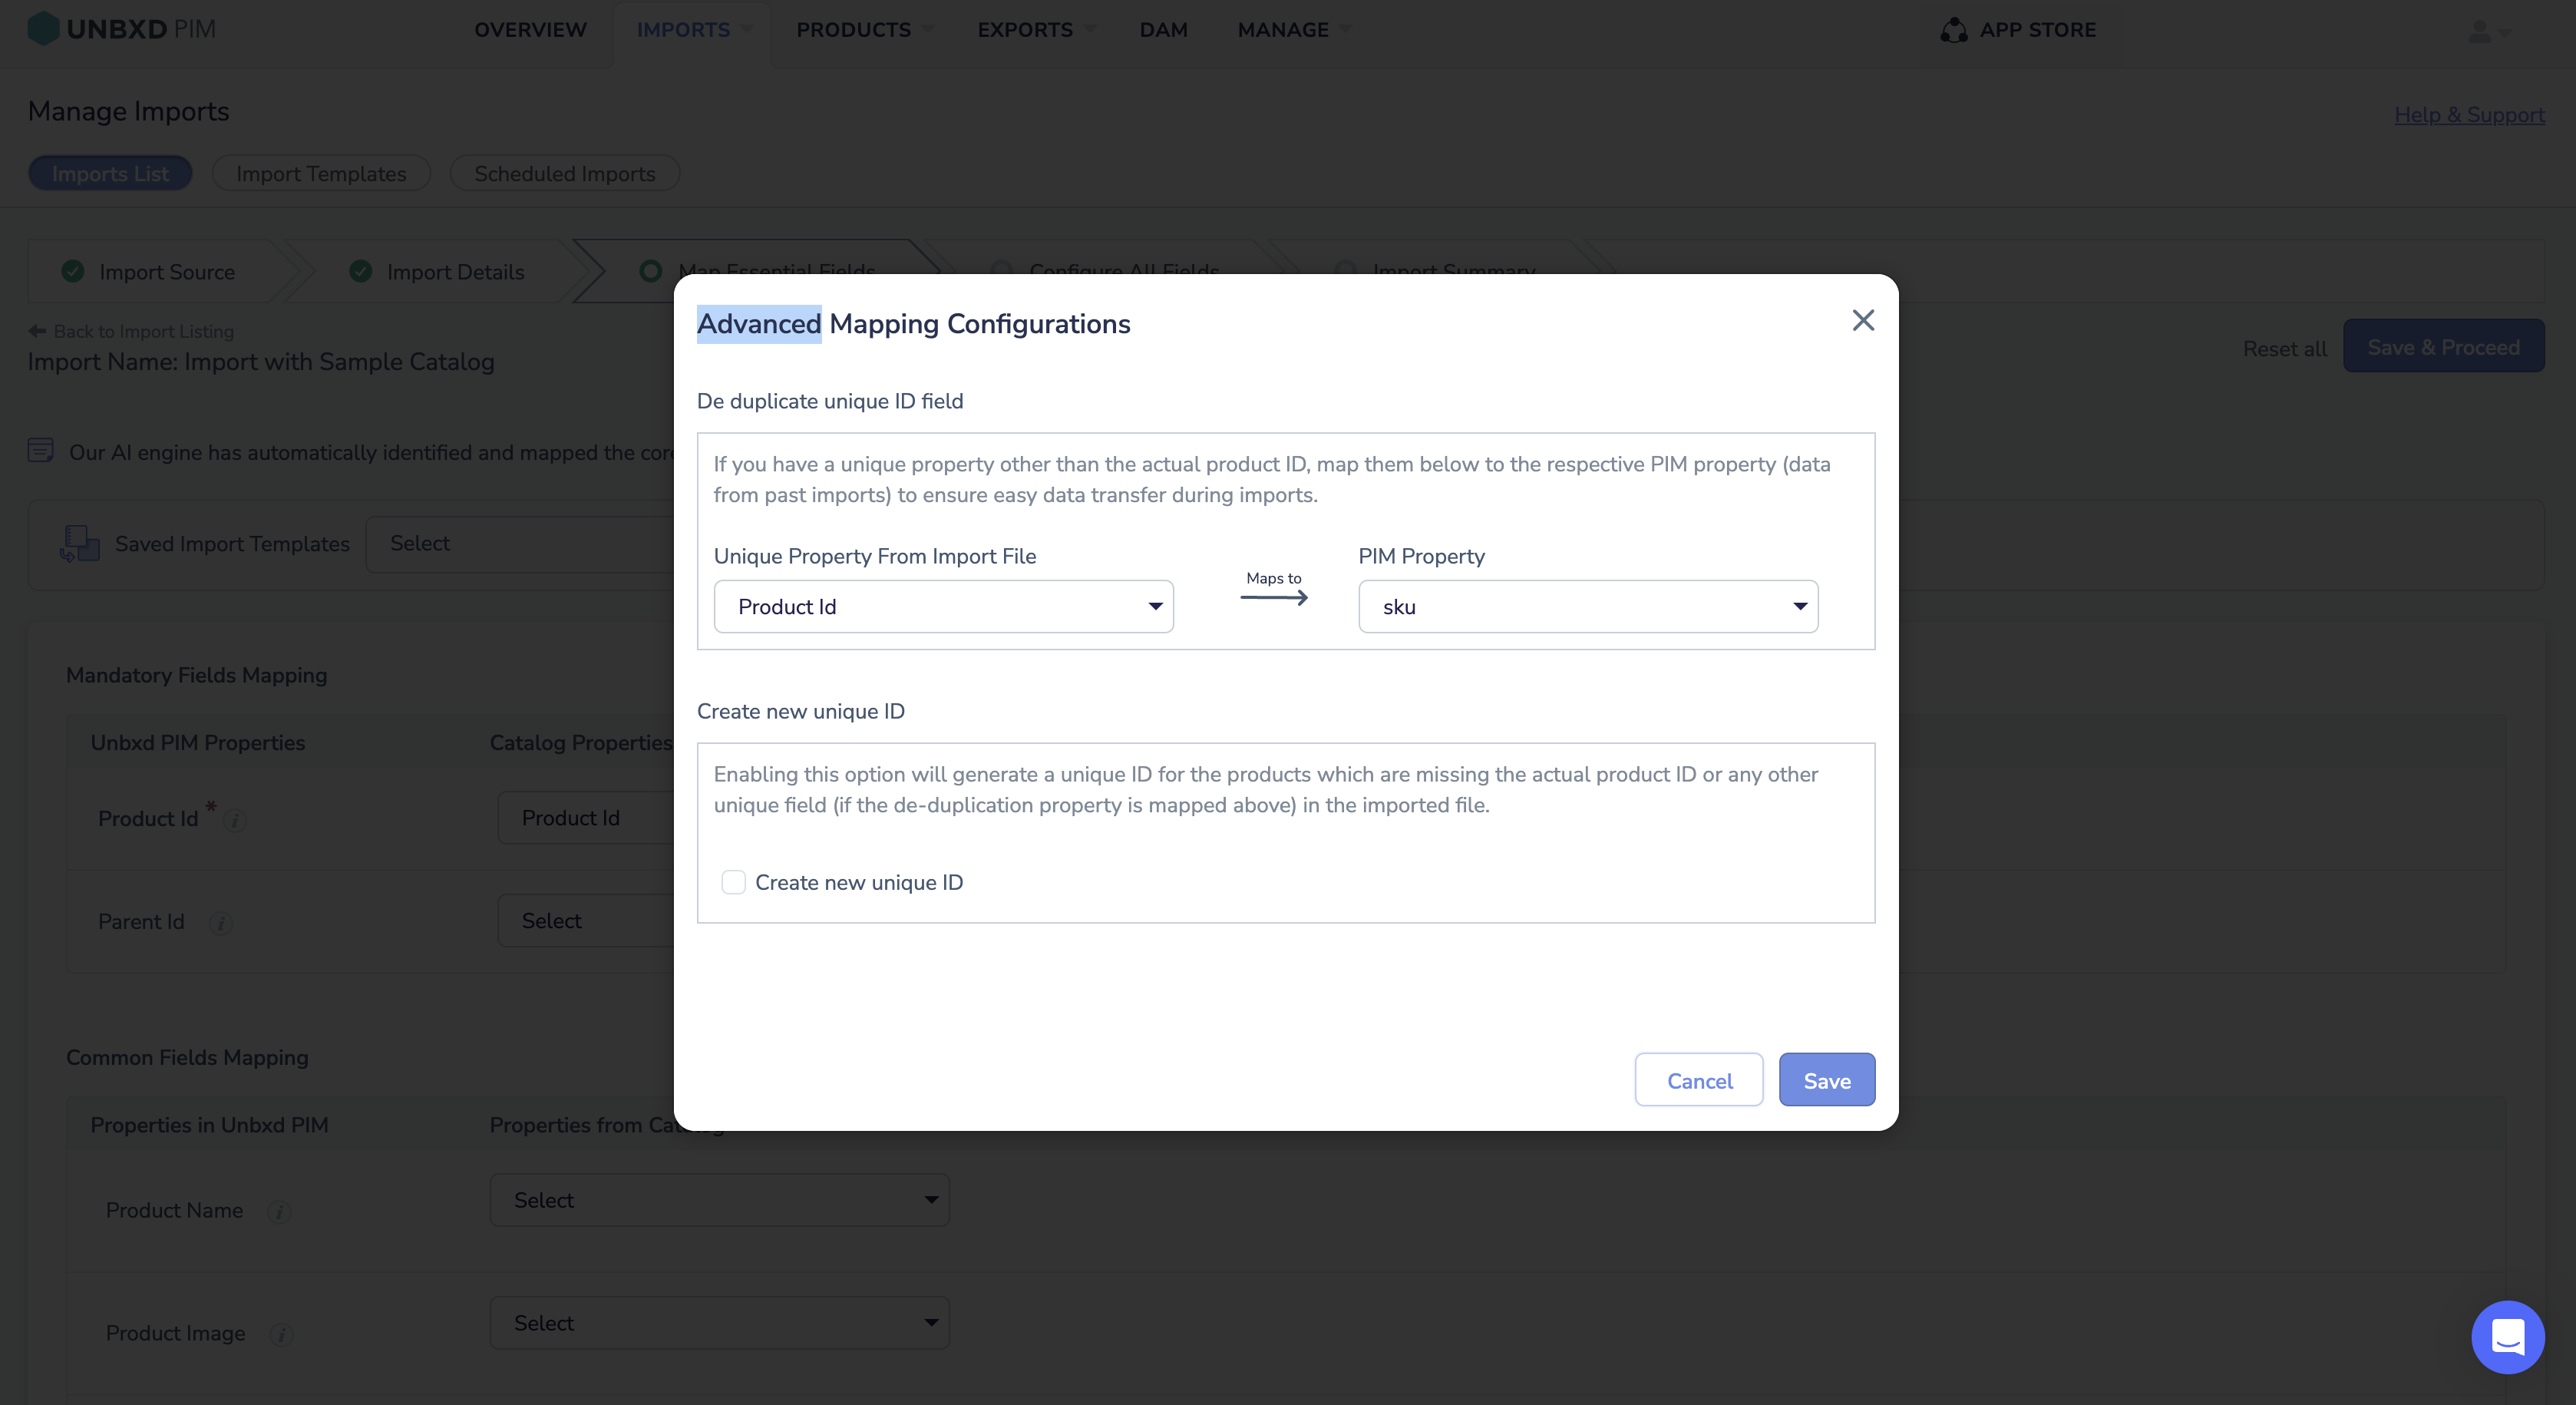
Unique ID Assignment and Duplicate Avoidance
Unbxd PIM offers an exceptional feature that addresses duplicate products and assigns a unique identifier to each product if it doesn’t already have one. This ensures data integrity and uniqueness within the system.
-
- Create a new unique Id: Unbxd PIM will automatically generate a unique identifier for each product that doesn’t have a pre-existing unique ID in the import file. This ensures that every product in your catalog has a distinct identifier within the system.
-
- De-Duplicate: Map the unique attribute from your import file with the unique attribute in Unbxd PIM. This allows the system to identify duplicate products based on the specified unique ID field. The de-duplication process merges duplicate products into a single record, eliminating redundancies in your product catalog.
Generate Unique Ids or Address Duplicate Ids
- Click on Auto-generate or De-duplicate based on other fields
- In Case you have If you have a unique attribute other than the actual product ID, map them below to the respective PIM attribute (data from past imports) to ensure easy data transfer during imports. Map unique file attributes with unique PIM attributes this will avoid duplication. OR
- If you want to Generate unique ids for each product, then checkmark the create new unique id field
- Click on save
 OR
OR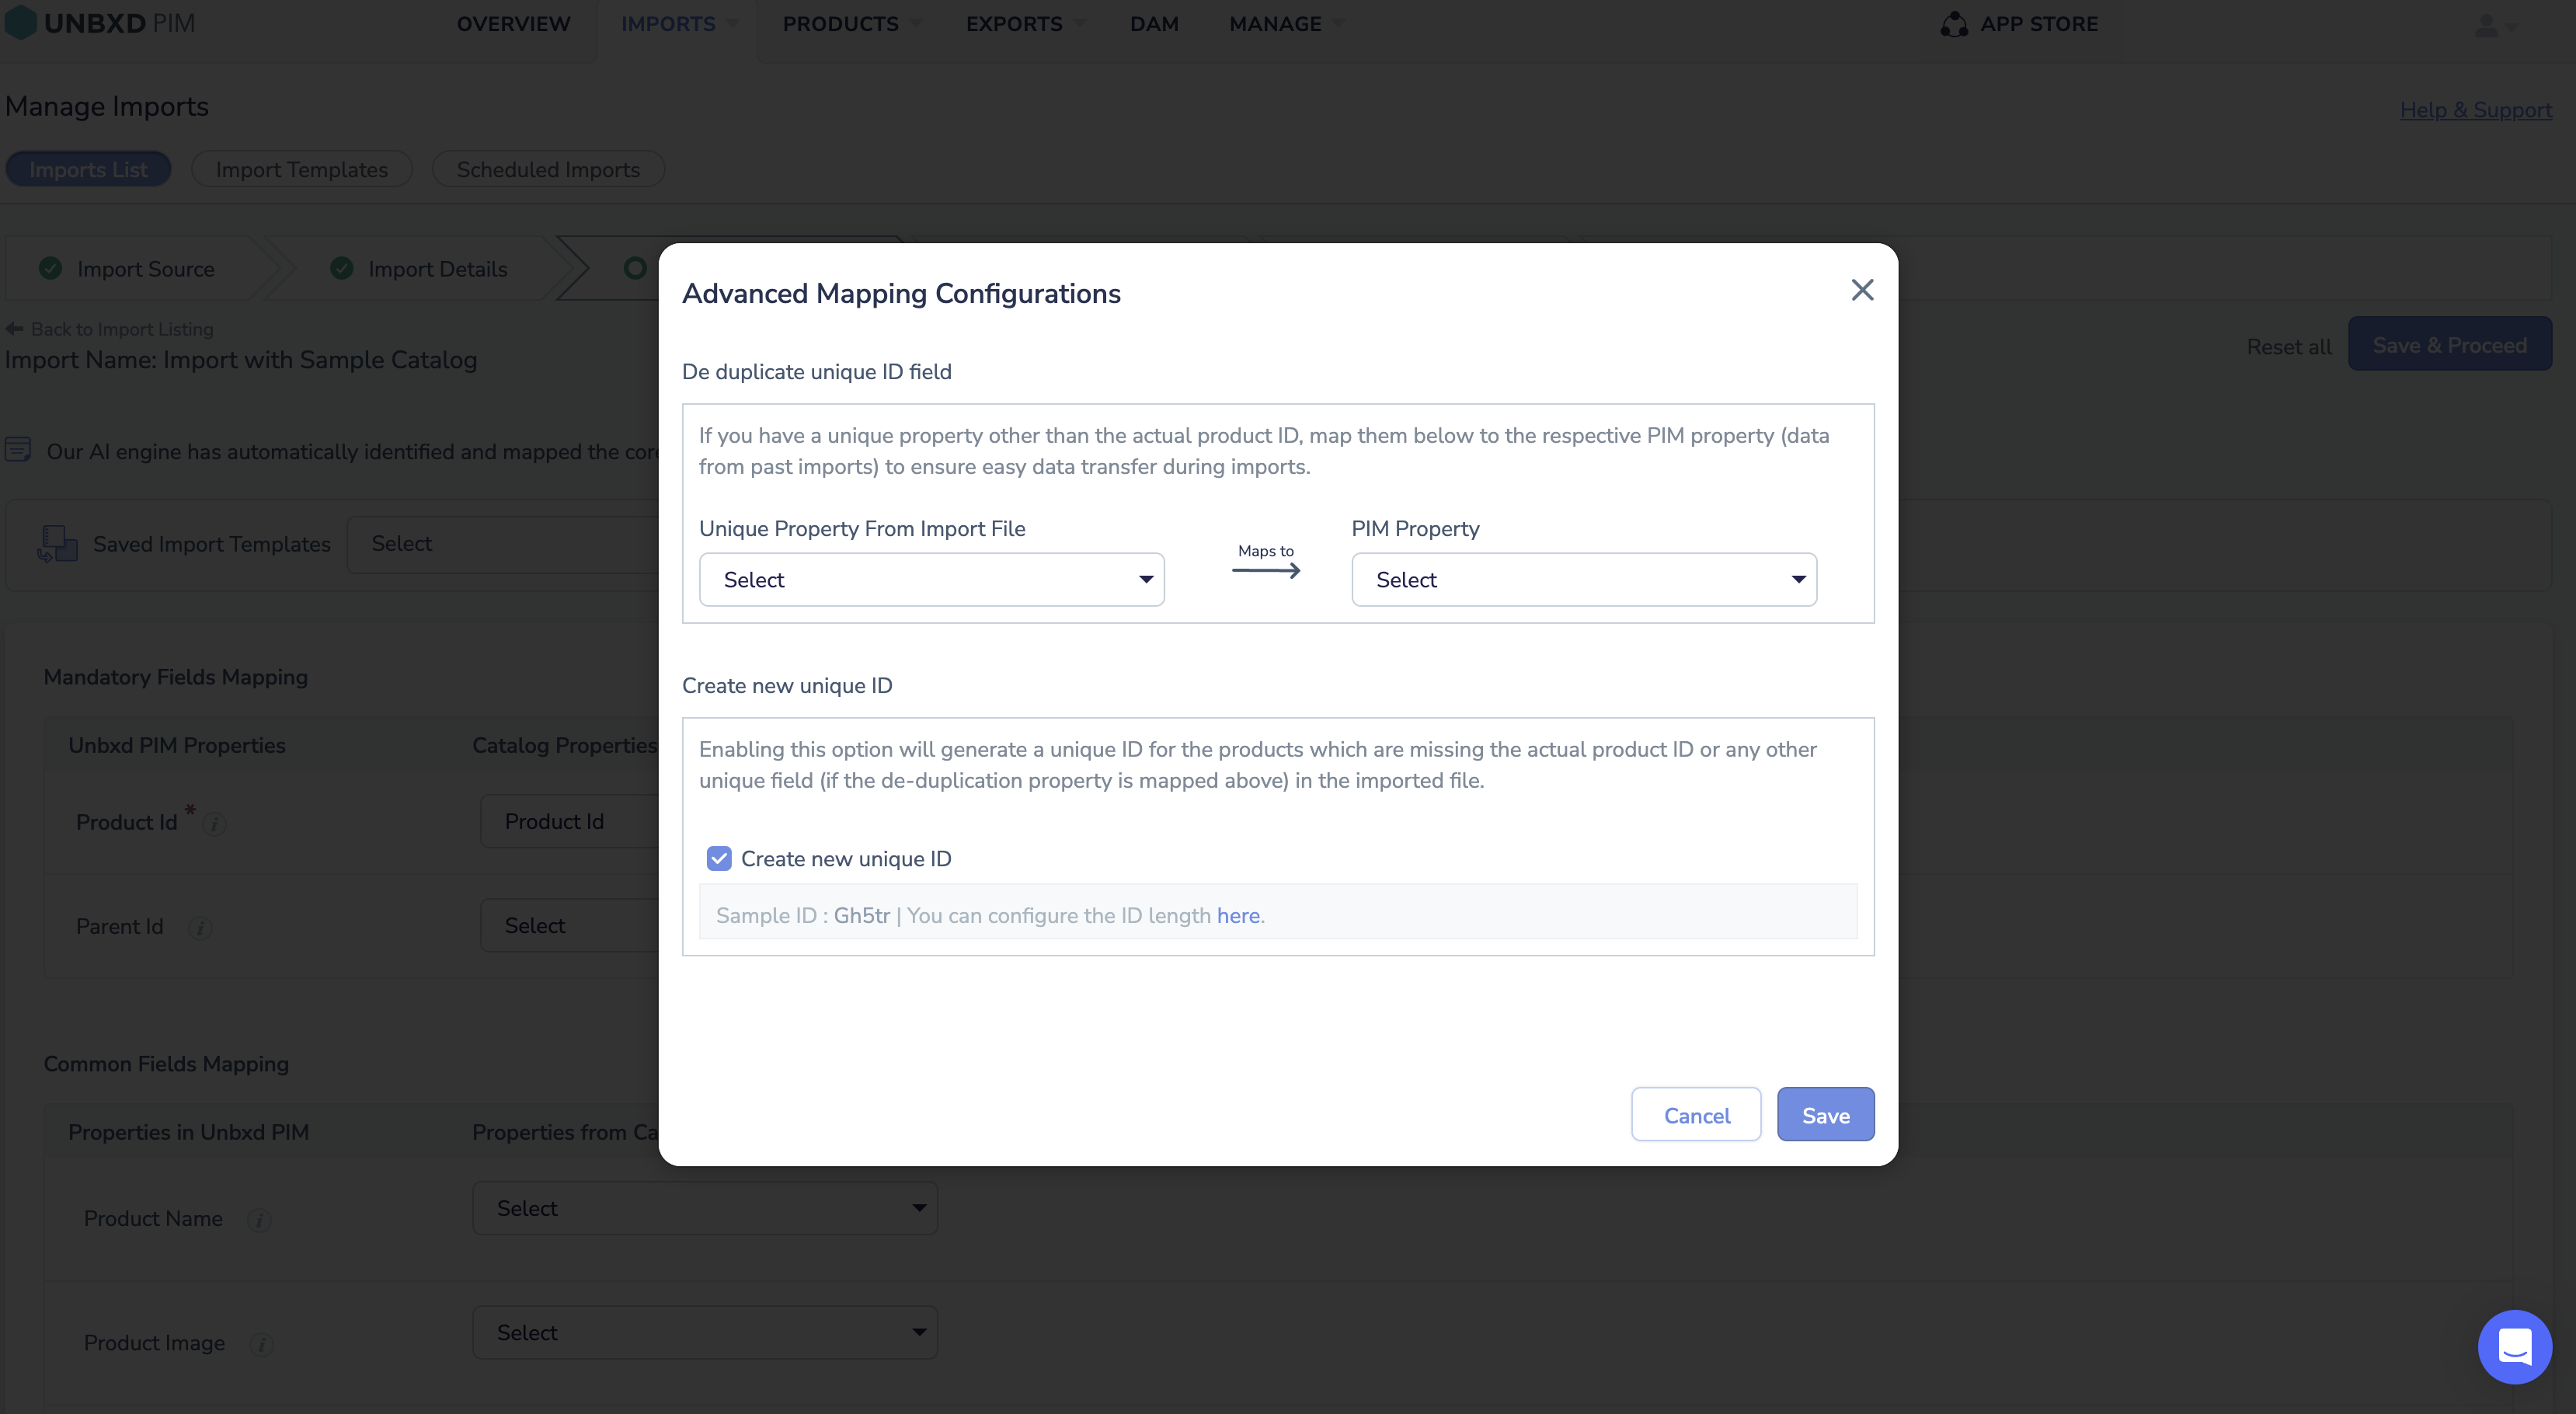
List of New Attributes
New attributes are automatically detected based on the different data types present in the uploaded product information. These attributes represent specific attributes or characteristics of the products being imported. Configuring and managing these attributes is an important step in the import process to ensure accurate and organized product data.
To view the newly created attributes and their associated data types, follow these steps:
-
- After mapping essential fields, click on “Save & Proceed.” This will redirect you to the “Configure All Fields” page.
- On the “Configure All Fields” page, you will find a list of attributes that have been detected from the uploaded data. Each attribute will be displayed along with its corresponding data type.
- Look for the attributes that have been newly created during the import process. These attributes will be tagged as “New.”
- For the newly created attributes, you have the option to select the appropriate data type. Choose the data type that best suits the nature of the data contained in the respective attribute.
- Click on Save & Import
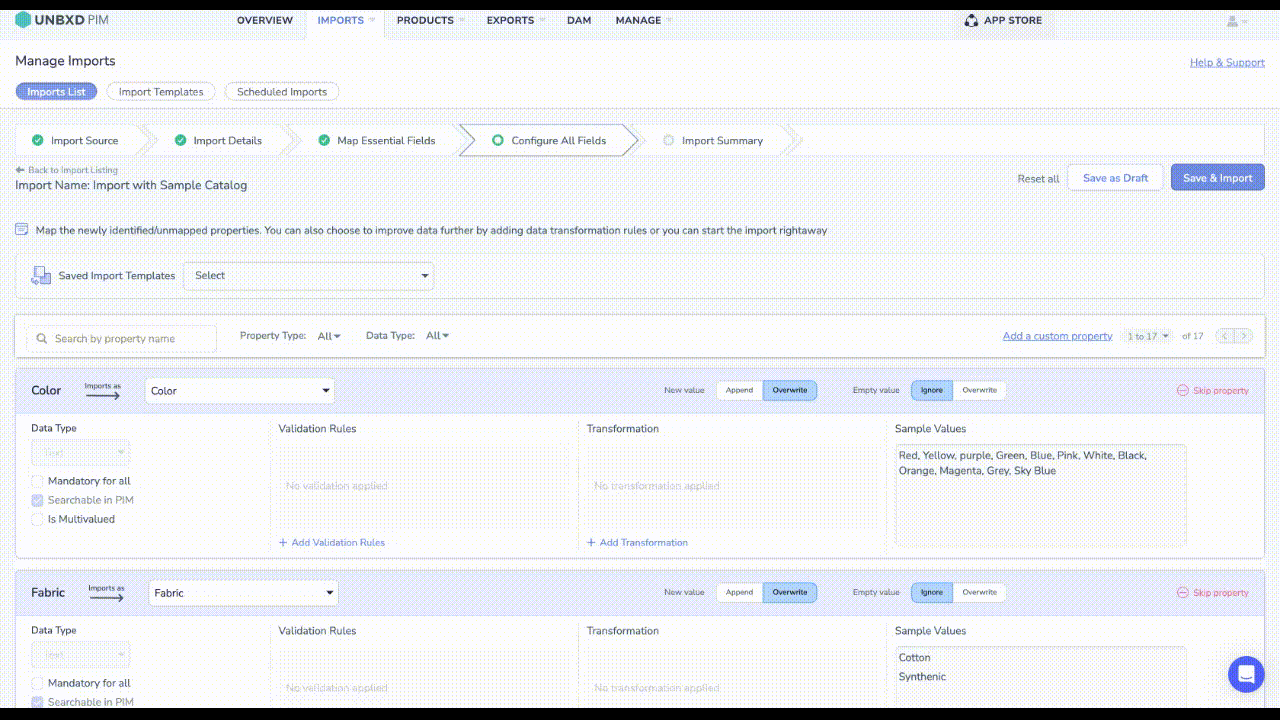
Step 2:Configuring Attributes
Once you have the list of attributes, you can configure them according to your requirements.
Here are the available configurations:
- Map to an Existing Attribute or Create a New Attribute
-
-
- You can choose to map a new attribute to an existing attribute if there is a similar attribute already defined. This helps maintain consistency and avoids duplication.
- If no mapping is available, Unbxd PIM will automatically create a new attribute with the same name.
-
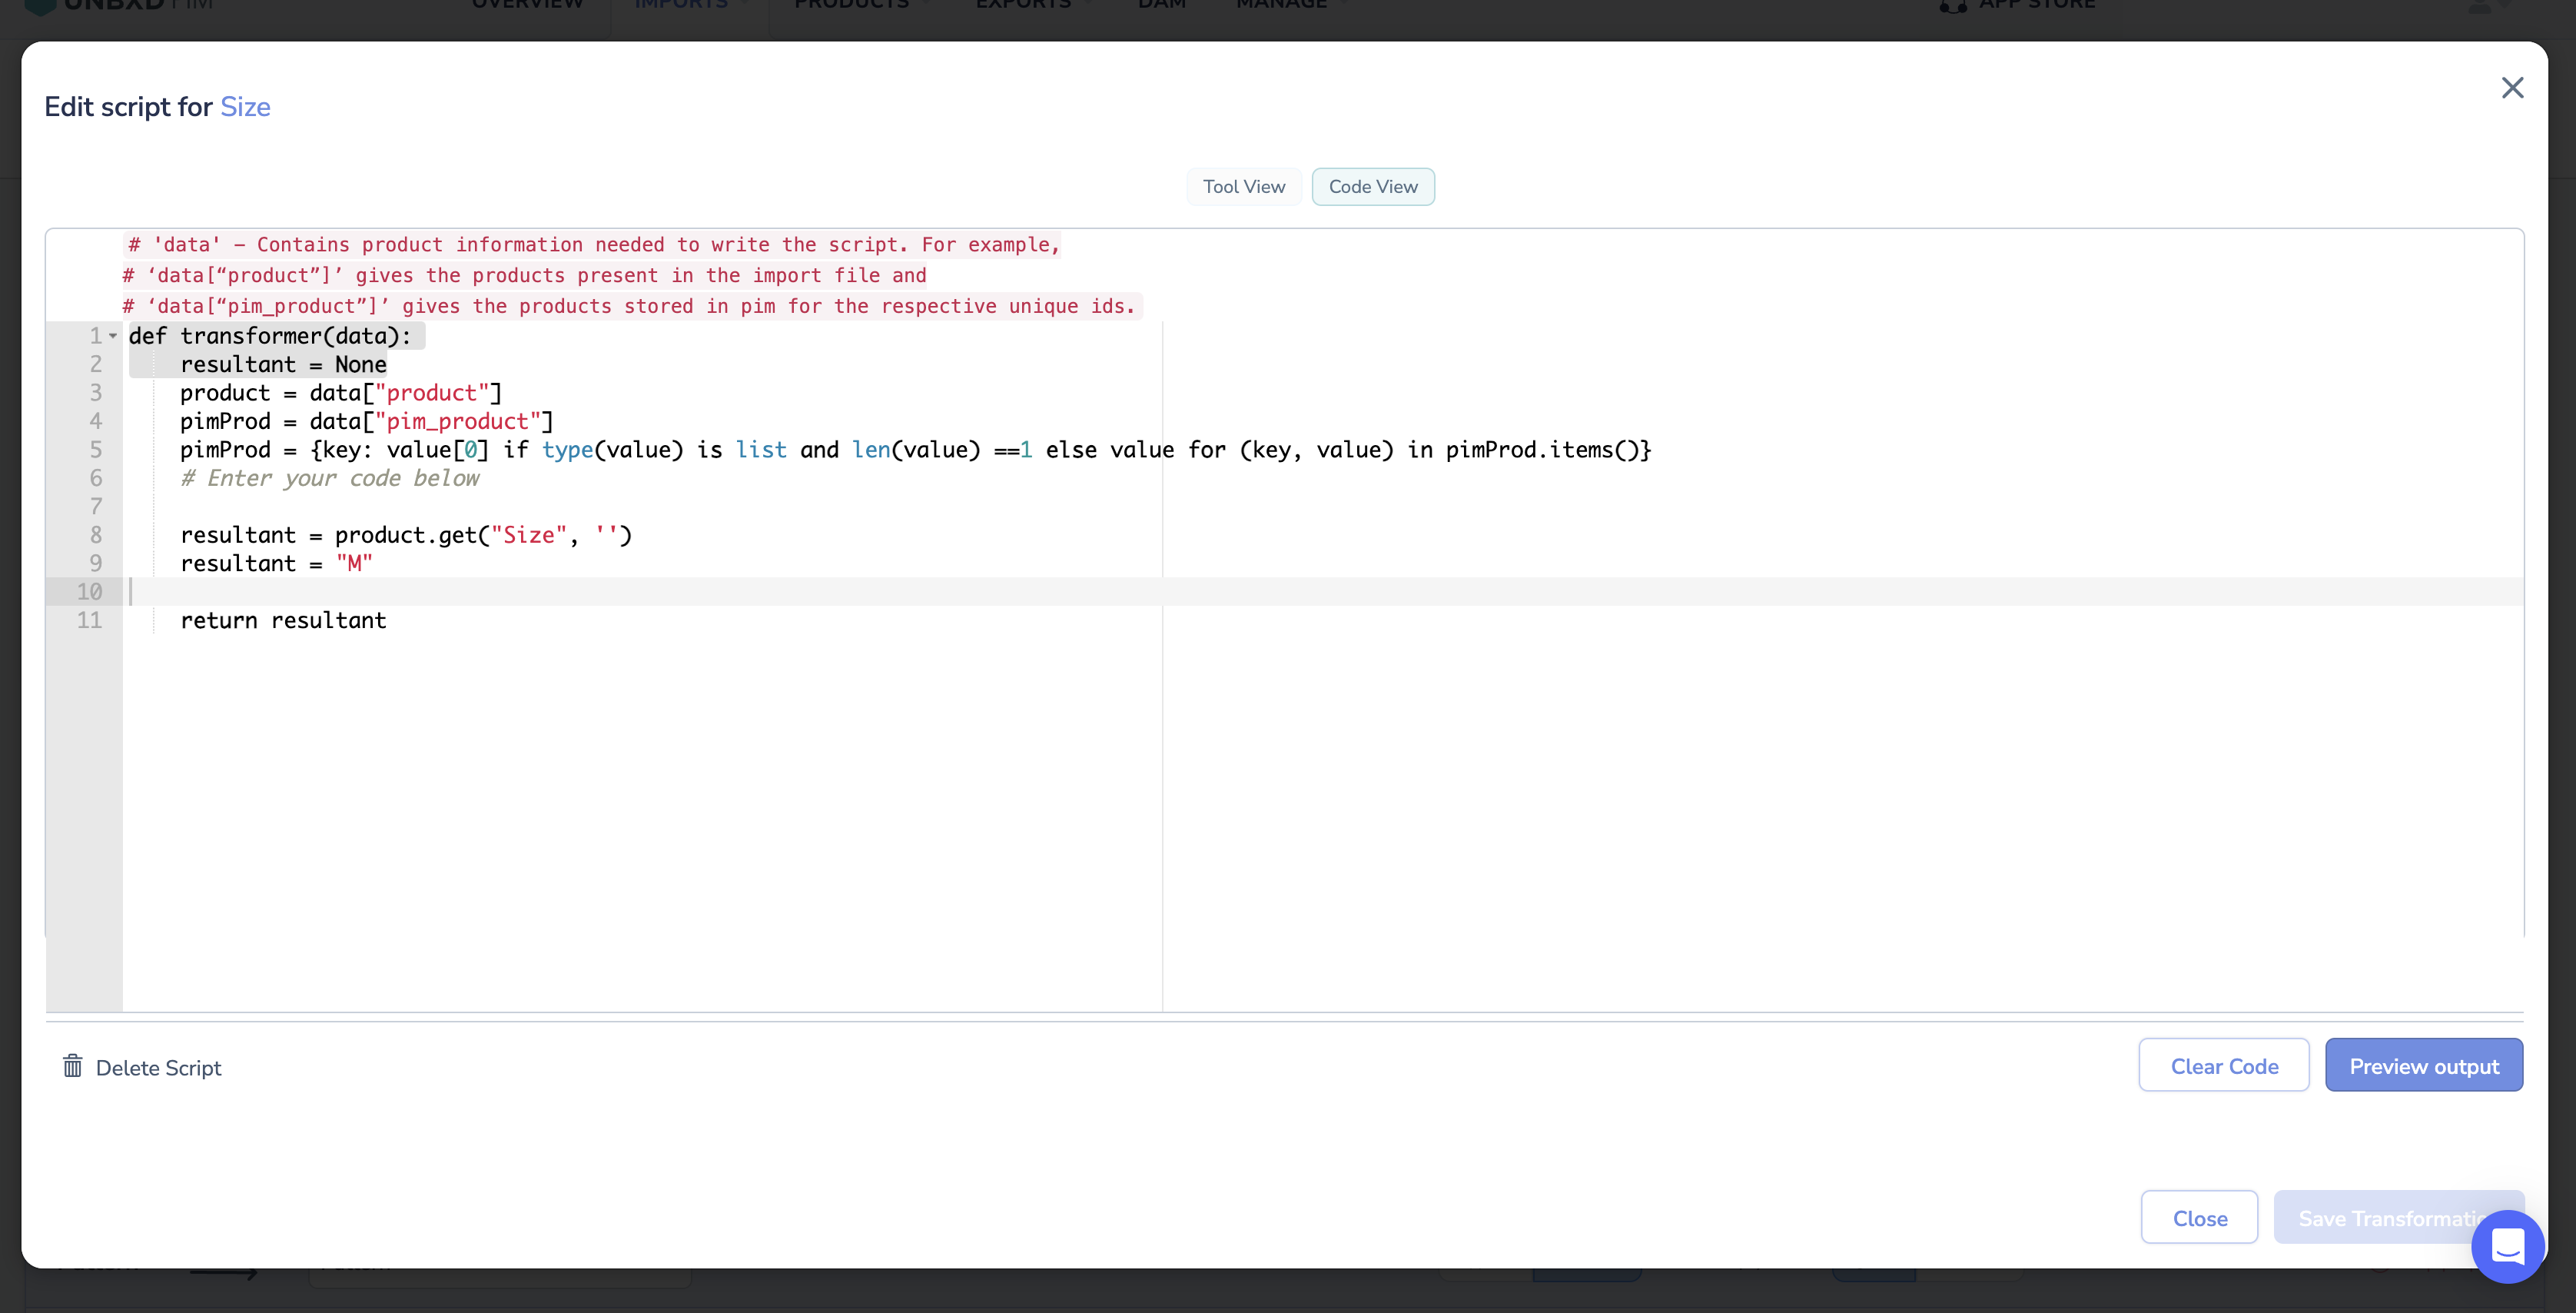
- Writing Scripts for Data Transformation
-
-
- Unbxd PIM allows you to write scripts in Python to perform data transformations. These scripts enable you to manipulate and transform the imported data based on your requirements.
- The Python scripting language is used for its readability and simplicity.
-
- Selecting the Data Type
-
-
- Each attribute has a specific data type assigned to it, such as Text, Number, Date, Link, Boolean, File, Image, Tree/List, or Text Area.
- You can select the appropriate data type for each attribute to ensure data consistency and accurate handling.
-
- Making a Attribute Searchable in PIM:
-
-
- You have the option to make a attribute searchable within the PIM system. By enabling this, you can search for values of that attribute in the Products Listing page.
- By default, attributes equivalent to the product ID and product name are set as searchable.
-
- Defining Multivalued Separators:
-
-
- Suppose a attribute has multiple values within a specific column of the import file. In that case, you can define a separator to split and import those values as separate values instead of a single value.
- This is useful when dealing with attributes that have multiple attributes or options.
-
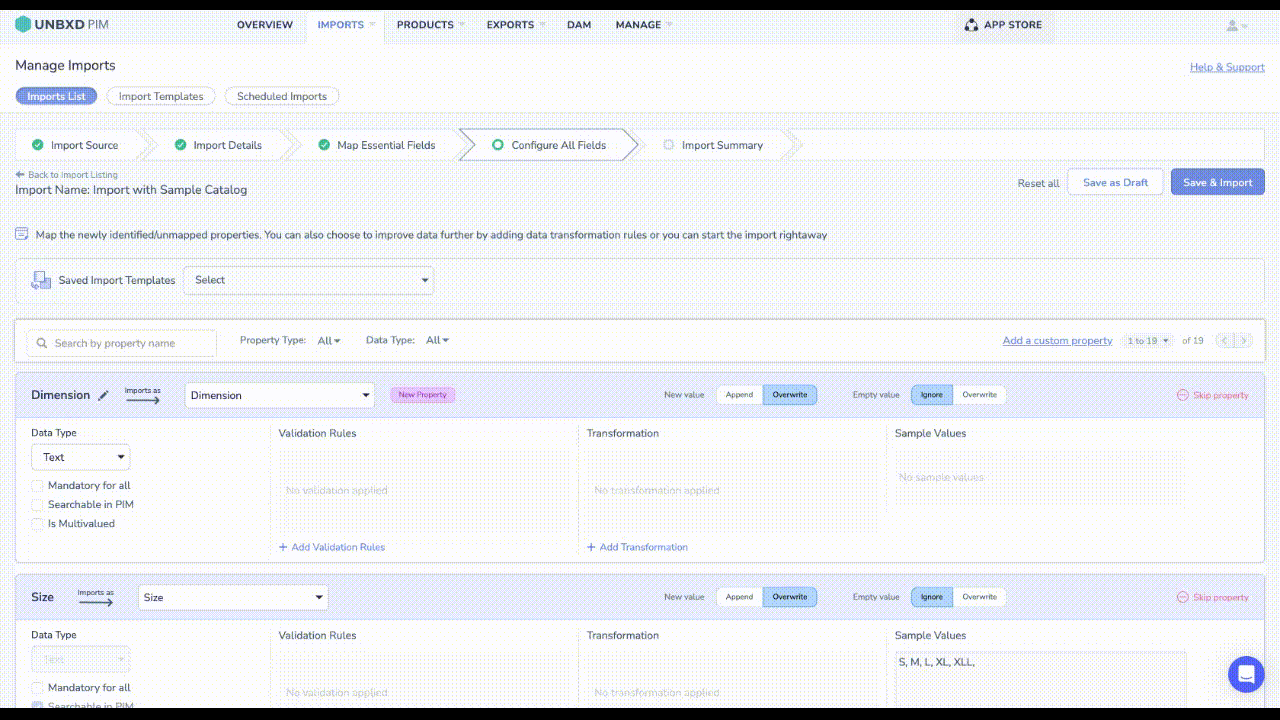
Adding a new attribute
Unbxd PIM provides the flexibility to add new custom attributes columns during the pre-import phase. These columns can be mapped to existing attributes or automatically created new attributes.
Additionally, you can write scripts to populate the values of the new column based on other attributes columns. This enables you to tailor the product information according to your specific requirements.
Example:
You can create a custom column called “Product Title” that combines the values of both “Brand” and “Product Name.“
Add a new custom attribute
- In Configure All Field Page
- Click on Add a custom attribute
- Mapping Options
-
-
- Once you select the option to add a custom attribute column, you will be presented with mapping options.
- Choose whether to map the new column to an existing attribute or let Unbxd PIM automatically create a new attribute.
-
- Writing Scripts (Optional)
-
-
- If you want to populate the values of the new column using other attribute columns, you can write a script.
- Using the Python scripting language, you can define the logic for fetching and combining values from different attributes.
-
- Configuring Attributes
-
- After adding the custom attributes, you can continue configuring other attributes and their respective mappings.
Remove a new custom column
- If, for any reason, you need to remove the newly added custom column,
- Click on the “Skip Attribute” option.
Now, let us get back to configuring attributes.
Mapping Attribute
If you want to map the attribute to an existing attribute, in the Map to list, map the attribute to an existing attribute. If there is no mapping, it will automatically create a new attribute with the same name. For example, you can map the new attribute “Product Name” to an existing attribute “Title”. The attribute “Title” is created via the Attribute section. For more information about creating a new attribute, see Creating a New Attribute.
Performing Data Transformations in Unbxd PIM
In Unbxd PIM, you have the flexibility to perform data transformations on your product information. This allows you to modify and manipulate the content before it is ingested into the PIM system.
There are two ways to perform data transformations:
-
- Code View
-
- On the “Configure all fields” page, locate the attribute for which you want to add a transformation script.
- Click on the “+ Add Transformation” button for that attribute.
- By default, you will be in the tool view. Switch to the code view by clicking on the code view confirmation tab.
- In the code view, you can write Python scripts to perform the desired data transformations.
- Once you have added the code, click on “Preview Output” to see the transformed data.
- If the preview output is as expected, the “Save Transformation” option will be enabled. Click on it to save the transformation script.
-
- Tool View
-
- On the “Configure all fields” page, click on the “+ Add Transformation” button for the attribute you want to modify.
- By default, you will be in the tool view.
- The tool view provides a range of operations you can select for data transformation.
- Select the desired operation from the “Select Operation” list based on your requirements.
- Depending on the selected operation, enter the necessary values in the provided fields.
- If you want to combine multiple operations, click on “Add another operation” and repeat the steps.
- To view sample values for a propert, click on “Show sample values” and select the property.
-
- Code View

Once you have configured the transformation, click on “Save” to save the changes.
| Operations | Sample Scenario | Steps |
| Text Rules | ||
| Copy | Populate the “Long Description” attribute with the content from the “Short Description” attribute for all products in your product catalog |
|
| Set | Automate the process of setting the brand name for products in your Unbxd PIM product catalog |
|
| Replace | Replace all occurrences of “Crimson” for the attribute “Color” with “Red” |
|
| Join | Join two atttributes “ Brand” and “Product Name” using the joining value “-” |
|
| Prefix | Prefix (add something at the beginning) US currency “$” for the attribute “Price” |
|
| Suffix | Suffix (add something at the end) registered trademark to the values of the attribute “Product Name” |
|
| Split & pick | Split the attribute “Image URL” and pick the image name
Example: Split the image url with “/” and pick the image name “174833handbag.jpg” When you specify the “split by” value as “/” and the “pick position” value as “6”, and execute the script, the url first splits into the following: The result will be 174833handbag.jpg |
|
| Remove HTML | You have a product catalog in Unbxd PIM that includes a attribute called “Product Description.” However, some of the product descriptions contain HTML tags, such as
, , or . To present the product information in a more readable format and remove the HTML tags, you can use the Remove HTML Tag operation. |
|
| Remove special character | You have a product catalog in Unbxd PIM that includes a attribute called “Product Name.” However, some of the product names contain special characters such as symbols or punctuation marks. To ensure consistency and improve data quality, you want to remove these special characters from the product names using the Remove Special Character operation. |
|
| Generate Partial Search | You have a product catalog in Unbxd PIM with a attribute called “Product Name.” To improve search accuracy and provide better search results to users, you want to generate partial search terms based on the product names. This will enable users to find products even if they enter a partial or incomplete search query. |
|
| Lower Case | You have a product catalog in Unbxd PIM that includes a attribute called “Product Title.” However, the product titles are inconsistently formatted, with some in uppercase, others in title case, and some in lowercase. To ensure uniformity and improve the overall presentation, you want to convert all product titles to lowercase using the Lowercase operation. |
|
| Upper case | You have a product catalog in Unbxd PIM that includes a attribute called “Product Name.” However, the product names are inconsistently formatted, with some in lowercase, others in title case, and some in uppercase. To ensure uniformity and improve the overall presentation, you want to convert all product names to uppercase using the Uppercase operation. |
|
| Title Case | You have a product catalog in Unbxd PIM that includes a attribute called “Product Description.” However, the product descriptions are inconsistently formatted, with some in uppercase, others in lowercase, and some in mixed case. To ensure uniformity and improve the overall presentation, you want to convert all product descriptions to title case using the Title Case operation. |
|
| Capitalize | You have a product catalog in Unbxd PIM that includes a attribute called “Product Category.” However, the category names are inconsistently formatted, with some in lowercase, others in uppercase, and some in mixed case. To ensure uniformity and improve the overall presentation, you want to capitalize the first letter of each word in the category names using the Capitalize operation. |
|
| Zero Pad | You have a product catalog in Unbxd PIM that includes a attribute called “Product Code.” The product codes are numeric values, but some of them have inconsistent lengths. To standardize the formatting and ensure a consistent number of digits, you want to add leading zeros to the product codes using the Zero Pad operation. |
|
| Number Rules | ||
| Addition | Add two numerical attribute values for attributes “ Base Price” and “Delivery Charges”. That is,
Actual price = Base price + Delivery charges |
|
| Subtraction | Subtract two numerical attribute values for attributes “ Actual Price” and “Discounted Price”. That is, Offer Price= Actual Price- Discount Price |
|
| Multiplication | Multiply two numerical attribute values for attributes “Number of Units” and “Price per Unit”. That is, Total Price = “Number of Units” * “Price per Unit” |
|
| Division | Divide two numerical attribute values for attributes “Total Weight of the Products” and “Total Weight of the Carton”. That is, Per Unit Weight = Total Weight of the Products / Total Weight of the Carton |
|
| Add number value | Product catalog in Unbxd PIM includes a attribute called “Price.” However,to increase all product prices by a specific value, such as a discount or tax percentage. To automate this calculation and update the prices accordingly,use the Add Number Value operation. |
|
| Substract number value | Product catalog in Unbxd PIM includes a attribute called “Price.” However, to increase all product prices by a specific value, such as a discount or tax percentage. To automate this calculation and update the prices accordingly, you can use the Add Number Value operation. |
|
| Multiply number value | Product catalog in Unbxd PIM includes a attribute called “Unit Price.” However, you want to adjust the prices based on a specific factor, such as a markup or discount percentage. To automate this calculation and update the prices accordingly, you can use the Multiply Number Value operation. |
|
| Divide number value | Product catalog in Unbxd PIM includes a attribute called “Unit Price.” However, you want to adjust the prices based on a specific factor, such as a markup or discount percentage. To automate this calculation and update the prices accordingly, you can use the Divide Number Value operation. |
|
| Percentage | Get % portion of a particular attribute value. That is,
Offer Price= 80% of Actual Price |
|
| Convert Integer to float | Product catalog in Unbxd PIM includes a attribute called “Weight.” However, the weight values are currently stored as integers, representing whole numbers. To provide more precise weight information, convert the integer values to floating-point numbers. |
|
| Ceil | If a product has an average rating of 3.7, applying the Ceiling operation with zero decimal places will round it up to 4. Similarly, if another product has an average rating of 2.2, it will also be rounded up to 3 |
|
| Convert float to integer | You have a product catalog in Unbxd PIM that includes a attribute called “Quantity.” The quantity values are currently stored as floating-point numbers, but you want to represent them as whole numbers without decimal places for consistency and simplicity. To achieve this, you can use the Convert Float to Integer operation. |
|
| Round off | Round off the attribute values of a attribute “Weight” upto two decimal places
That is, the value 114.7261 will become 114.73 |
|
| Import Utility Rules | ||
| Merge | Product data coming from multiple sources, each containing specific information about the products. To create a unified view of the products and consolidate the data,use the Merge operation within an Import Utility rule. |
|
| DeDuplicate | You have an import file containing product data from different sources, and there might be instances where duplicate products exist with slightly different information. To streamline your product catalog and avoid duplicates, you can use the De-duplicate operation within an Import Utility rule. |
|
-
-
- If you want to combine another operation with the previous operation, click Add another operation.
- If you want to copy the automatically generated code, click Copy Code.
- If you want to preview the output of your code, click Preview Output.
- Click Save.
-
For more information about transformation scripts, see Working with Transformation Scripts.
Append or Overwrite the New Values
In the Unbxd PIM system, you have the flexibility to choose how new data is handled for a attribute using the “Append” or “Overwrite” option. This allows you to customize the behavior when updating attributes in your product catalog. Here are two examples illustrating the Append and Overwrite options:
Append Example: Attributes : “Product Features” Existing Value: “Waterproof, Lightweight” New Value: “Durable” Append Option: Selected
Result: After applying the Append function, the updated “Product Features” attributes will be “Waterproof, Lightweight, Durable”. The new value “Durable” is appended to the existing features, maintaining the previous values.
Overwrite Example: Attributes: “Product Features” Existing Value: “Wireless, Noise-cancelling” New Value: (No value provided) Append Option: Not selected (Overwrite option is chosen)
Result: The existing value “Wireless, Noise-cancelling” is completely overwritten with an empty value. The updated “Product Features” attributes will be an empty field, as the new value is not provided.

Ignore or Overwrite Empty Values
In the Unbxd PIM system, you have the flexibility to choose how empty or missing data is handled for a attributes using the “Ignore” or “Overwrite” options.
Ignore
When you select the “Ignore” option, the system will keep the field or attribute blank if no data is provided. This means that if there is missing information, the field will not be populated with any default or placeholder value. The product information will be saved as is, with the missing data, allowing you to keep track of attributes that have missing values.
This option is suitable when the attribute is not essential or required for the product, and you want to maintain visibility of the missing data.
Example: If you select the “Ignore” option for the “Product Weight” attribute, the system will keep the field blank if no weight information is provided for a product in the import file. This allows you to maintain the visibility of products with missing weight data. For example, if the file includes products A, B, and C, but only products A and B have weight values, the “Product Weight” field for product C will be empty. This option is suitable when the weight is not essential for all products and you want to track which products have missing weight information.
Overwrite
Selecting the “Overwrite” option instructs the system to replace any existing data in the field or attribute with an empty value if no data is provided during import or update. This ensures the field is cleared of any previous data and saved as an empty value.
It is useful when you want to enforce completeness and ensure that all attributes are kept up-to-date. This option is typically chosen for attributes that are essential for the product and should not have any missing values.
In Unbxd PIM, the data types for product attributes are automatically detected during the import process based on the uploaded file. However, you have the flexibility to change the data type for each attribute when importing the file for the first time.
Example: Overwrite Option: On the other hand, if you select the “Overwrite” option for the “Product Color” attribute, the system will replace any existing color data with an empty value if no color information is provided during import. This ensures that the “Product Color” field is cleared of any previous data. For example, if the file includes products X, Y, and Z, and only product Y has a color value, the “Product Color” field for products X and Z will be overwritten and saved as an empty value. This option is useful when you want to enforce completeness and ensure that all products have up-to-date color information.

Set the data type for a specific attribute
- On the import configuration page, locate the attribute for which you want to set the data type.
- In the “Data Type” column, you will find a dropdown list. Click on the dropdown to view the available data types.
- Select the appropriate data type from the list.
- Text: Used for alphanumeric text values, such as product names or descriptions.
- Number: Used for numerical values, such as prices or quantities.
- Date: Used for date values, such as release dates or expiration dates.
- Link: Used for hyperlink values, such as URLs or product links.
- Boolean: Used for boolean values, representing true or false.
- File: Used for file attachments, such as product manuals or specifications.
- Image: Specifically for image files, allowing you to associate product images.
- Tree/List: Used for hierarchical or list-based structures, enabling you to define categories or variations.
- Text Area: Used for larger text content, such as detailed descriptions or notes.

-
-
- If you prefer, you can also filter for a specific data type using the Data Type filter.
- Once you have selected the desired data type, it will be assigned to the attribute.
- For more information on attribute data types, see Attribute Data Types.
-
Making a Attribute Searchable
If you want to make a attribute searchable, select Searchable in PIM check box.
Note: By default, attributes equivalent to product id and product name are set as searchable.
Once a attribute is made searchable, you can search for its values in the Products Listing page. For example, post the import, there are products with the “3900” in the Price. Searching for the same in the Products Listing page gave the following results:
Attribute with Multiple Values
When dealing with a attribute with multiple values in a specific column of your import file, Unbxd PIM provides a feature to handle this scenario effectively. Here’s how you can handle attributes with multiple values:
-
-
- During the import process, locate the column that contains the attribute with multiple values.
- Select the “Is multivalued” checkbox for that column.
- Enter the separator that separates the multiple values within the column. This separator can be any character or string that you specify.
- Proceed with the import process.
-
By enabling the “Is multivalued” option and specifying the separator, Unbxd PIM recognizes that the attribute in that column can have multiple values. The values will be split based on the specified separator, and each value will be treated as a separate value for that attribute.
Example:
Let’s say you have a column named “Tags” that contains multiple tags separated by commas. If you enable the “Have multivalued separator” option and specify the comma (“,”) as the separator, Unbxd PIM will import each tag as a separate value for the “Tags” attribute. This allows you to manage and search for individual tags within the PIM system.
Confirmation before Import
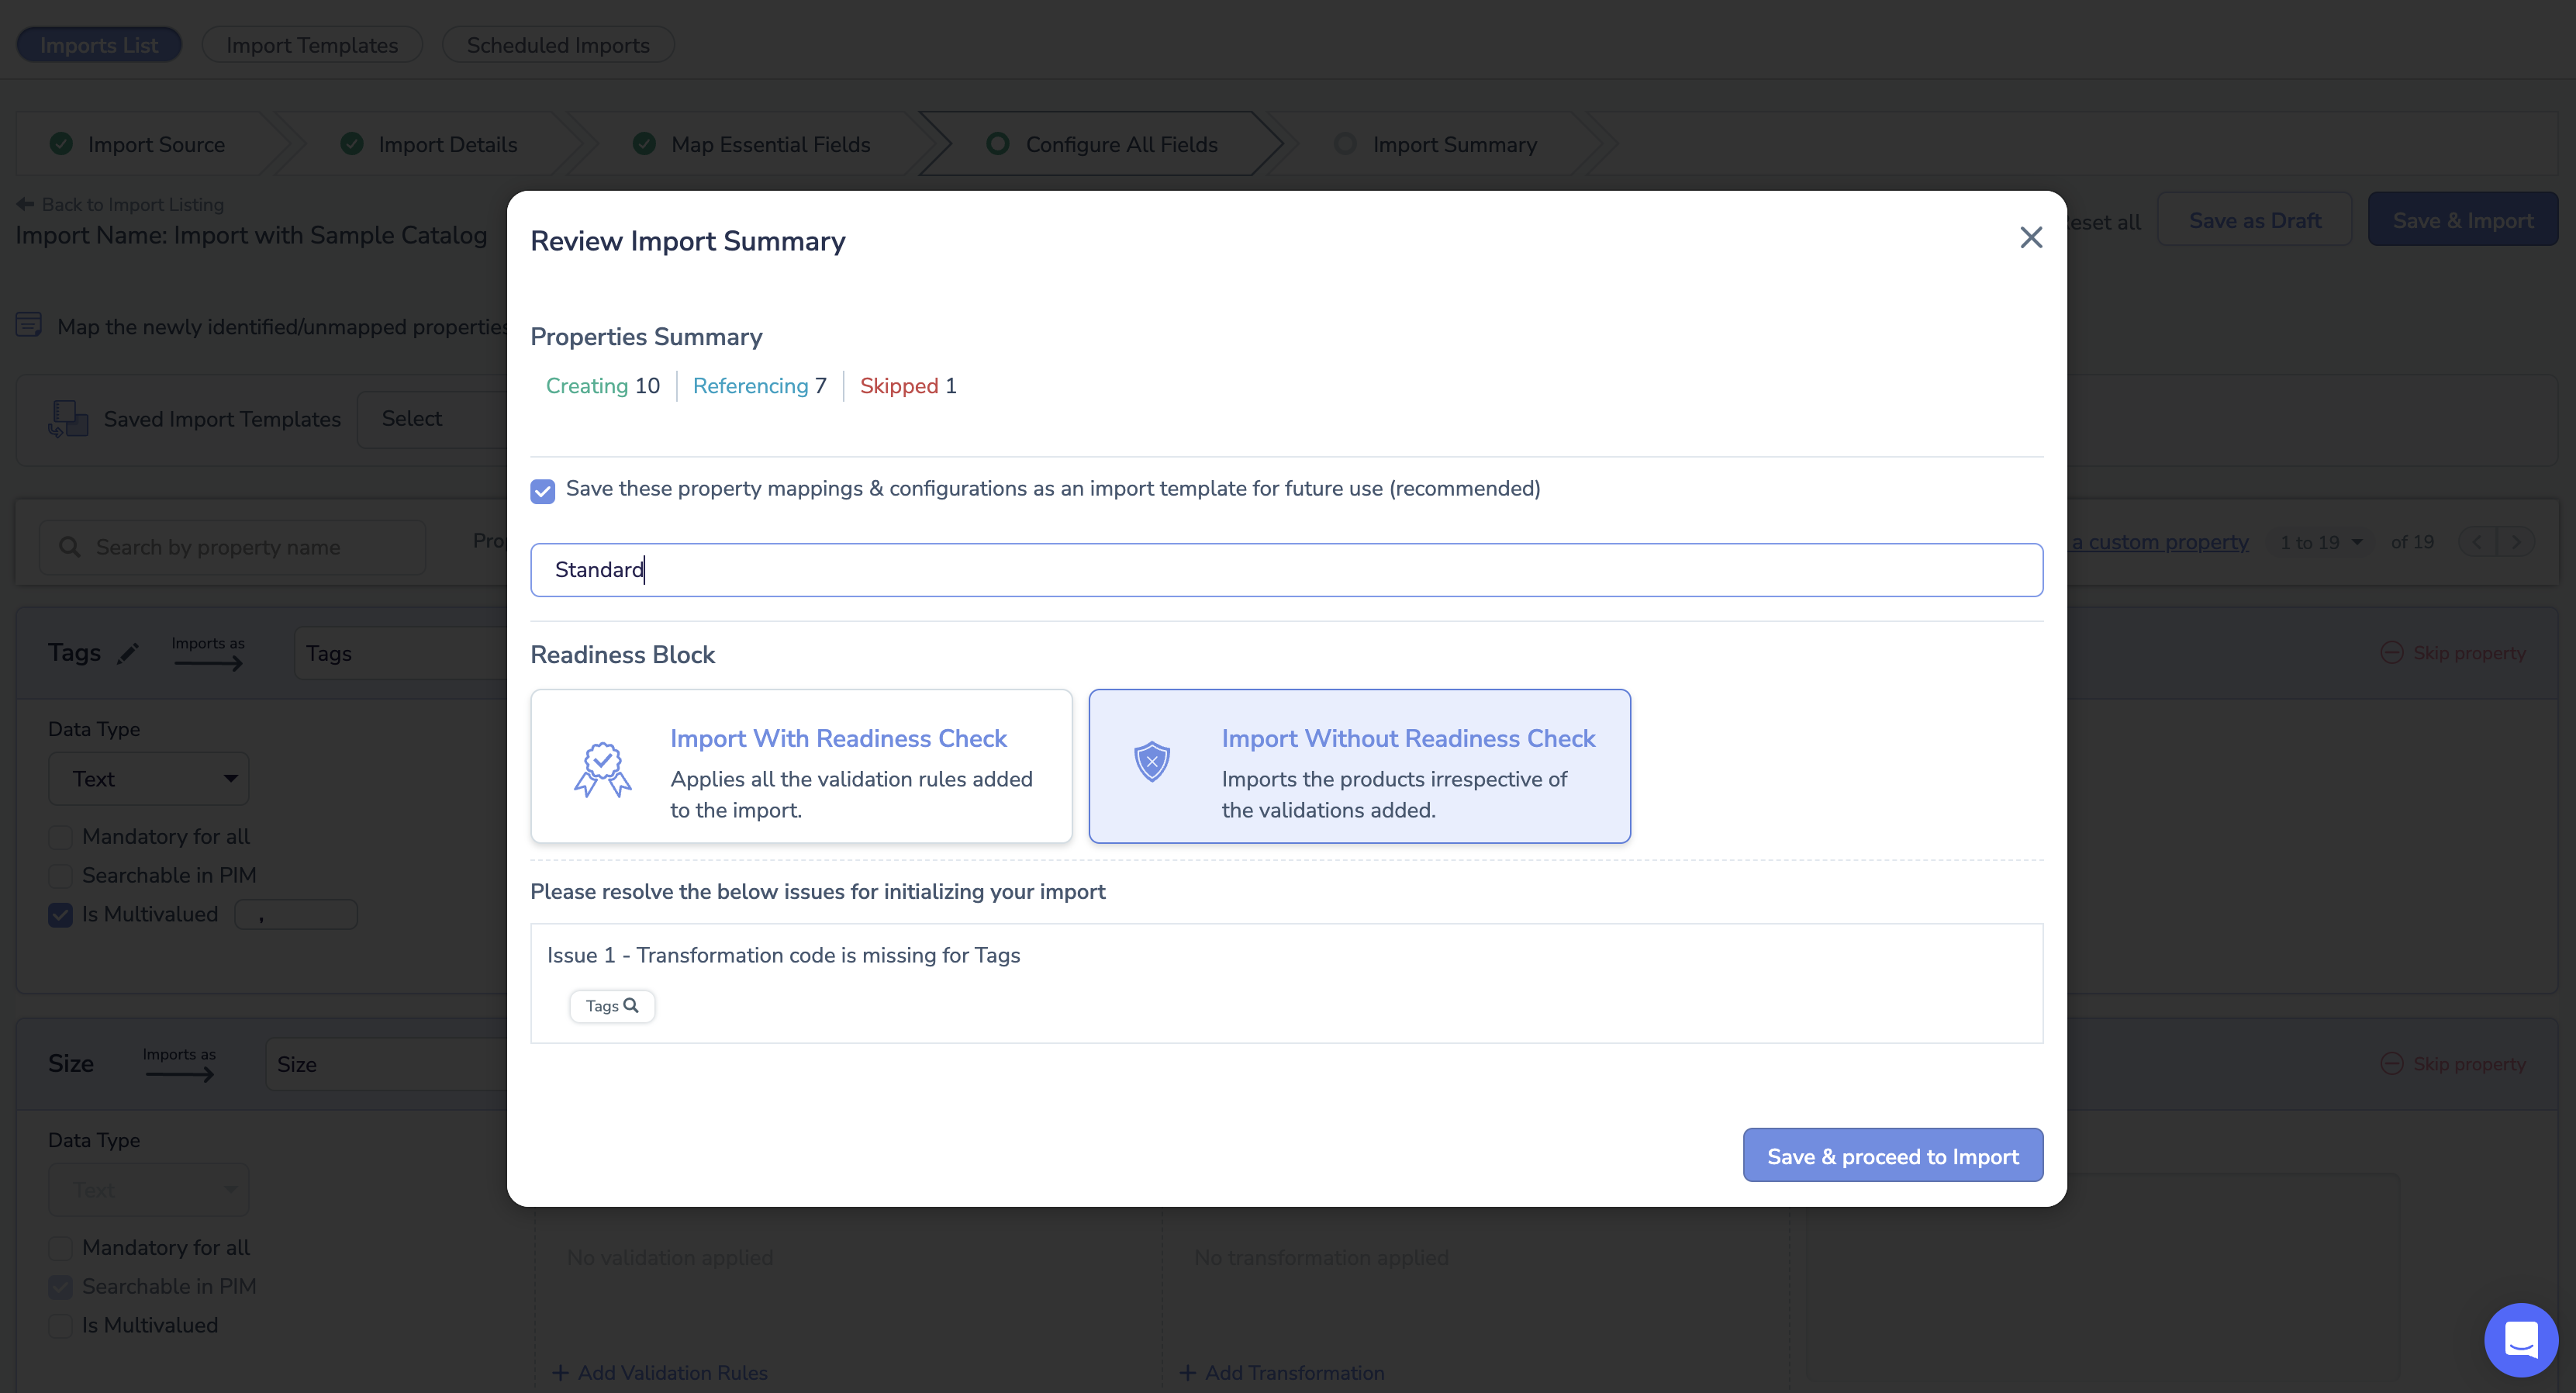
After completing the mapping and attribute configurations in Unbxd PIM, you can proceed to import your data by clicking the “Save & Import” button. Upon clicking, a confirmation window will appear, summarizing the changes you have made.
In the confirmation window, you can review the changes you have made to ensure they are accurate and as intended. This allows you to verify the mapping of attributes, the configured transformations, and any other modifications made before proceeding with the import.
Identify errors in mapping and configurations
If there are any issues or errors with the mapping or configurations, you can easily identify them by clicking on the magnifying glass icon. It will take you directly to the specific attribute or field that requires attention.
This helps in quickly identifying and resolving any mapping or configuration errors before proceeding with the import.

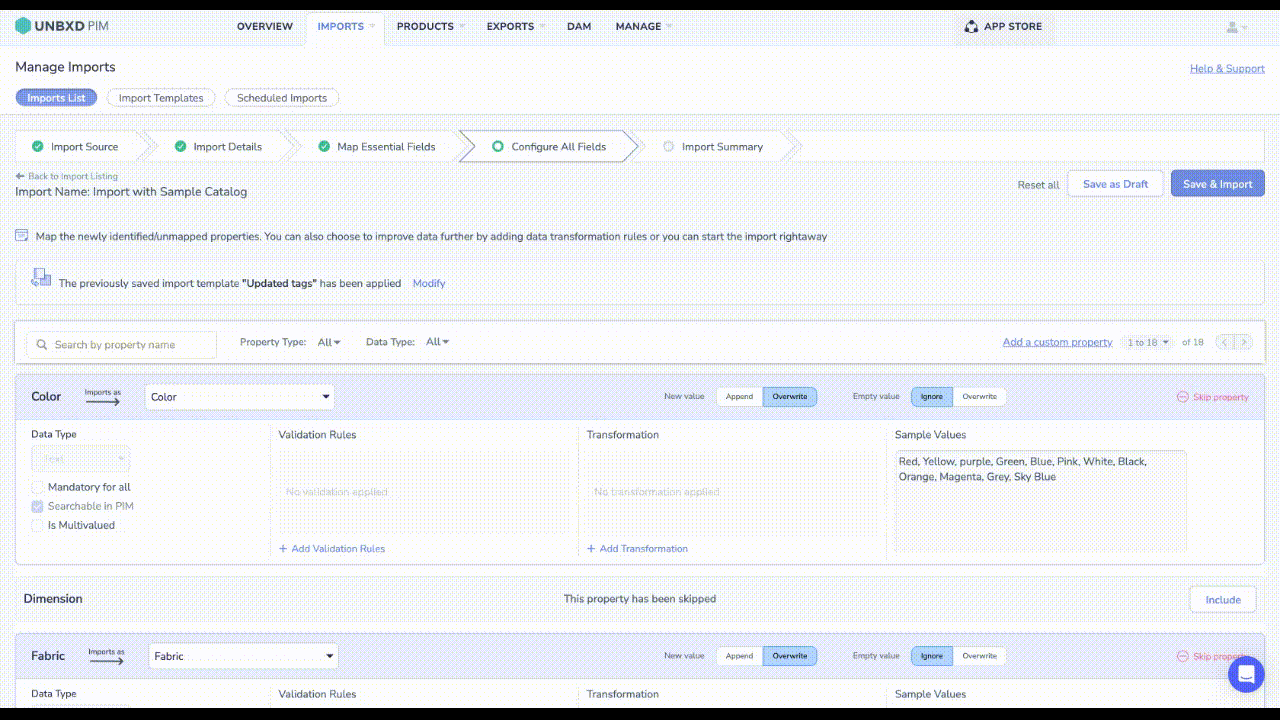
Step 3: Creation of Import Template
To save the mapping and configurations as an import template, you can select the checkbox provided on the confirmation window. By doing so, the system will save the current mapping and configurations as a template that can be accessed and used later.
After a successful import, you can view the import status.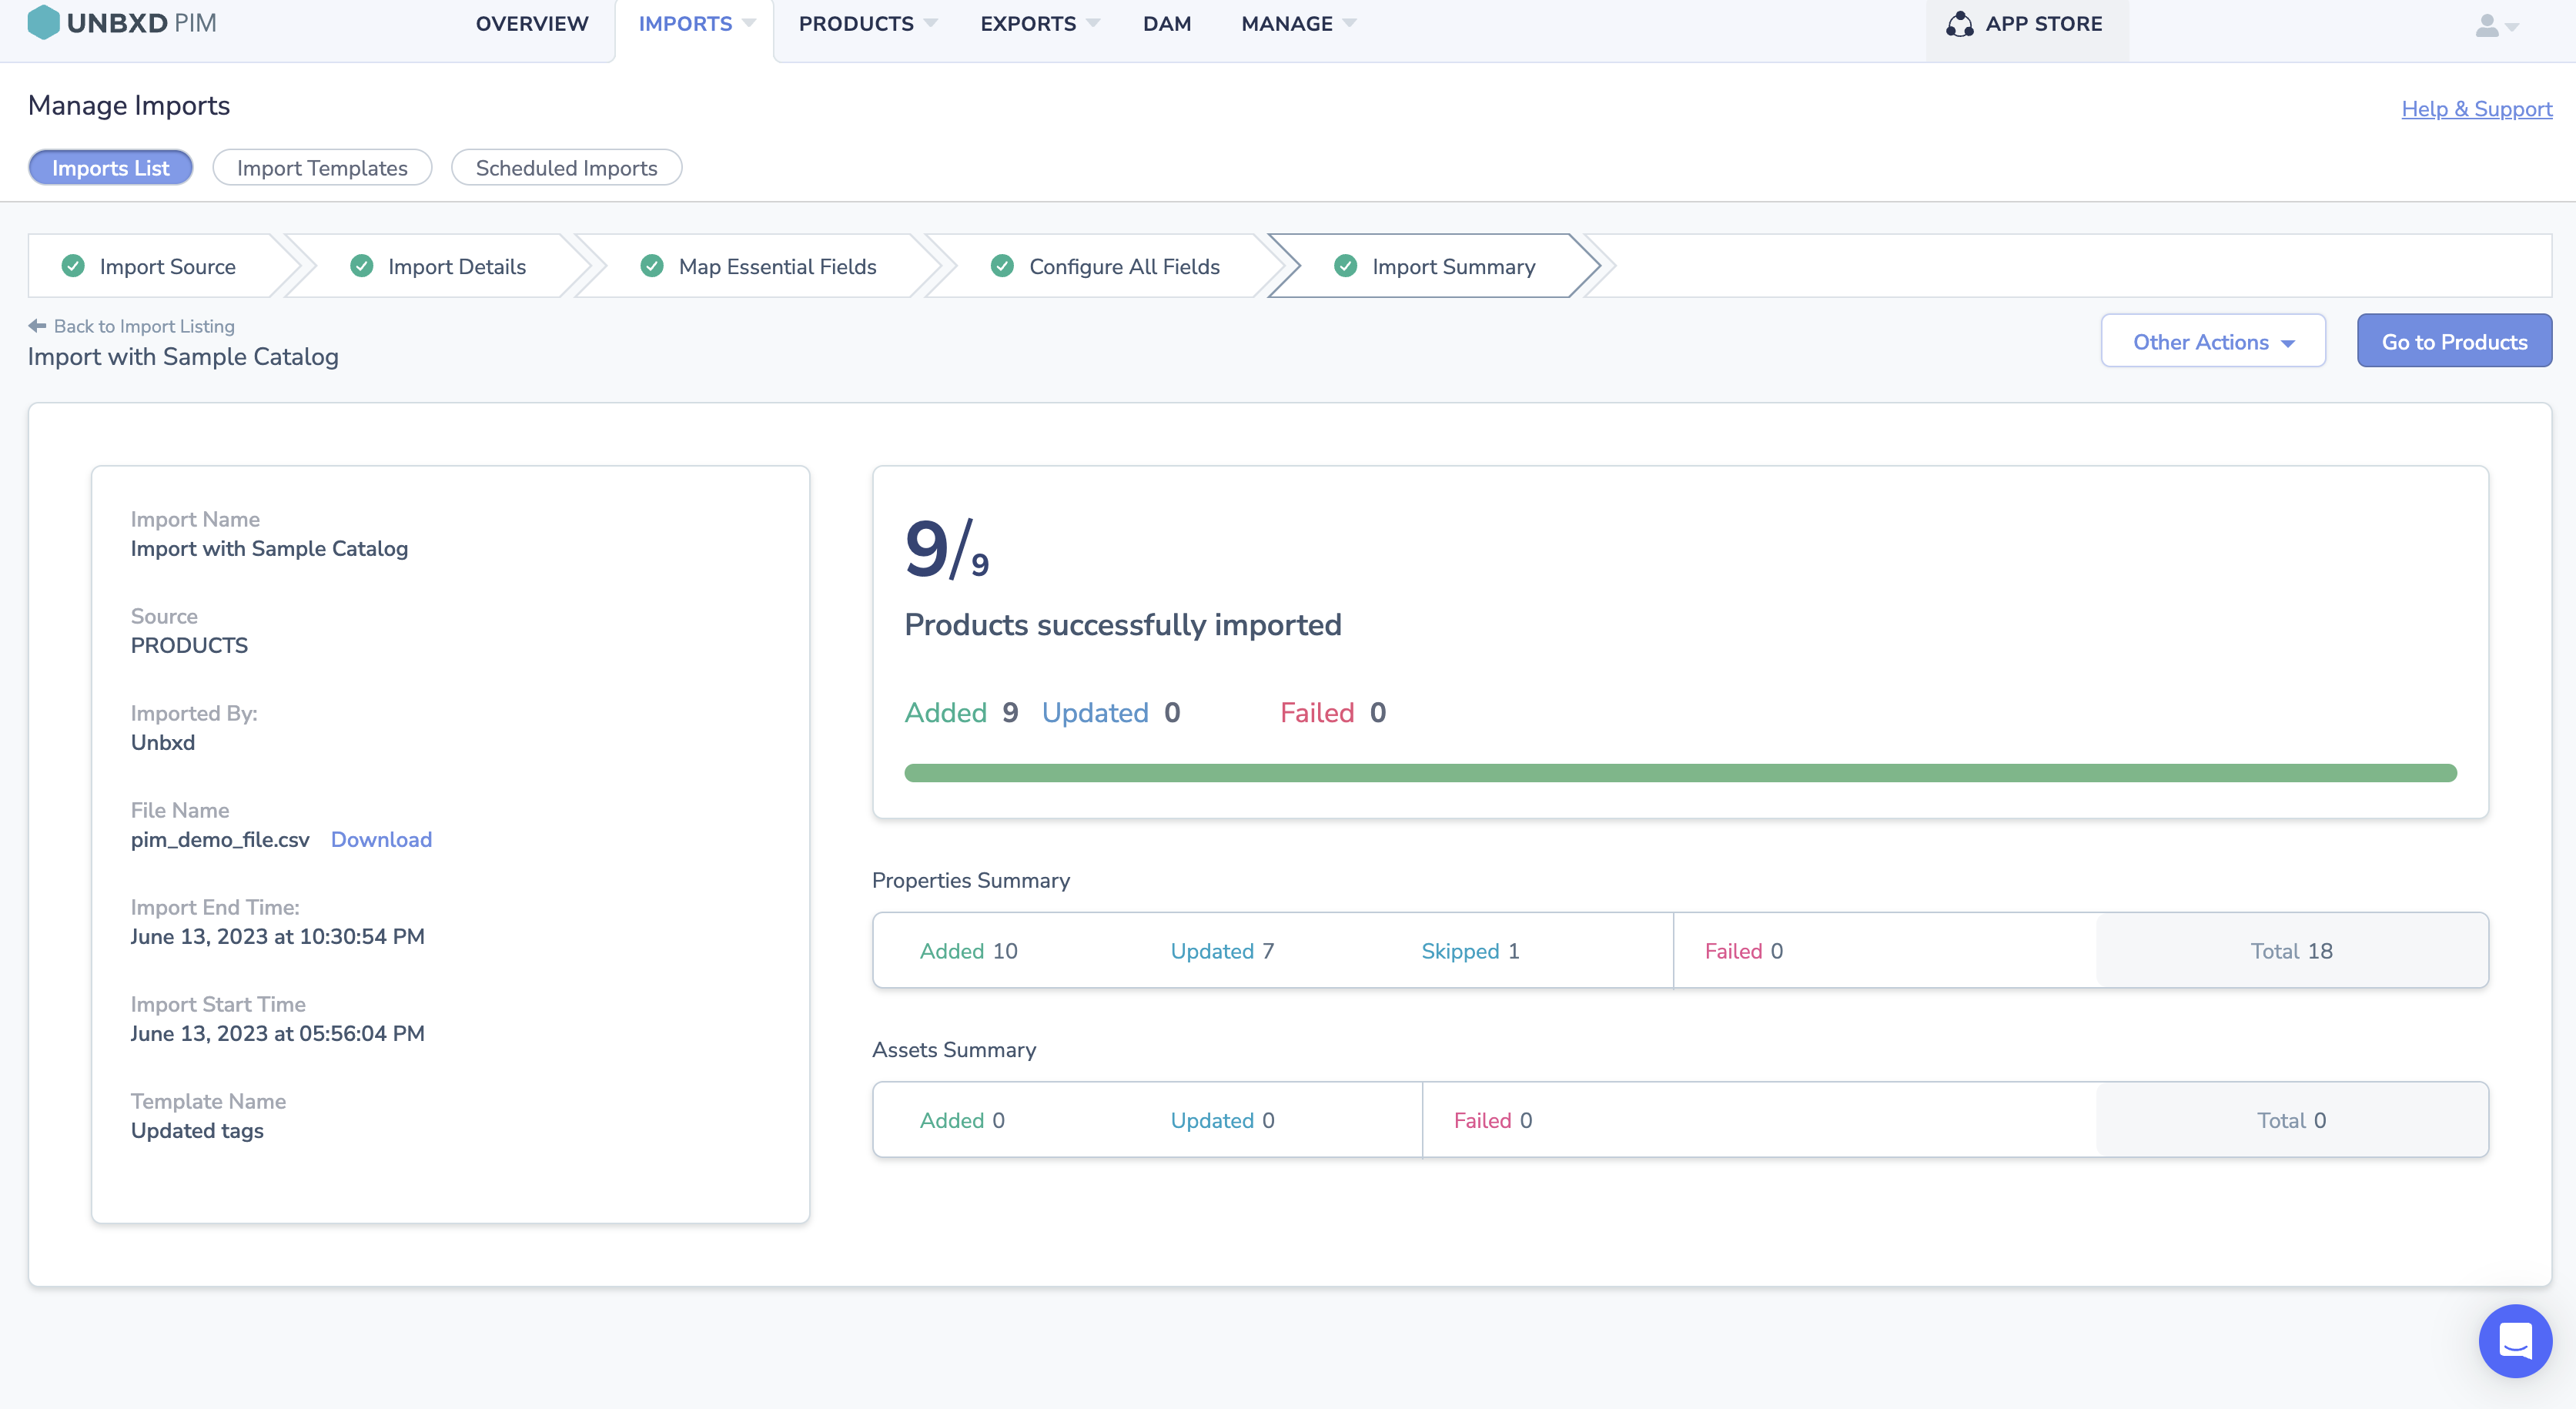
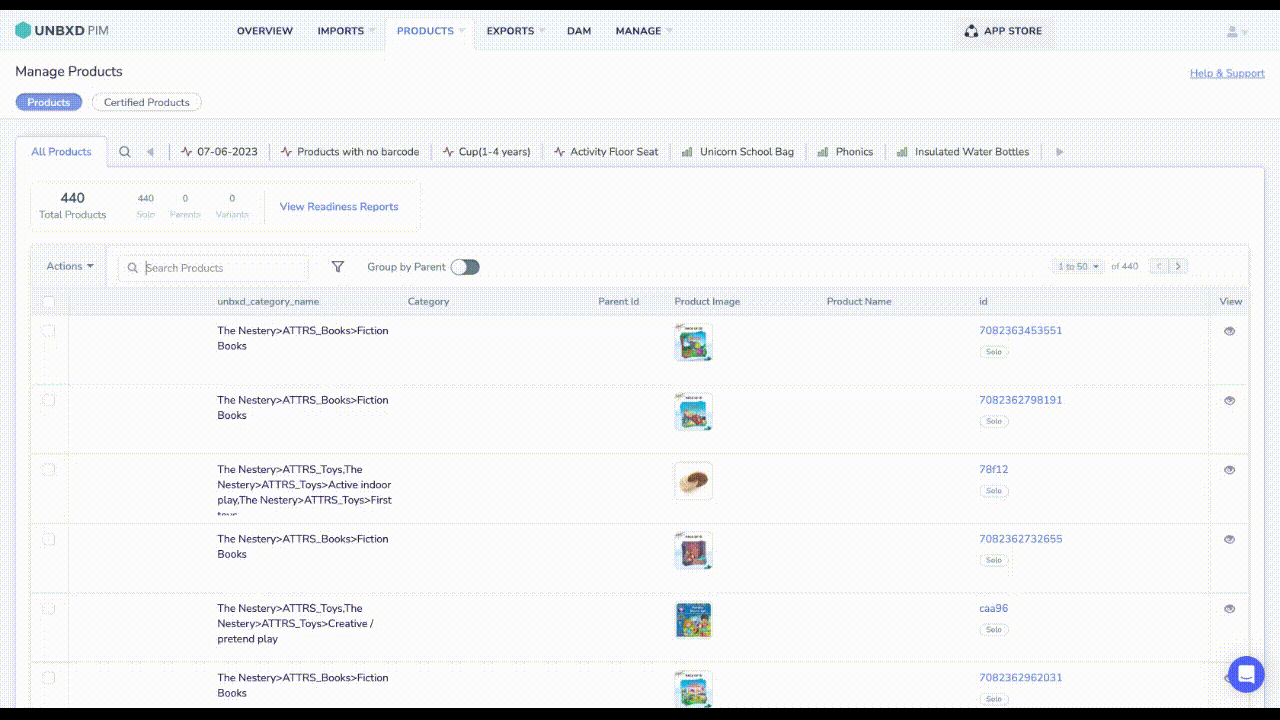
Once you are done with the product import, you can find the updated products and attributes in the following pages:
-
-
- Attributes Listing page
- Products Listing page
-